
Have you ever stared at a freshly painted wall, only to have those sharp, crisp corners look…well, a little messy? It’s a common painting problem! Those tricky inside and outside corners can make even the best DIY painter feel frustrated. Getting a clean line where two walls meet shouldn’t feel like a battle.
Choosing the right technique or tool for painting corners makes a huge difference in the final look of your room. If you use the wrong method, you might end up with drips, uneven paint thickness, or fuzzy edges that look unprofessional. Nobody wants to spend hours painting just to have the corners spoil the whole effect!
This guide cuts through the confusion. We will explore the best ways to tackle those hard-to-reach spots, whether you prefer using specialized brushes, handy rollers, or even painter’s tape. By the end of this post, you will know exactly which “Way To Paint Corners” works best for your project, guaranteeing smooth, sharp results every time.
Top Way To Paint Corners Recommendations

- Painting Your Way Out Of A Corner: The Art of Getting Unstuck
- Barry, Barbara Diane (Author)
- English (Publication Language)
- 208 Pages - 01/16/2014 (Publication Date) - Tarcher (Publisher)

- Secure connection mechanism: Ensures wheels stay firmly attached even under heavy use, providing stable support for painting walls, ceilings, and corners with precision
- Professional clean finishes: Achieves crisp edges on window frames, baseboards, and cabinet contours, making it ideal for both DIYers and professional painters
- 360° rotating handle: Allows precise left/right/vertical/diagonal adjustments; slip-proof locking design ensures stability (always lock the handle before use). Compatible with any extension rod for versatile reach
- Includes 6 high-quality paint pads: Includes dense 5mm bristles for even paint absorption, delivering smooth, streak-free coatings on walls and detailed trim work
- Warm Tip: When painting a wall corner, you can paint directly into the corner if both sides use the same color, but if only one side needs paint, applying protective tape first will help achieve cleaner edges

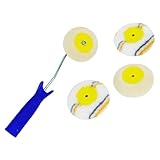
- Plastic comfort grip handle with woven pad applicator
- Perfect for inside corners
- Pivoting handle provides speed and control
- Easy one-step painting for inside corners
- Handle is threaded for extension poles
- Paint Pad is lighter, easier to use and more versatile than a paint roller or a brush with a fabric pad that delivers a smooth even paint finish. Ideal for painting walls and flat surfaces.
- Excellent paint pad set suitable for painting walls,ceiling paint,door,floor,roof.No Drip. The Corner Paint Roller is edge painting tool, edge painter.NO MESS, 𝗡𝗢 𝗦𝗣𝗜𝗟𝗟𝗦,𝗡𝗢 𝗗𝗥𝗜𝗣𝗦
- Corner paint pad is a fabric pad that delivers a smooth paint finish with no brush marks. Featuring an angled pad to get into corners.
- Suitable for all types of paint including gloss, emulsion & woodstai
- Useful assortment of polyester micro fibre paint pads,Good coverage on smooth or uneven surfaces
- Versatile Application: Specifically designed for corners and edges, perfect for achieving neat finishes on all room painting projects.
- High Compatibility: Compatible with a range of materials including water-based, oil, and enamel paints, as well as stains and drywall compounds. Also suited for emulsion paints.
- Extended Reach: Features the ability to attach to a threaded broom handle, enabling extended reach for high and hard-to-reach areas.
- Ease of Use and Maintenance: Includes a comfortable grip handle for easy handling and simple maintenance - just clean with solvent and rinse with water after use.
- Comprehensive Kit: Comes complete with 3 pieces including a frame, sleeve, roller covers, and replacement covers to ensure continuous performance and satisfaction.

- Enhanced Edge Trimming for Perfect Lines: The IAOVAW Paint Edge Trimmer ensures sharp, clean lines around ceilings, baseboards, windows, doors, and moldings, helping you achieve precise paint edges every time. The guide wheel structure is designed for durability, ensuring it stays secure during use.
- 360° Adjustable Rotating Handle: Our unique universal rotator handle can be adjusted in any direction—left, right, up, or down—offering maximum flexibility for all painting angles. Simply tighten the handle to avoid any unwanted rotation for smooth, consistent application.
- High Paint Absorption Bristles: The trimmer’s dense, 5mm long bristles have excellent paint absorption properties, ensuring a smooth and even coat of paint without streaks. Perfect for edge painting tasks in various home projects.
- Flexible Use with Extension Pole: This paint edger tool can be used manually or with the included 78-inch extension pole, providing extra reach for higher areas like ceilings or tall walls. To ensure secure connection, make sure the handle knob is tightened after attaching the extension pole.
- Durable and Smooth for Professional Results: The IAOVAW Paint Edge Trimmer features a thicker, more robust shell with a glossy finish and fine detailing, ensuring effortless guiding wheel rotation. Ideal for both DIY and professional painters looking for a premium edge painting experience.

- Guide wheels ensure sharp clean lines when trimming around ceilings, baseboards, windows, doors and moldings.Our products have improved the design structure of the guide wheel to ensure that it will not fall off during use.
- The rotatable handle design, also known as universal rotator, can be adjusted from left to right, up and down, or at any angle. It is very convenient to use.Before using, please take care to lock the handle tightly to avoid the rotation of the handle affecting the application.
- The paint edge trimmer has 5 mm long, dense and flat bristles with high paint absorption capacity, resulting in a smooth film. It is a widely used edge painting tool.
- It can be used manually or with an extension rod with threaded connectors on it. It is worth noting that after connecting the extension pole, you need to tighten the knob on the handle to prevent the handle from loosening and affecting the correct direction of painting.
- Warm Tip: When painting the corner of a wall, if both sides of the wall need to be painted with the same paint, you can confidently cut into the corner of the wall for painting.If the other wall does not need to be painted, it is recommended to use it together with protective tape for better results, considering that everyone's experience is different.
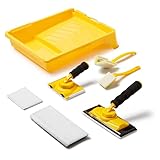
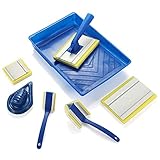
- PAINT EDGER TOOL KIT INCLUDES: 4 different shapes of paint edger pads, 9-Inch paint trim edger Pad, 360 ° rotating paint edge trimmer, corner painter pad, 1-Inch Mini trim pad and 9-inch paint tray, and 2 refill pads for replacement when needed. Not include extension poles
- PAINT PAD SET: 9-inch (228mm)paint pad and 360 ° rotating painting wall edges pad handle can be held directly or connected to a threaded extension poles for large-scale wall and ceiling painting. Corner painter can paint to the corners of two surfaces, and 1-inch detail paint edger trimmer are perfect for painting edges
- PORTABLE 9’ PAINT TRAY: The paint tray can be used to hold the current paint needed without contaminating all spilled paint. The paint pad slides back and forth on the raised design inside the tray, effectively distributing paint evenly across the pad for a smooth paint surface. Line areas on the sides help scrape off excess paint. Easy to clean for reuse
- 360 ° ROTATABLE HANDLE: Paint edger trimmer handle is sturdy and durable, ergonomic design of the handle makes your painting smoother. Detachable 360 ° rotatable device allows you to adjust the handle angle for painting wall edges for home interior.Paint edger tool for walls,paint a room quick and easy
- PAINT EDGER TOOL FOR WALLS: Whether it's latex paint, water-based paint, or oil painting, this set of Paint tool for wall painting, wood decks, sheds and fences can be easily operated. The paint edger trimmer with pad refills is light and easy to operate. It will not absorb a large amount of paint and will release it evenly, forming a smooth surface without scratches
The Ultimate Buying Guide: Mastering Those Tricky Corners
Painting corners can be a real headache. You want clean lines without messy drips. That’s where specialized corner painting tools come in handy. This guide helps you pick the best “Way To Paint Corners” tool for your next project.
1. Key Features to Look For
When shopping for a corner painter, focus on what makes the job easier and cleaner.
Edge Definition
The best tools give you a sharp, straight line where the two walls meet. Look for tools with firm, angled edges. A soft or floppy edge usually smears paint into the other wall section.
Paint Capacity and Loading
How much paint does the tool hold? Smaller tools need constant refilling. Larger reservoirs save time. Also, check how easily the paint loads onto the applicator. Some use a simple dipping method; others have a built-in reservoir that you pump.
Applicator Material
The pad or brush tip matters a lot. Microfiber or high-density foam pads usually spread paint smoothly. Natural bristle brushes might offer more control but can sometimes leave streaks.
Ease of Cleaning
You will use this tool again. If it is hard to clean, you might throw it away. Look for tools that disassemble easily or have smooth surfaces where paint doesn’t stick stubbornly.
2. Important Materials in Corner Tools
The materials used determine how long the tool lasts and how well it performs.
- Handle: Sturdy plastic or lightweight aluminum handles provide a good grip. Avoid flimsy plastic that might crack under pressure.
- Applicator Pad/Brush: High-quality synthetic fibers or dense foam work best. Natural materials might absorb too much paint or dry out quickly.
- Housing: The main body that holds the pad should resist paint buildup and be durable enough to withstand being bumped against walls.
3. Factors That Improve or Reduce Quality
The design heavily influences the final paint job quality.
Quality Enhancers
A good tool features a slight spring-back or tension in the applicator. This tension helps the tool glide along the corner seam instead of digging in. Tools designed with interchangeable heads also improve quality because you can replace worn pads.
Quality Reducers
If the tool design traps too much paint, drips will happen. Poorly molded plastic edges create uneven application. Cheap foam pads often tear or leave behind lint or debris in the wet paint.
4. User Experience and Use Cases
Think about where and how often you plan to use this tool.
For Quick Touch-Ups
If you only paint a few corners once a year, a simple, inexpensive dipping tool might suffice. These are easy to store but require more patience during use.
For Whole-Room Painting
If you are painting an entire house, invest in a more robust tool with a large paint reservoir. These models save significant time and reduce arm fatigue because you stop reloading so often. Many professionals prefer models that attach to an extension pole, letting you work from the floor for high corners.
User experience is often about comfort. Test the weight. Does it feel balanced in your hand?
10 Frequently Asked Questions (FAQ) About Corner Painting Tools
Q: Can I use a regular paintbrush for corners instead?
A: Yes, you can, but it takes much more skill and time. A dedicated corner tool helps beginners achieve straight lines faster.
Q: Do these tools work with all types of paint?
A: Most tools work well with latex and acrylic paints. Oil-based paints might require more thorough cleaning afterward.
Q: How deep should the tool go into the corner?
A: The tool should just graze the seam. Pushing too hard can force paint onto the adjacent wall surface.
Q: Are these tools better than using painter’s tape?
A: For speed, yes. Tape requires careful application and removal. A good tool lets you paint the corner directly without waiting for tape to set.
Q: How do I prevent the tool from skipping?
A: Ensure the applicator pad is fully saturated with paint but not dripping wet. Also, move the tool slowly and steadily along the seam.
Q: What is the best way to clean the foam pad?
A: Rinse it immediately after use under warm running water until the water runs clear. Gently squeeze out excess water.
Q: Will this tool work on textured walls?
A: Tools with dense, slightly flexible pads handle light textures better than rigid brushes. Very rough textures might still require some hand-cutting with a brush afterward.
Q: Can I paint ceilings corners with this?
A: Many models allow you to attach an extension pole. This lets you reach ceiling corners comfortably from the floor.
Q: How often should I replace the applicator pad?
A: If you notice streaks, fraying, or if the pad no longer holds paint evenly, it’s time for a replacement.
Q: Are the expensive corner tools really worth the extra money?
A: If you paint often, yes. Higher-priced tools usually have better paint capacity, more durable materials, and superior edge control, which saves you time and frustration.