
What is the best way to sign the back of a painting? The best way to sign the back of a painting is with clear, permanent ink that will not bleed or fade. This blog post will guide you through the process of signing your artwork, ensuring your legacy is preserved for years to come. Signing artwork is a crucial step in completing a piece, offering vital information for collectors and future generations. This comprehensive guide will delve into the art of the artist’s signature, the importance of a painting inscription, and the best practices for signing your art.
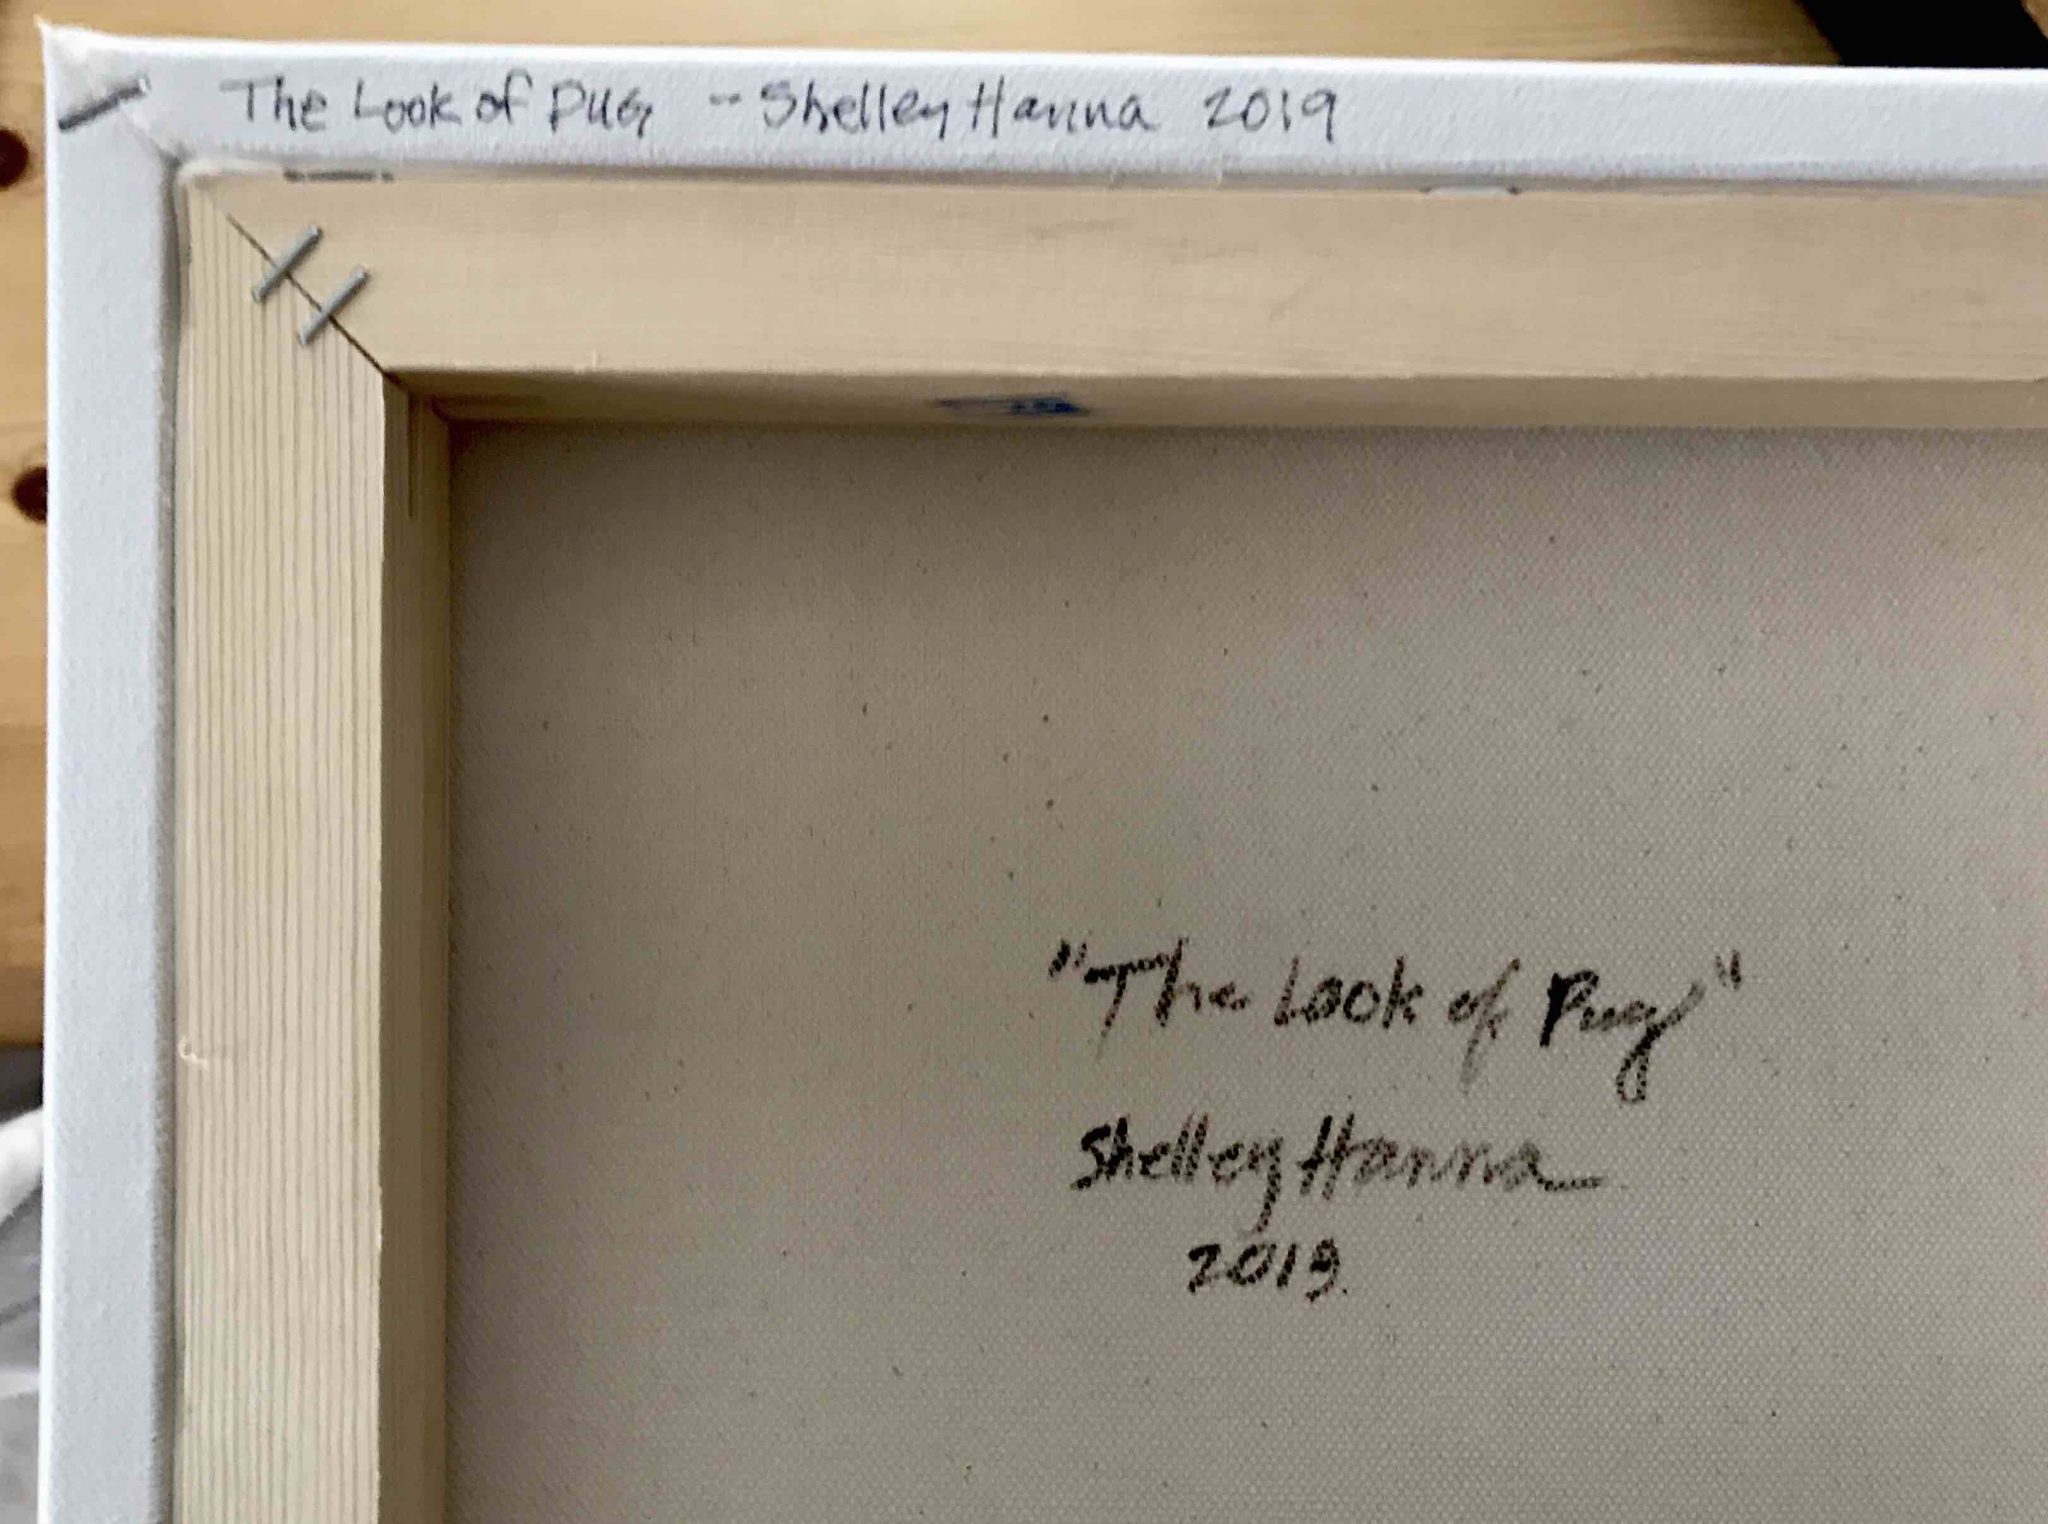
Image Source: cdn-0.shelleyhannafineart.com
The Importance of the Artist’s Signature
Your signature is more than just a mark; it’s your identifier, your stamp of authenticity, and a direct connection to your creative spirit. On the back of a painting, your signature serves as a permanent record of your creation. It tells the world, “I made this.” This is especially important for collectors who value provenance and the story behind a piece. A well-placed and legible artist’s signature on the back can significantly enhance the value and desirability of your work.
Why Sign the Back?
- Authenticity: It confirms the artwork is genuinely yours.
- Provenance: It helps track the history of ownership and creation.
- Information: It provides a space for details about the piece.
- Legacy: It ensures your work is attributed correctly for posterity.
- Professionalism: It’s a mark of a dedicated and serious artist.
Deciphering the Art of Signing Your Canvas
Signing a canvas is a deliberate act that requires thoughtful consideration of where to sign a painting and what information to include. While the front signature is often prominent, the back offers a private space for more detailed documentation. This is where a comprehensive painting inscription can truly shine.
Placement of Signature: Front vs. Back
Most artists are familiar with signing the front of their work. This is usually a discreet corner, integrated into the composition. However, the back of the painting offers a different kind of canvas for your artist marking.
Front Signature Considerations:
- Aesthetics: Should not detract from the artwork itself.
- Visibility: Usually visible but not overpowering.
- Style: Can be artistic and fluid, matching the artwork’s style.
Back Signature Considerations:
- Durability: Needs to withstand time and handling.
- Information: Allows for more details beyond just your name.
- Security: Less likely to be accidentally damaged or altered.
- Completeness: A fully documented piece is often more valued.
What to Include in Your Painting Inscription
A thorough artwork inscription on the back can include a wealth of information, transforming a simple signature into a valuable historical document.
Essential Elements:
- Your Full Name or Artist Name: The most critical element.
- Year of Completion: Crucial for dating the artwork.
- Title of the Artwork: Helps identify the specific piece.
- Medium Used: e.g., Oil on canvas, Acrylic on board, Watercolor on paper.
- Dimensions: Height x Width (and depth if applicable).
- Edition Number (if applicable): For prints or limited editions.
- Your Studio/Location (Optional): Can add historical context.
- Copyright Symbol (©) and Year (Optional but Recommended): Protects your intellectual property.
- A Personal Note or Quote (Optional): Adds a unique touch.
Choosing Your Signing Tools
The choice of materials is paramount when signing artwork, especially on the back. You want something permanent and unobtrusive, ensuring your artist signature remains clear and legible without degrading the materials.
Recommended Tools:
- Archival Ink Pens: These are specifically designed for longevity and resist fading. Look for Pigma Micron pens or similar brands.
- Tip Size: A fine tip (0.3mm to 0.5mm) is usually best for legibility on the back of a painting.
- Oil-Based Markers: Brands like Sharpie (oil-based) or specialized art markers can work well, especially on primed canvas or wooden panels. Ensure they are acid-free.
- Test First: Always test on a scrap piece of your painting material.
- Oil Paints (Thinly Applied): If you prefer to use paint, thin down a small amount of oil paint with a solvent like turpentine or odorless mineral spirits. Use a fine brush.
- Drying Time: Be aware that oil paint will take longer to dry.
- Pencils (Graphite): A soft graphite pencil (like a 2B or softer) can be a good option for paper or unprimed surfaces, but it’s less permanent than ink and can smudge.
- Avoid: Hard pencils (H grades) as they can indent the surface.
Tools to Avoid:
- Ballpoint Pens: Ink can fade and degrade over time.
- Water-Based Markers: Ink may bleed or fade.
- Regular Permanent Markers (Alcohol-Based): While seemingly permanent, some can fade or react with certain paint layers over long periods. Oil-based or archival ink is safer.
The Process of Signing Your Art
Signing your art thoughtfully involves more than just putting your name down. It’s about creating a lasting imprint of your creative journey.
Step-by-Step Guide to Signing the Back
- Ensure the Painting is Completely Dry: This is the most critical first step. Whether you’re working with oils, acrylics, or mixed media, ensure every layer is thoroughly dry to the touch and cured. Rushing this can lead to the ink or paint bleeding or smudging. For oil paintings, this might mean waiting weeks or even months. Acrylics dry faster but still need ample time.
- Choose Your Location on the Back:
- Avoid the Center: The center is often where the canvas is stretched most taut and can be more prone to flexing.
- Consider the Frame: If you know the painting will be framed, think about whether your signature will be visible through the frame or if it might be covered. A common placement is on the stretcher bar, typically the bottom or side, so it remains accessible even when framed.
- Clean Surface: Opt for a clean, relatively flat area of the canvas, linen, or wooden panel. Avoid areas with heavy texture if possible, as this can make signing difficult and legibility poor.
- Prepare Your Surface (Optional but Recommended):
- For Canvas: You can lightly apply a very thin layer of archival varnish or gesso in the area where you plan to sign. This creates a smoother, more uniform surface for the ink or paint to adhere to, preventing it from soaking into the canvas weave too much. Let this layer dry completely.
- For Wooden Panels: Ensure the panel is sealed and free of dust.
- Gather Your Materials: Have your chosen signing tool (archival pen, oil-based marker, thinned oil paint) and any necessary cleaning supplies ready.
- Practice Your Signature: If you’re trying a new method or pen, practice on a scrap piece of the same material you’re signing. This helps you get a feel for the flow and how the ink/paint behaves.
- Execute Your Signature:
- Steady Hand: Hold the painting securely or place it on a stable surface.
- Apply Even Pressure: Whether using a pen or a brush with paint, apply even pressure.
- Write Clearly: Focus on legibility. Your full name and the essential details should be easy to read.
- Allow to Dry: Let your signature dry completely before handling the painting further or placing it in a frame.
Timing Your Signature
When should I sign the back of my painting?
The best time to sign the back of your painting is after the artwork has fully cured.
- Acrylics: Generally dry to the touch within hours, but it’s wise to wait at least a few days to a week for the paint film to harden properly before signing.
- Oils: Can take weeks to months to dry to the touch and even longer to fully cure. A conservative approach is to wait at least 6 months to a year before applying an inscription. If you must sign sooner, use a very thin layer of oil paint with a solvent, and let it dry for at least a few weeks.
A Timeline for Signing:
| Medium | Dry to Touch | Recommended Signing Time | Full Cure Time |
|---|---|---|---|
| Acrylics | 1-2 hours | 1-2 weeks | 6-12 months |
| Oil Paints | 2 days – 2 weeks | 6-12 months | 12-24 months |
| Watercolors | Immediate | Immediate (on paper) | N/A |
| Mixed Media | Varies | Varies (follow medium) | Varies |
Note: These are general guidelines. Drying and curing times can vary significantly based on paint thickness, humidity, temperature, and specific brand formulations.
Creative Approaches to Artwork Inscription
While a simple name and date are standard, artists can get creative with their painting inscription.
Beyond the Basics: Adding Personal Touches
- Location of Creation: “Painted in my London studio, 2023.”
- Inspiration: “Inspired by the morning light over the coast.”
- Dedication: “For [Name/Cause] with gratitude.” (Ensure this is appropriate for the artwork’s intended audience).
- Unique Markings: Some artists use symbols or monograms in addition to their written signature.
- Thumbprint: A fingerprint can be a very personal and secure form of artist marking. Ensure it’s applied clearly and with permanent ink.
Documenting the Process
You can even document key aspects of the painting’s creation.
- Exhibition History: Add stickers or write details of galleries where the work has been shown.
- Collection History: If sold, note the original collector’s name (with their permission).
- Conservation Notes: Any future conservation efforts can be recorded here.
Case Studies: Famous Artist Signatures on the Back
Many renowned artists have utilized the back of their canvases for more than just a simple signature.
Artists Who Emphasized the Back
- Salvador Dalí: Known for his elaborate signatures, Dalí often signed the backs of his works, sometimes including significant inscriptions, doodles, or even “authenticity certificates” on the artwork itself.
- Willem de Kooning: While his front signatures are prominent, de Kooning also made marks on the back, sometimes with dates or simple notations.
- Jackson Pollock: Although often seen signing the front, his drip paintings, due to their dynamic nature, sometimes have signatures or markings on the back for stability and identification.
These examples highlight the tradition and importance of making a definitive mark, both artistically and factually, on the physical object itself.
Maintaining Your Art’s Integrity
When signing the back of a painting, your goal is to add value and information without compromising the artwork.
Protecting Your Artwork
- Acid-Free Materials: Always use acid-free pens, inks, and any adhesives if adding extra documentation. Acids can yellow and degrade materials over time.
- Non-Bleeding Ink: Ensure your chosen ink will not bleed through the canvas or react with the paint layers. Archival inks are formulated for this.
- Avoid Obstructing: Do not sign over areas that might be important for the artwork’s structural integrity or future handling (e.g., where a wire might be attached, or on a joint of a stretcher bar).
- Minimal Application: Use the least amount of material necessary to make your mark clear and lasting.
What if the Back is Already Filled?
If the back of your canvas or panel is already covered with labels, other inscriptions, or has a complex surface, consider these options:
- Attach a Separate Certificate: Create a separate, archival-quality certificate of authenticity with all the details and sign that. Attach it securely to the back of the painting using archival methods (e.g., acid-free photo corners, archival tape on the certificate itself, not the painting).
- Use a Durable Label: If the surface is too problematic, use a high-quality, acid-free label and write your inscription on that, then adhere it to the back of the painting using an archival adhesive.
- Stretcher Bar Area: Many artists reserve the stretcher bars for their signatures and dates, as these are often cleaner and more stable surfaces than the canvas itself.
Frequently Asked Questions (FAQ)
Here are some common questions artists have about signing the back of their paintings:
Q1: Do I have to sign the back of my painting?
While not legally mandatory in all cases, it is highly recommended for authenticity, provenance, and professional practice. It adds significant value and historical context to your work.
Q2: Can I use a regular Sharpie pen on the back of a painting?
It’s best to avoid regular alcohol-based Sharpies. Opt for oil-based markers or archival ink pens, as they are more stable and less likely to fade or react with the artwork over time.
Q3: What if my painting is on paper? How do I sign the back?
For works on paper, you can sign the back of the paper itself using archival ink pens. Ensure the paper is completely dry and consider signing on a slightly thicker section if available, or use a very fine-tipped pen to avoid indenting the paper. You might also use a mat or backing board for additional inscriptions.
Q4: Should I sign the stretcher bar or the canvas itself?
Both are acceptable. Stretcher bars often provide a more stable and smoother surface. Signing the canvas itself can be done if you prepare the area lightly or use a very fine-tipped tool. Many artists use the stretcher bar as it’s less likely to be covered by framing elements.
Q5: Is it okay to sign the front and the back of a painting?
Yes, it is perfectly fine and often encouraged to sign both the front and the back. The front signature is typically for aesthetic integration, while the back provides a space for more detailed information and robust authentication.
Q6: How much information is too much for the back of a painting?
There’s no strict rule, but focus on essential details: your name, date, and title. If you add more, ensure it’s concise and relevant. Overcrowding the back can look messy and detract from the piece’s presentation.
Q7: What if my painting is very old and I need to add information?
If it’s a historical piece you’ve acquired or are conserving, it’s best to consult with a professional art conservator. They can advise on the best methods for adding inscriptions without damaging the original artwork. If it’s your own older work, try to find a suitable, stable area and use archival materials as described.
Q8: Can I sign the frame instead of the painting?
While you can sign the frame, it’s generally preferable to sign the artwork itself. The frame is an accessory, and the signature should be on the piece it represents. If you choose to sign a frame, ensure it’s done with archival materials.
By carefully considering how to sign the back of a painting, you are not just marking your territory; you are contributing to the enduring legacy and value of your art. A thoughtful artist signature and a detailed painting inscription are investments in your artistic future. Remember to always use archival materials and allow ample drying time to ensure your artist marking lasts as long as your art does. Happy signing!