
Can you seal an acrylic painting? Yes, you absolutely can and should seal an acrylic painting to protect it. Sealing your acrylic artwork provides a crucial layer of defense against dust, dirt, UV rays, and accidental scuffs, ensuring its longevity and vibrancy for years to come. This process, often referred to as varnishing acrylics, is a vital step in preserving your artistic creations.
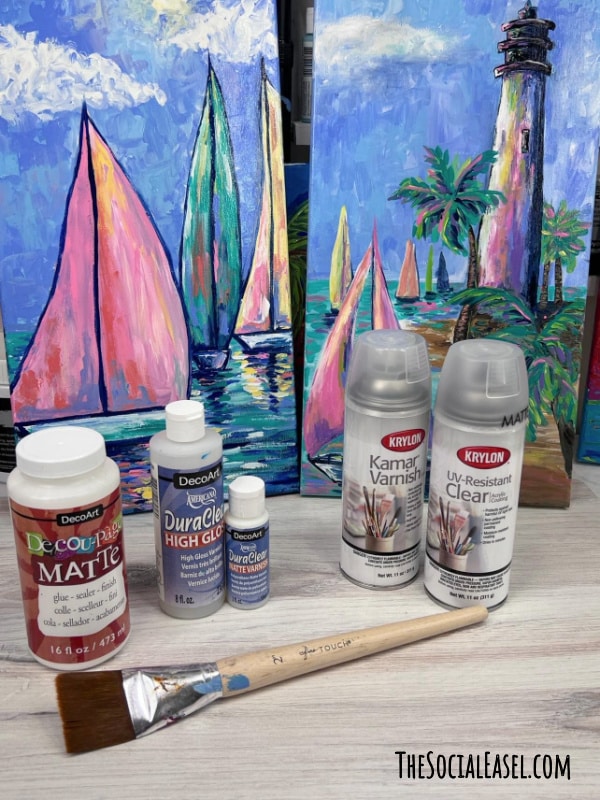
Image Source: www.thesocialeaselonlinepaintstudio.com
Why Seal Your Acrylic Artwork?
Acrylic paints, while durable, are not impervious to damage. Over time, exposure to the environment can take its toll. Sealing your artwork acts like a shield, safeguarding it from various forms of degradation.
Key Benefits of Sealing
- Protection from Dust and Dirt: A sealed surface is smoother and less porous, making it easier to clean without damaging the paint.
- UV Resistance: Many sealants contain UV inhibitors that help prevent colors from fading when exposed to sunlight.
- Moisture Resistance: While acrylics are water-resistant once dry, a sealant adds an extra layer of protection against humidity and spills.
- Abrasion Protection: A sealant can prevent minor scratches and scuffs that might occur during handling or display.
- Uniform Sheen: Varnish can unify the finish of your painting, eliminating uneven gloss or matte areas and giving it a professional look.
- Preserving Acrylic Art: Ultimately, sealing is a fundamental practice for preserving acrylic art and ensuring its visual integrity for future generations.
Choosing the Right Acrylic Sealant
Selecting the best sealant for acrylics depends on the desired finish and the specific needs of your artwork. There are several types of acrylic sealant available, each offering unique properties.
Types of Sealants
- Acrylic Mediums as Sealants: Some acrylic mediums, particularly those labeled as “glazing liquid” or “varnish medium,” can be used as a final layer to seal and unify the surface. These are often more subtle and can be mixed with paint to create glazes.
- Spray Sealants for Acrylics: These are convenient and provide an even coat, especially for textured surfaces or when you want to avoid brush strokes. They are ideal for quickly fixing acrylic paintings.
- Liquid Varnishes: These are applied with a brush and offer excellent durability and a range of finishes (matte, satin, gloss).
Finishes Available
- Gloss: Provides a shiny, reflective surface that can make colors appear more vibrant and saturated. It can also highlight texture.
- Satin: Offers a semi-gloss finish, less reflective than gloss but still provides a lovely sheen. It’s a popular choice for its balance.
- Matte: Eliminates reflections, giving the artwork a non-shiny, natural appearance. It’s excellent for preserving the original texture and preventing glare.
- Combination Finishes: Some products offer combinations like “matte-gloss” or allow artists to mix finishes to achieve a custom look.
Factors to Consider When Selecting a Sealant
- Drying Time: Some sealants dry quickly, while others require longer curing periods.
- Yellowing: Ensure the sealant you choose is non-yellowing to prevent discoloration over time. Archival quality sealants are best for this.
- Reversibility: While most acrylic sealants are not easily reversible without damaging the paint, some archival varnishes are designed to be removed with specific solvents if necessary for conservation.
- Application Method: Consider whether you prefer spraying or brushing.
How to Apply Varnish to Acrylics: A Step-by-Step Guide
Applying varnish to acrylics is a straightforward process, but it requires careful preparation and a steady hand to achieve the best results. Following these steps will help you effectively protect your art.
Step 1: Ensure the Painting is Completely Dry
Acrylic paint needs to be fully cured, not just dry to the touch, before applying a sealant. This can take anywhere from 72 hours to several weeks, depending on the thickness of the paint and humidity. Applying varnish too soon can trap moisture and cause clouding or damage.
Step 2: Prepare Your Workspace
- Clean Environment: Work in a dust-free, well-ventilated area. Dust particles can settle on the wet varnish, ruining the finish.
- Protective Covering: Lay down a drop cloth or newspaper to protect your surfaces from drips or spills.
- Lighting: Ensure you have good, even lighting so you can see what you’re doing and spot any imperfections.
Step 3: Clean the Painting Surface
Gently clean the surface of your dry acrylic painting.
- For Dust: Use a soft, clean brush (like a large makeup brush or a dry paintbrush) to gently sweep away any surface dust.
- For Grime: If there’s any stubborn dirt or fingerprints, use a slightly damp, lint-free cloth. Be very gentle to avoid lifting or smudging the paint. Ensure the surface is completely dry after cleaning.
Step 4: Choose Your Application Method and Sealant
Decide whether you will use a spray sealant for acrylics or a brush-on varnish. Your choice will influence the application technique.
Applying a Spray Sealant for Acrylics
Spray sealants are excellent for even coverage and minimal risk of brush marks.
- Shake the Can: Shake the spray can vigorously for at least a minute or two to ensure the contents are thoroughly mixed.
- Test Spray: Before applying to your artwork, spray a small amount onto a piece of scrap paper or cardboard to check the spray pattern and ensure it’s working correctly.
- Hold at a Distance: Hold the can about 10-12 inches (25-30 cm) away from the painting.
- Apply in Thin Coats: Apply the sealant in light, even strokes, moving your hand in a consistent pattern (e.g., side-to-side, then up-and-down). Avoid spraying too much in one spot.
- Allow Drying Between Coats: Let each thin coat dry completely according to the manufacturer’s instructions before applying the next. This usually takes 15-30 minutes.
- Multiple Coats: Apply 2-3 thin coats for adequate protection.
Applying a Brush-On Varnish
Brush-on varnishes offer more control over application and are ideal for achieving specific finishes.
- Choose a Soft Brush: Use a high-quality, soft-bristled brush, such as a synthetic or natural hair brush specifically designed for varnishing. A large, flat brush is often best for even application.
- Load the Brush: Dip the brush into the varnish, but don’t overload it. Wipe off any excess on the rim of the container.
- Apply in Long, Even Strokes: Apply the varnish in long, smooth, overlapping strokes, working from top to bottom or side to side. Try to maintain a consistent pressure.
- Avoid Overworking: Do not go back over areas you have already varnished too many times, as this can lead to brush marks and an uneven finish.
- Allow Drying Between Coats: Let each coat dry completely before applying the next. Drying times will vary depending on the product and environmental conditions.
- Multiple Coats: Apply 2-3 thin coats for the best protection.
Step 5: Drying and Curing
- Drying: This is the initial stage where the surface feels dry to the touch.
- Curing: This is a longer process where the varnish hardens fully. During curing, the varnish reaches its maximum durability and resistance. Avoid touching or moving the painting excessively during the curing period, which can last for several days to a few weeks. Always refer to the product’s instructions for specific drying and curing times.
Common Issues and How to Fix Them
Even with careful application, you might encounter minor issues. Knowing how to fix them can save your artwork.
Bubbles in the Varnish
Bubbles can occur if the varnish is applied too thickly, agitated excessively, or applied to a surface that isn’t completely dry.
- Fix: If the bubbles are still wet, you might be able to gently pop them with a fine-tipped needle or a toothpick. If the varnish has already dried, you may need to lightly sand the affected area with very fine-grit sandpaper (e.g., 400-600 grit) and then reapply a thin coat of varnish over the area.
Brush Strokes
Visible brush strokes can mar the appearance of your painting.
- Fix: If you’re using a brush-on varnish, ensure you’re applying it in thin, even coats with a soft, high-quality brush. Sometimes, applying the varnish in the direction of the brushstrokes of your painting can help integrate the varnish. If brush strokes are prominent after drying, you might need to lightly sand the surface and reapply. Spray sealants are often better at avoiding this issue.
Uneven Finish
Areas that are too glossy or too matte can create an inconsistent look.
- Fix: This often happens if the varnish was applied unevenly. If the difference is slight, you might be able to apply another thin, even coat of the desired finish over the entire surface to unify it. If the unevenness is significant, you may need to use a solvent recommended by the varnish manufacturer to remove the varnish layer (if the varnish is removable) and start again.
Runs or Drips
These occur when too much varnish is applied, especially on vertical surfaces.
- Fix: If caught while the varnish is still wet, gently feather out the run with a clean, slightly damp brush. If the varnish has dried, you will likely need to sand the affected area smooth and reapply the varnish.
Maintaining Your Sealed Acrylic Painting
Once your artwork is sealed and cured, proper care will ensure its longevity.
Cleaning and Care
- Regular Dusting: Gently dust your painting periodically with a soft, dry brush or a feather duster. Avoid using household cleaning sprays.
- Spot Cleaning: For minor smudges or marks, use a slightly damp, lint-free cloth. Gently wipe the affected area and then dry it with a separate dry cloth. Avoid rubbing too hard.
- Avoid Harsh Chemicals: Never use solvents, ammonia-based cleaners, or abrasive materials on your sealed artwork.
Displaying Your Artwork
- Avoid Direct Sunlight: While UV-resistant sealants offer protection, it’s still best to avoid prolonged exposure to direct sunlight, which can fade colors over time.
- Climate Control: Protect your artwork from extreme temperature fluctuations and high humidity, which can affect both the paint and the sealant.
- Framing: Framing your artwork behind glass or acrylic can provide an additional layer of protection. Ensure there is a mat or spacer so the artwork doesn’t touch the glass.
Advanced Techniques and Considerations
For seasoned artists or those working on special projects, there are advanced techniques to consider for sealing.
Using Acrylic Medium Sealant for Specific Effects
Some artists prefer using acrylic mediums as a final sealant, especially when they want to maintain a certain level of control over the finish or integrate it with the painting’s texture.
- Mixing with Paint: Certain mediums can be mixed directly into the paint to increase its fluidity and permanence, acting as an internal sealant.
- Glazing Layers: Applying thin, translucent layers of a gloss or satin medium can build up depth and unify the surface without the heavy coating of traditional varnish. This is a form of applying varnish to acrylics that is very controlled.
Protecting Textured Surfaces
Textured acrylic paintings, such as those with impasto techniques, can be challenging to seal evenly.
- Spray Sealants are Key: Spray sealants for acrylics are often the best choice for textured surfaces, as they can reach into crevices and coat the peaks and valleys of the paint without leaving brush marks.
- Multiple Thin Coats: It is crucial to apply multiple thin coats to ensure complete coverage of all surfaces without drowning the texture.
Archival Considerations
For professional artists and collectors, using archival-quality sealants is paramount. These products are specifically formulated to be non-yellowing, non-cracking, and resistant to environmental factors, ensuring the long-term preservation of acrylic art.
- Archival Varnishes: Look for products explicitly labeled as “archival,” “conservation grade,” or “non-yellowing.” These are typically available in spray and liquid forms.
- Testing: Even with archival products, it’s a good practice to test the sealant on a small, inconspicuous area of your painting or on a similar test piece to ensure compatibility and desired results.
Frequently Asked Questions (FAQ)
Q1: Do I need to seal every acrylic painting?
While not strictly mandatory for every single piece, it is highly recommended for any artwork you intend to display or sell. Sealing protects your work from environmental damage, ensuring its longevity and maintaining its visual appeal.
Q2: Can I use hairspray to seal an acrylic painting?
No, it is strongly advised against using hairspray. Hairspray is not designed for artwork and can become sticky, yellow over time, attract dirt, and potentially damage the acrylic paint layer. Always use products specifically designed for sealing artwork.
Q3: How long does it take for varnish to cure completely?
Curing time varies by product and environmental conditions (humidity, temperature). Typically, varnishes take anywhere from 24 hours to several weeks to cure fully. Refer to the manufacturer’s instructions for precise curing times.
Q4: Can I apply gloss varnish over a matte finish?
Yes, you can apply a gloss varnish over a matte finish or vice versa, but it’s important to ensure the previous layer is fully dry. Applying a gloss varnish over a matte surface will result in a localized glossy area. To achieve a uniform finish, you would typically apply the desired finish over the entire piece.
Q5: What is the difference between an acrylic medium and an acrylic varnish?
Acrylic mediums are versatile art materials that can be used for various purposes, including altering paint texture, enhancing flow, or creating glazes. Some mediums, when applied as a final layer, can act as a sealant. Acrylic varnishes are specifically formulated as a protective top coat for finished artwork, offering durability and specific finishes like gloss, satin, or matte. While some mediums can function as a sealant, a dedicated acrylic sealant or varnish is generally preferred for maximum protection and longevity.
Q6: How do I remove acrylic varnish if I make a mistake?
Removing varnish can be tricky and depends on the type of varnish used. For many acrylic varnishes, a solvent like mineral spirits or a specific art varnish remover might be necessary. Always test the solvent on a small, inconspicuous area first. If you are unsure, it’s often best to consult with a professional art conservator.
Q7: Can I varnish an acrylic painting on canvas that is still stretched?
Yes, you can varnish a painting while it’s still stretched on its canvas. Ensure the canvas is taut and stable. You can lay the canvas flat on a protected surface or prop it up securely if working vertically.
By understanding the importance of sealing and following these detailed steps, you can confidently protect your acrylic paintings, ensuring your art remains vibrant and well-preserved for years to come. This diligent approach to preserving acrylic art is a hallmark of a dedicated artist.