
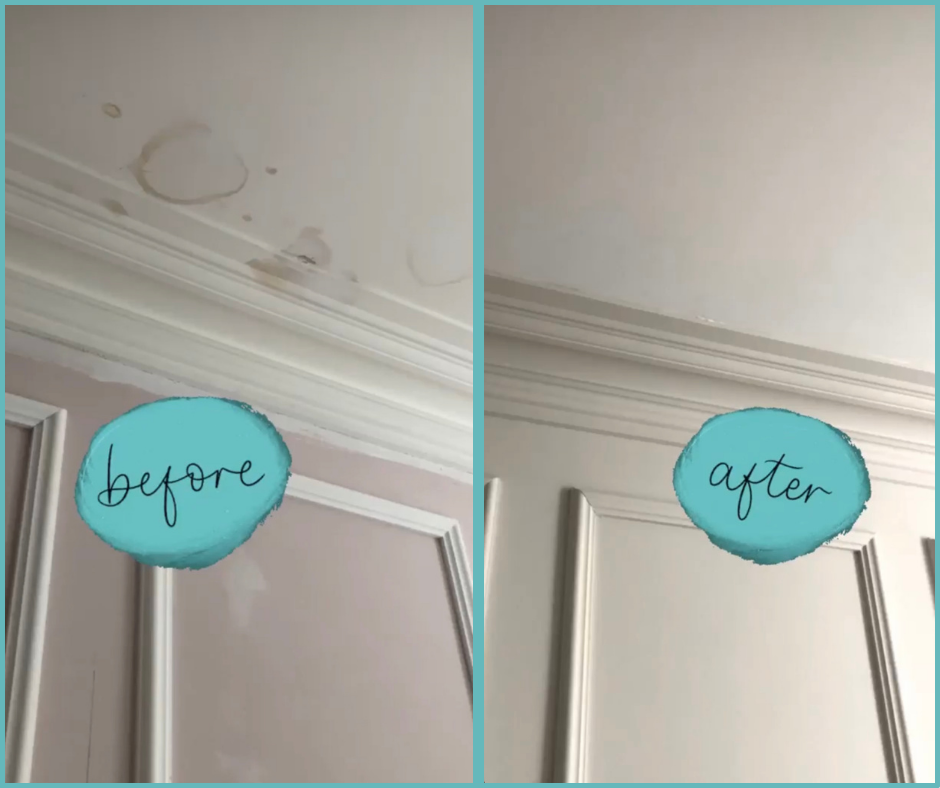
Can you remove a water stain from a ceiling without painting? Yes, you can often remove water stains from a ceiling without repainting, especially if the stain is fresh and the drywall or plaster is not compromised. The key is to identify the source of the leak, let the area dry completely, and then use appropriate cleaning methods.
Dealing with a discolored patch on your ceiling can be frustrating. You might think painting is your only option, but there are effective ways to tackle these unsightly marks without reaching for a paintbrush. This guide will walk you through the process of cleaning water spots ceiling and restoring its pristine appearance, using simple household items and a bit of DIY know-how. We’ll explore different methods for addressing a damp ceiling patch and tackling water damage ceiling issues, ensuring you can achieve a clean finish.
Image Source: images.squarespace-cdn.com
First Steps: Addressing the Leak and Drying
Before you even think about removing the stain, the most crucial step is to stop the source of the water. A water damage ceiling is a symptom of a larger problem. Ignoring the leak will only lead to recurring stains and potentially more significant structural damage.
Finding and Fixing the Leak
- Identify the Source: Look for pipes, roof leaks, or issues with bathrooms or appliances on the floor above.
- Repair the Leak: This might involve calling a plumber, roofer, or handyman. Ensure the leak is completely stopped before proceeding with stain removal.
Thorough Drying
Once the leak is fixed, the affected area needs to dry completely. This can take several days, depending on the humidity and the extent of the water exposure.
- Ventilation is Key: Open windows and doors to allow for air circulation.
- Use Fans: Place fans strategically to speed up the drying process. Aim them directly at the damp ceiling patch.
- Dehumidifiers: If the area is very damp, a dehumidifier can significantly speed up drying.
Important: Do not attempt to clean or paint a damp ceiling. This can worsen the problem and lead to mold growth.
Cleaning Water Stains: Your Non-Painted Solution
With the leak fixed and the ceiling dry, you can now focus on the stain itself. The effectiveness of your cleaning method will depend on the type of ceiling material and the age and severity of the stain.
Mild Stains and Fresh Marks
For lighter, newer stains, simpler cleaning solutions often suffice.
Method 1: Soap and Water
This is the gentlest approach and a good starting point.
What you’ll need:
- Mild dish soap
- Two buckets
- Clean, soft cloths or sponges
- Ladder or sturdy stool
Steps:
- Mix Solution: Fill one bucket with warm water and add a few drops of mild dish soap. Fill the second bucket with clean, plain water for rinsing.
- Test Area: Dampen a cloth with the soapy water and gently wipe a small, inconspicuous area of the stain. This helps you see how the ceiling material reacts to the cleaning solution.
- Gentle Scrubbing: If the test is successful, use the soapy cloth to gently scrub the stain. Work in circular motions, applying minimal pressure to avoid damaging the ceiling surface.
- Rinse: Use a clean cloth dampened with plain water to wipe away any soap residue.
- Dry: Pat the area dry with a clean, dry cloth. Allow the area to air dry completely.
Method 2: Baking Soda Paste
Baking soda is a natural abrasive and deodorizer, making it excellent for lifting stains.
What you’ll need:
- Baking soda
- Water
- Small bowl
- Soft cloth or sponge
- Ladder or sturdy stool
Steps:
- Make Paste: Mix baking soda with a small amount of water in a bowl to create a thick paste.
- Apply Paste: Gently apply the paste to the stain using a cloth or sponge.
- Let it Sit: Allow the paste to sit on the stain for about 15-20 minutes.
- Gently Scrub: Use a damp cloth to gently scrub the area where the paste was applied.
- Rinse: Wipe away any residue with a clean, damp cloth.
- Dry: Pat the area dry and let it air dry.
Moderate to Stubborn Stains
If the stain is more persistent, you might need something a bit stronger.
Method 3: Bleach Solution (Use with Caution!)
Bleach is a powerful ceiling stain remover that can effectively lighten discoloration. However, it can also damage certain ceiling finishes and requires careful handling.
What you’ll need:
- Household bleach (e.g., Clorox)
- Water
- Spray bottle or sponge
- Gloves
- Eye protection
- Mask
- Old cloths or towels
- Ladder or sturdy stool
Safety First!
- Ventilation: Ensure the room is extremely well-ventilated. Open windows and use fans.
- Protection: Wear gloves, eye protection, and a mask to avoid inhaling fumes or getting bleach on your skin or in your eyes.
- Never Mix Bleach: Never mix bleach with ammonia or other cleaning products, as this can create toxic fumes.
Steps:
- Dilute Bleach: Mix one part bleach with three parts water in a spray bottle or bucket.
- Test Area: Lightly spray or dab the solution onto an inconspicuous part of the ceiling to check for any adverse reactions.
- Apply to Stain: Gently apply the diluted bleach solution to the stain using a sponge or spray bottle. Avoid over-saturating the area.
- Let it Work: Allow the solution to sit on the stain for a few minutes. You should see the stain begin to lighten.
- Rinse Thoroughly: Use a clean cloth dampened with plain water to wipe away the bleach solution. Rinse the area multiple times to ensure all bleach residue is removed.
- Dry: Pat the area dry and allow it to air dry completely.
Considerations for Bleach:
- Color Fastness: Bleach can lighten or remove paint or wallpaper. Test in a hidden spot first.
- Ceiling Type: Avoid using bleach on unpainted wood or certain textured finishes unless you’re sure it won’t damage them.
Method 4: Hydrogen Peroxide
Hydrogen peroxide is a milder alternative to bleach and can be effective for lifting discoloration. It’s also a great option if you’re looking for a non-toxic ceiling cleaner.
What you’ll need:
- 3% hydrogen peroxide solution (available at drugstores)
- Spray bottle or sponge
- Clean cloths
- Ladder or sturdy stool
Steps:
- Apply Peroxide: Pour the hydrogen peroxide into a spray bottle or onto a sponge.
- Apply to Stain: Gently spray or dab the peroxide onto the water stain.
- Let it Sit: Allow the peroxide to sit on the stain for about 10-15 minutes. You may see it begin to bubble slightly.
- Wipe Clean: Use a clean, damp cloth to gently wipe the stain away.
- Rinse: Wipe the area again with a cloth dampened with plain water to remove any peroxide residue.
- Dry: Pat the area dry and let it air dry.
Pro Tip: For tougher stains, you can try saturating a paper towel with hydrogen peroxide and placing it directly on the stain for 15-30 minutes. Then, gently wipe and rinse.
Method 5: White Vinegar
White vinegar is another natural option that can help break down stains.
What you’ll need:
- White vinegar
- Water
- Spray bottle or sponge
- Clean cloths
- Ladder or sturdy stool
Steps:
- Dilute Vinegar: Mix equal parts white vinegar and water in a spray bottle or bucket.
- Apply to Stain: Spray or dab the solution onto the water stain.
- Let it Sit: Allow the solution to sit for about 10-15 minutes.
- Gently Scrub: Use a soft cloth to gently scrub the stain.
- Rinse: Wipe the area with a clean, damp cloth.
- Dry: Pat the area dry and let it air dry.
Note on Vinegar: The smell of vinegar will dissipate as it dries.
Dealing with Mold and Mildew
Sometimes, water stains are accompanied by mold or mildew, especially if the dampness lingered for a while. Mold can appear as black, green, or gray spots. Addressing mold is crucial for health and preventing further damage. This falls under ceiling mold removal.
Identifying Mold
Look for fuzzy growth or discolored patches that don’t disappear with standard cleaning. If you suspect mold, proceed with caution.
Mold Removal Methods
- Bleach Solution (for non-porous surfaces): A diluted bleach solution (as described above) can kill surface mold on painted surfaces. Ensure excellent ventilation and protective gear.
- Hydrogen Peroxide: Hydrogen peroxide is also effective against mold and is less harsh than bleach.
- Vinegar: Undiluted white vinegar can kill certain types of mold.
- Commercial Mold Removers: There are specialized ceiling stain remover products designed for mold. Follow the manufacturer’s instructions carefully.
Important for Mold:
- Severity: If mold covers a large area (more than a square foot) or you suspect it has penetrated the drywall, it’s best to consult a professional mold remediation service.
- Porosity: Mold can grow into porous materials like unpainted drywall. If the mold is deep within the material, cleaning the surface may not be enough, and the affected section might need to be cut out and replaced. This is a more involved DIY ceiling repair.
When Cleaning Isn’t Enough: Repair Options
Sometimes, a water stain is a sign that the ceiling material itself has been damaged. If the drywall is soft, sagging, or has begun to break down, simply cleaning the stain won’t suffice.
Surface Damage
If the surface is slightly deteriorated but not structurally compromised, you might be able to repair it before attempting to clean.
- Light Sanding: For minor surface damage or peeling paint, you can gently sand the area smooth.
- Primer: After cleaning and drying, apply a stain-blocking primer specifically designed for water stains. This will seal the stain and prevent it from bleeding through any new paint.
Deeper Damage
If the drywall or plaster is significantly damaged, you’ll need to consider more extensive repairs.
- Drywall Patching: For small holes or areas where the paper has delaminated, you might use drywall compound (spackle) to fill and smooth the area.
- Replacing Sections: For larger areas of damage, you may need to cut out the damaged section of drywall and replace it with a new piece. This is a more advanced DIY ceiling repair that often requires patching compound, tape, and paint to blend seamlessly.
Preventing Future Water Stains
The best way to deal with water stains is to prevent them from happening in the first place.
Regular Maintenance
- Check Roof: Inspect your roof regularly for damaged shingles or flashing.
- Gutter Cleaning: Keep gutters and downspouts clear of debris to ensure proper water drainage away from your home.
- Plumbing Inspections: Periodically check for leaks in pipes, especially those in attics, basements, or bathrooms.
- Appliance Checks: Ensure washing machines, dishwashers, and water heaters are in good working order and not leaking.
- Bathroom Ventilation: Use exhaust fans in bathrooms during and after showers to reduce moisture buildup.
Prompt Action
If you notice any signs of a leak, address it immediately. The sooner you fix the problem, the less damage will occur, and the easier it will be to clean up.
Choosing the Right Cleaning Method
Here’s a quick reference table to help you decide on the best approach:
| Stain Type/Severity | Recommended Cleaner(s) | Cautionary Notes |
|---|---|---|
| Fresh, Light Stain | Mild dish soap and water, Baking soda paste | Use minimal water. Test in an inconspicuous area. |
| Moderate Stain | Hydrogen peroxide, White vinegar solution | Good ventilation. Test for colorfastness. Vinegar smell dissipates. |
| Stubborn Stain | Diluted bleach solution (1:3 bleach to water ratio) | High caution required! Excellent ventilation, wear protective gear. Can damage paint. Test extensively. |
| Mold/Mildew Present | Diluted bleach solution, Hydrogen peroxide, White vinegar | Prioritize ventilation and protection. If extensive, consider professional help. |
| Damaged Material | Cleaning first, then patching compound, primer, or replacement | Address structural integrity before cosmetic fixes. Painting may be necessary after repairs. |
Frequently Asked Questions (FAQ)
Q1: What if the stain is very large or the ceiling is sagging?
A: If the ceiling is sagging, it indicates significant water saturation and potential structural weakness. Do not attempt to clean it. You must first support the ceiling to prevent collapse and then address the source of the leak. It’s highly recommended to consult a professional contractor for significant water damage ceiling repairs.
Q2: Can I use magic eraser on ceiling water stains?
A: Melamine foam sponges (like Magic Eraser) can be effective for some stains. However, they are abrasive. Test in an inconspicuous area first, and use very light pressure to avoid damaging the ceiling’s finish.
Q3: Will the water stain come back after cleaning?
A: If the source of the leak is not fully resolved, the stain will likely return. Ensure the leak is permanently fixed. Sometimes, even after cleaning, a faint discoloration might remain, especially on textured ceilings. In such cases, a stain-blocking primer followed by paint might be the only way to achieve a uniform appearance.
Q4: Is it safe to use bleach on my ceiling?
A: It can be safe if done correctly, but with caution. Always dilute bleach, ensure extreme ventilation, wear protective gear (gloves, mask, eye protection), and test on a small, hidden area first. Bleach can damage paint and some ceiling materials. If in doubt, opt for milder solutions like peroxide or vinegar.
Q5: How long should I let the ceiling dry?
A: Allow the ceiling to dry completely for at least 24-48 hours after the leak has been fixed. Use fans and dehumidifiers to speed up the process. The area should feel completely dry and cool to the touch before you attempt any cleaning.
Q6: Can I remove water stains from popcorn ceilings without damaging the texture?
A: Removing stains from popcorn ceilings is trickier. Water can loosen the texture. Try the gentlest methods first (soap and water, baking soda paste). Use a sponge very lightly and avoid scrubbing. For tougher stains, a diluted bleach or peroxide solution applied with a sponge, rather than sprayed, might work, but there’s a higher risk of altering the texture. Always test in a hidden spot.
By following these steps and using the right cleaning agents, you can effectively remove water stains from your ceiling without resorting to painting, saving you time and money while restoring your home’s appearance. Remember, addressing the root cause of the leak is always the first and most important step.