
Can you paint a deck without preparing it? While technically yes, painting a deck without proper preparation will lead to a poor finish and a short-lived coating. Preparing a deck for painting is crucial for achieving a beautiful, durable, and long-lasting finish. It involves a series of steps that ensure the new paint adheres well and protects the wood.
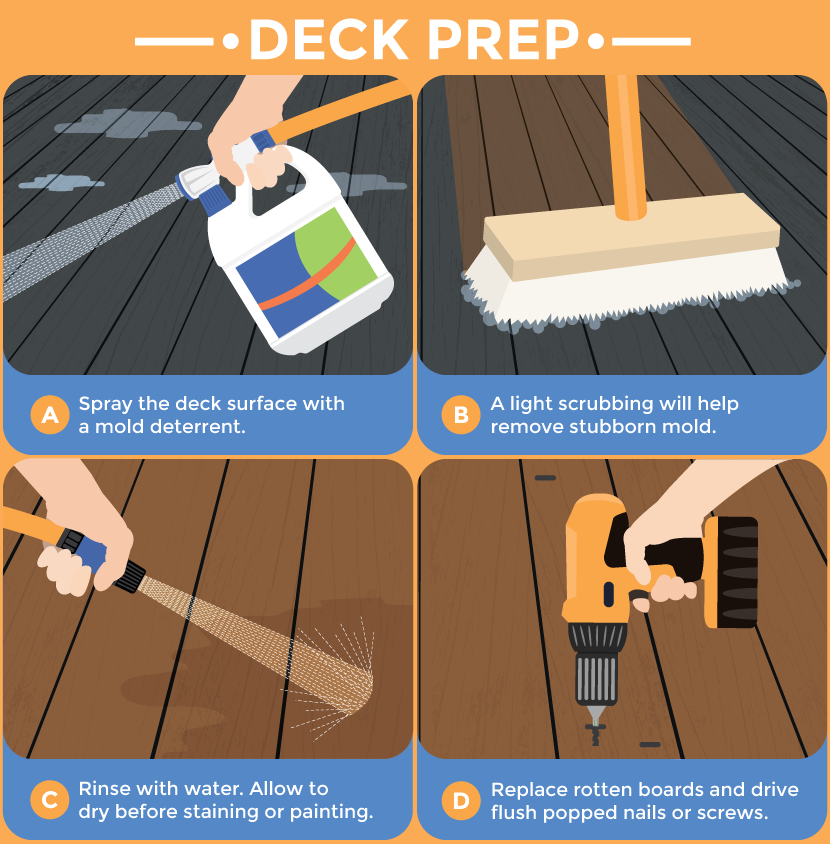
Image Source: fixcom-g4bhetdmcgd9b7er.z01.azurefd.net
Why Deck Preparation Matters
Preparing your deck before painting isn’t just an extra step; it’s the foundation for success. A well-prepared surface ensures the paint adheres properly, preventing peeling, blistering, and premature wear. It also allows the color to be consistent and vibrant. Skipping these steps is like building a house on sand – it won’t stand the test of time. This guide will walk you through every essential step, from initial cleaning to final priming.
The Importance of a Clean Surface
The most critical aspect of deck preparation is a clean surface. Dirt, grime, mildew, and old finishes can all interfere with new paint adhesion. Think of it like trying to stick a sticker onto a dirty window – it won’t stay put for long. Proper deck cleaning removes these contaminants, providing a fresh canvas for your paint.
Adhesion: The Key to Durability
Paint needs something to grip onto. Without good adhesion, your beautiful paint job will start flaking off in no time. This is why deck sanding is so vital. It creates a slightly rough surface that allows the paint to bond effectively.
Protecting Your Investment
Your deck is an investment in your home. Regular deck maintenance, including proper preparation for painting, extends its lifespan and keeps it looking its best. This prevents costly repairs and replacements down the line.
Step-by-Step Deck Preparation
Preparing your deck for painting involves several distinct stages. Each stage builds upon the previous one, ensuring a flawless finish.
Step 1: Inspection and Necessary Deck Repair
Before any cleaning or sanding begins, a thorough inspection is a must. What is the condition of your deck boards? Are there any loose boards, popped nails, or rotten sections? Addressing these issues now is far easier than trying to fix them after painting.
Common Deck Issues to Look For:
- Loose or Cracked Boards: These can be secured with new screws or replaced if severely damaged.
- Popped Nails: Hammer them back down or replace them with deck screws for a more secure hold.
- Rotten Wood: This is a serious structural issue. Rotten boards must be replaced entirely. Look for soft, spongy wood, especially around connection points.
- Splintering: Minor splintering can often be addressed during the sanding phase, but significant splintering might indicate the need for board replacement.
- Mold and Mildew: These will be tackled during the cleaning phase, but it’s good to note their presence.
Performing Deck Repair:
- Replacing Boards: If you find rotten or severely damaged boards, carefully remove them. Measure and cut new deck boards to match the existing ones. Secure them with galvanized deck screws. Ensure the new boards are flush with the surrounding deck surface.
- Securing Loose Boards: Use long deck screws to reattach any boards that have pulled away from the joists.
- Dealing with Nails: Old nails can rust and pop up. Either hammer them back down or, preferably, remove them and replace them with screws.
Step 2: Deep Deck Cleaning
This is where the real magic begins. A deep deck cleaning removes all the accumulated dirt, grease, mold, mildew, and algae that can prevent paint from adhering.
Methods for Deck Cleaning:
- Manual Scrubbing: For light dirt and mildew, a stiff-bristled brush and a bucket of warm, soapy water can work wonders.
- Deck Cleaners: Numerous commercial deck cleaners are available. They are formulated to break down grime and kill mold and mildew. Always follow the manufacturer’s instructions carefully.
- Pressure Washing Deck: This is often the most efficient method. However, it requires caution.
Pressure Washing Deck Safely:
- Choose the Right Nozzle: Use a wider fan spray nozzle (25-40 degrees). Never use a zero-degree nozzle, as it can gouge the wood.
- Start with Low Pressure: Begin with the lowest effective pressure setting and gradually increase if needed.
- Maintain a Consistent Distance: Hold the wand at a consistent distance (about 12-18 inches) from the deck surface.
- Work with the Grain: Always move the wand in the direction of the wood grain.
- Avoid Over-Washing: Too much pressure or too much time in one spot can damage the wood fibers, leading to a fuzzy surface that will require more sanding.
Table: Deck Cleaning Solutions
| Cleaning Method | Pros | Cons | Best For |
|---|---|---|---|
| Soap & Water | Gentle, eco-friendly, inexpensive | Labor-intensive, less effective on tough stains | Light dirt, mild mildew |
| Commercial Deck Cleaner | Effective on grime, mold, mildew; fast-acting | Can be harsh on wood if not rinsed properly; chemical use | Moderate to heavy dirt and organic growth |
| Pressure Washer | Fast, efficient, deep cleaning | Risk of wood damage if misused; requires equipment rental/purchase | Stubborn stains, widespread mildew/algae |
Rinsing After Cleaning:
Thorough rinsing is as important as cleaning. Use a garden hose to wash away all traces of the cleaning solution. If you used a pressure washer, a gentle rinse with the hose is sufficient.
Step 3: Deck Stripping (If Necessary)
If your deck has an old, failing stain or paint, you’ll need to remove it before applying a new coat. This process is called deck stripping. Leaving old finishes on can lead to peeling and a patchy appearance.
When to Strip Your Deck:
- Peeling or Chipping Paint/Stain: If the existing coating is in poor condition, it must be removed.
- Layered Finishes: If multiple layers of different finishes have been applied over the years, stripping can provide a uniform surface.
- Inconsistent Color: If you want to change the color significantly and the old stain is deep.
Deck Stripping Methods:
- Chemical Strippers: These are powerful solvents that break down old finishes.
- Application: Apply the stripper with a brush or roller, following the product’s instructions. Allow it to work for the recommended time.
- Removal: Use a stiff brush or a scraper to remove the softened finish.
- Neutralizing: Most strippers require a neutralizer to stop the chemical reaction and prevent damage to the wood.
- Sanding: For lighter finishes or as a follow-up to chemical stripping, sanding can remove residual coatings.
- Pressure Washing (with caution): In some cases, a pressure washer at a higher setting might remove loose flaking paint, but it’s generally less effective for ingrained finishes.
Important Considerations for Deck Stripping:
- Safety First: Wear chemical-resistant gloves, eye protection, and old clothing. Ensure good ventilation.
- Environmental Impact: Some chemical strippers can be harmful to plants and aquatic life. Protect surrounding areas and dispose of waste properly.
- Deck Type: Be aware that stripping can sometimes lighten the wood color.
Step 4: Deck Sanding for a Smooth Finish
Deck sanding is crucial for creating a smooth surface for the paint to adhere to. It also helps to open up the wood grain, allowing for better penetration of primers and paint.
Sanding Techniques:
- Orbital Sander: This is a good choice for most deck surfaces. It provides a smooth finish without being overly aggressive.
- Belt Sander: For very rough surfaces or removing stubborn old finishes, a belt sander can be effective, but use it with care to avoid creating unevenness.
- Hand Sanding: For tight corners or small areas, hand sanding with a sanding block is necessary.
Sandpaper Grits:
- Start Coarse: Begin with a coarser grit sandpaper (e.g., 40-60 grit) to remove any rough spots, splinters, or remaining old finish.
- Progress to Finer Grits: Gradually move to finer grits (e.g., 80-100 grit) to smooth the surface. The goal is a smooth, but not polished, finish. You want the wood to have a slight “tooth” for the paint to grip.
Sanding Strategy:
- Always Sand with the Grain: This is vital to avoid visible scratch marks.
- Even Pressure: Apply even pressure across the surface.
- Clean the Sander: Periodically clean the sandpaper to maintain its effectiveness.
- Vacuum or Sweep: After sanding, thoroughly clean the deck to remove all dust. A shop vacuum is ideal for this.
Step 5: Deck Repair Revisited (Post-Sanding Check)
After sanding, it’s a good time for another quick inspection. Sanding can reveal any previously unnoticed damage or highlight areas that might need further attention.
Minor Repairs After Sanding:
- Fill Gouges: Small gouges or holes can be filled with an exterior-grade wood filler.
- Address Splinters: Sand down any remaining splinters.
Final Cleaning After Sanding:
Dust is the enemy of paint adhesion. After sanding, the deck needs to be meticulously cleaned.
- Vacuuming: Use a shop vacuum to remove all dust.
- Tack Cloth: For a truly dust-free surface, wipe the deck down with a tack cloth.
Step 6: Deck Priming for Enhanced Adhesion
Applying a primer is a critical step, especially when painting over bare wood or a stripped surface. Priming ensures the topcoat of paint adheres better, provides a uniform base color, and can even help block stains from bleeding through.
When to Prime:
- Bare Wood: Always prime bare wood.
- Stripped Surfaces: If you’ve used a chemical stripper, priming is usually recommended.
- Dark to Light Colors: If you’re going from a dark stain or paint to a light color, primer is essential for coverage.
- Problematic Woods: Some woods, like cedar or redwood, can bleed tannins. A good stain-blocking primer is recommended.
Types of Deck Primers:
- Water-Based Primers: These are easy to work with, clean up with water, and dry quickly. They are generally good for most situations.
- Oil-Based Primers: These offer excellent adhesion and stain-blocking capabilities but require mineral spirits for cleanup and have a longer drying time.
- Stain-Blocking Primers: If you’re concerned about wood tannins or residual stains, opt for a primer specifically designed to block them.
Applying Deck Primer:
- Application Method: Use a brush, roller, or sprayer, depending on your preference and the product. Ensure even coverage.
- Drying Time: Allow the primer to dry completely according to the manufacturer’s instructions before applying the paint.
Step 7: Applying the Paint (The Final Coat)
With all the preparation complete, you’re ready for the paint. Applying paint is the most visible part, but its success hinges entirely on the preceding steps.
Choosing the Right Paint:
- Exterior Grade: Always use paint specifically formulated for exterior use.
- Latex or Acrylic: These are the most common and versatile choices for decks. They offer good durability and flexibility.
- Paint and Primer in One: While convenient, these often don’t provide the same level of adhesion and protection as a separate primer and topcoat, especially on a deck. It’s generally better to use a dedicated primer.
Painting Techniques:
- Apply Thin, Even Coats: Avoid applying the paint too thickly, as this can lead to sagging and poor adhesion.
- Work with the Grain: For consistency, paint in the direction of the wood grain.
- Avoid Overlapping Wet Edges: This can create lap marks. Work in manageable sections.
- Multiple Coats: Most decks will benefit from at least two coats of paint for optimal coverage and durability. Allow each coat to dry thoroughly before applying the next.
Step 8: Deck Sealing (Optional but Recommended)
While paint provides a protective coating, an additional layer of deck sealing can offer extra protection against moisture and UV damage, especially for the paint itself.
When to Seal:
- After Painting: Some paints have a built-in seal, but a clear or semi-transparent deck sealer can add an extra barrier.
- On Stained Decks: If you’ve chosen to stain your deck instead of paint, a clear sealer is essential for protection.
Types of Deck Sealers:
- Clear Sealers: Offer protection without altering the appearance.
- Tinted Sealers: Add a slight color while protecting the wood.
- Penetrating Sealers: Soak into the wood to protect from within.
- Surface Sealers: Form a protective film on the surface.
Applying Deck Sealer:
- Follow Manufacturer Instructions: Application methods and drying times vary.
- Ensure Dry Surface: Make sure the painted surface is completely dry before applying a sealer.
Maintaining Your Newly Painted Deck
Proper preparation is key to a long-lasting paint job, but ongoing deck maintenance is also vital.
Regular Cleaning:
- Sweep your deck regularly to remove debris.
- Wash the deck annually or as needed to remove dirt and grime.
Inspect for Damage:
- Periodically check for any signs of wear, peeling, or damage. Address minor issues promptly to prevent them from worsening.
Reapplication:
- Depending on the climate and usage, you may need to repaint your deck every 3-5 years. The preparation steps will remain the same for future repaints.
Frequently Asked Questions (FAQ)
Q1: How long does deck preparation take?
The time required for deck preparation can vary significantly based on the deck’s size, its current condition, and the methods you choose. A simple cleaning and light sanding might take a day, while extensive deck repair, stripping, and multiple sanding steps could take several days to a week.
Q2: Can I paint my deck in cold weather?
It’s generally not recommended to paint decks in cold weather. Most exterior paints and primers have specific temperature requirements for application and drying. Always check the product label for the ideal temperature range. Extreme cold can prevent proper curing and lead to adhesion problems.
Q3: What’s the difference between deck staining and deck painting?
Deck staining penetrates the wood and enhances its natural grain, offering a more natural look. It typically requires less preparation than painting and is easier to reapply. Deck painting, on the other hand, forms a protective film on the surface, offering a solid color and potentially more robust protection against the elements. Painting requires more thorough preparation, including priming, to ensure proper adhesion.
Q4: Do I need to pressure wash my deck?
While pressure washing deck is an effective cleaning method, it’s not always mandatory. If your deck is only lightly soiled, manual scrubbing might suffice. However, if there’s significant mildew, algae, or ingrained dirt, pressure washing is highly recommended for a truly clean surface. Just remember to use it cautiously to avoid damaging the wood.
Q5: Is deck resurfacing necessary before painting?
Deck resurfacing usually refers to more extensive repairs, like replacing all the deck boards or adding a new layer of decking material. If your deck structure is sound but the surface is worn, proper cleaning, sanding, and potentially deck stripping are usually sufficient for a paint job. Full resurfacing is for decks that are structurally compromised or have significant damage to the boards themselves.
Q6: How do I choose the right deck sealant?
The choice of deck sealing depends on your desired finish and the type of wood. For painted decks, a clear or tinted acrylic sealer can add an extra layer of protection. For stained decks, a penetrating sealer is often preferred to protect the wood from within. Always consider the manufacturer’s recommendations for compatibility with your chosen paint or stain.
Q7: What is deck priming for?
Deck priming is essential for several reasons. It creates a uniform surface for the paint, ensuring even color absorption. It significantly improves paint adhesion, preventing peeling and blistering. Primers can also block tannins from certain woods (like cedar or redwood) from bleeding through the paint and can help obscure minor imperfections or stains on the deck surface.
By following this comprehensive checklist, you can ensure your deck is perfectly prepared for a beautiful and lasting paint finish, enhancing your home’s exterior appeal and extending the life of your deck.