
Can you paint a deck without prepping it? No, you cannot paint a deck without proper preparation. Skipping the prep work leads to peeling paint, uneven finishes, and a shorter lifespan for your paint job. This guide will walk you through each essential step to ensure your deck looks beautiful and lasts for years. Preparing your deck for painting is crucial for a professional and durable finish.
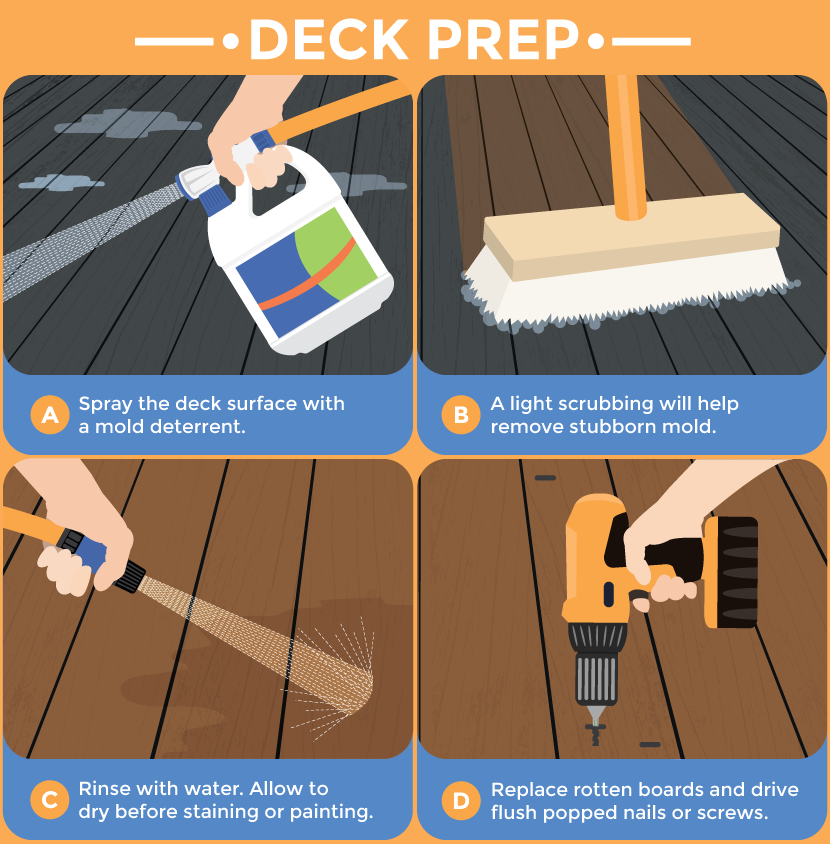
Image Source: fixcom-g4bhetdmcgd9b7er.z01.azurefd.net
Why Deck Preparation Matters
Think of deck preparation as building a strong foundation for your house. If the foundation is weak, the house will have problems. The same is true for your deck. Good preparation means your new paint will stick well, look smooth, and resist wear and tear from weather and foot traffic. Without it, you’ll be back to square one much sooner than you’d like. This process includes vital steps like deck cleaning, deck sanding, and deck repair.
Step 1: Inspect Your Deck Thoroughly
Before you do anything else, you need to know what you’re working with. Walk around your entire deck. Look for any loose boards, popped nails or screws, rotting wood, or any damaged areas. Check the railings, stairs, and any other structural elements. This is also the time to assess the condition of the existing finish. Is it peeling? Is it a solid stain or a transparent one?
What to Look For During Inspection:
- Loose or Cracked Boards: These need to be secured or replaced.
- Popped Fasteners: Hammer down nails or replace loose screws.
- Rotting Wood: Soft, spongy wood indicates rot and needs replacement.
- Splinters: Raised wood fibers that can snag and cause injuries.
- Mold or Mildew: Green or black fuzzy patches that need to be removed.
- Existing Finish Condition: Identify peeling, flaking, or worn areas.
Step 2: Deck Repair and Replacement
Once you’ve found any issues, it’s time to fix them. This stage is all about deck repair.
Replacing Damaged Boards:
- Carefully pry out old boards.
- Replace them with new, pressure-treated lumber that matches your existing deck’s thickness and type.
- Secure the new boards with deck screws, ensuring they are flush with the surface.
Securing Loose Elements:
- Hammer down any popped nails.
- If screws are loose, tighten them or replace them with new, longer ones.
- Ensure railings are sturdy and attached securely.
This is also a good time to consider deck resurfacing if the damage is extensive, though our focus here is on prepping for paint.
Step 3: Deep Deck Cleaning
Now, the real work begins: deck cleaning. This is probably the most critical step for a lasting paint job. You need to remove all dirt, grime, mildew, old finishes (if necessary), and any other contaminants.
Methods for Deck Cleaning:
- Sweeping: Start by sweeping away all loose debris like leaves, dirt, and cobwebs.
- Power Washing (Deck Washing): A power washer can be very effective for deck washing.
- Choose the Right Nozzle: Use a wide fan nozzle (25-40 degrees) to avoid damaging the wood. A narrow nozzle can gouge the wood.
- Test a Small Area: Always test the pressure washer on an inconspicuous spot first to ensure it doesn’t splinter the wood.
- Maintain a Consistent Distance: Hold the wand about 12-18 inches away from the deck surface.
- Work in Sections: Move the wand in steady, overlapping strokes.
- Deck Cleaner Solutions:
- Oxygen Bleach Cleaners: These are generally safe for wood and effective against mold and mildew. They work by releasing oxygen to break down stains.
- Chlorine Bleach Cleaners: These are stronger and kill mold and mildew quickly but can be harsh on wood and surrounding plants. Always dilute properly and rinse thoroughly.
- Commercial Deck Cleaners: Many products are specifically designed for cleaning wood decks. Follow the manufacturer’s instructions carefully.
Using a Deck Cleaner:
- Apply the cleaner: Mix the cleaner according to the product’s directions. Apply it to the deck using a garden sprayer or a roller.
- Let it dwell: Allow the cleaner to sit on the surface for the time recommended by the manufacturer (usually 10-20 minutes). Do not let it dry.
- Scrub (if needed): For stubborn dirt or mildew, you might need to scrub with a stiff-bristled brush.
- Rinse thoroughly: This is vital. Use a garden hose or your power washer on a low setting to rinse away all cleaner residue. If you don’t rinse well, the cleaner can interfere with the paint adhesion.
Important Note: If your deck has an old, failing finish (like peeling paint or solid stain), you might need to deck strip it before cleaning. This involves using a chemical stripper or aggressive sanding to remove the old coating. This is a more intensive process and might be considered part of deck resurfacing if the entire finish needs removal.
Step 4: Deck Sanding
After cleaning and rinsing, let your deck dry completely. This can take 24-48 hours, depending on the weather. Once dry, it’s time for deck sanding. Sanding smooths out the wood grain, removes any remaining fuzzy bits from cleaning or splintered areas, and creates a uniform surface for the paint to adhere to.
Sanding Techniques:
- Orbital Sander: This is the most common and user-friendly tool. Use it with the grain of the wood.
- Belt Sander: More aggressive and faster, but requires more skill to avoid creating uneven patches. Best for larger, flat areas.
- Pole Sander: Attaches to an extension pole, allowing you to sand the deck floor while standing.
Grit Recommendations:
- Start with Medium Grit: For most decks, start with 60-80 grit sandpaper. This will effectively remove rough patches and any remaining old finish.
- Follow with Fine Grit: After the initial sanding, switch to a finer grit (100-120 grit) to create a smooth surface.
Sanding Process:
- Wear Protective Gear: Always wear a dust mask and safety glasses during sanding.
- Work Systematically: Sand in sections, following the direction of the wood grain.
- Edge Sanding: Use a smaller handheld sander or sanding block to reach edges and corners.
- Remove Dust: After sanding, thoroughly sweep or vacuum up all the dust. You can also use a leaf blower. A tack cloth can be used for a final dust removal.
This step is crucial for preparing the surface for deck priming and painting.
Step 5: Deck Priming
While some might be tempted to skip this, deck priming is a vital step, especially when painting. Primer seals the wood, promotes better paint adhesion, and helps create a uniform color base. It can also block tannins from bleeding through lighter paint colors.
Choosing the Right Primer:
- Oil-Based Primers: Offer excellent adhesion and stain blocking. They are durable but can have strong odors and longer drying times.
- Water-Based Primers (Latex/Acrylic): Easier to clean up, low odor, and dry faster. Many modern water-based primers offer excellent durability and adhesion for exterior wood.
- Self-Priming Paints: Some high-quality exterior paints are designed to act as both primer and paint. However, for best results, especially over bare wood or a previously stained surface, a dedicated primer is often recommended.
Applying the Primer:
- Check the Weather: Apply primer on a dry day with mild temperatures (usually between 50°F and 80°F). Avoid direct sunlight, as it can cause the primer to dry too quickly and unevenly.
- Application Methods:
- Brush: Use a quality synthetic bristle brush for edges and corners.
- Roller: Use a medium-nap roller for larger flat surfaces.
- Sprayer: A paint sprayer can be efficient for large decks, but requires careful masking of surrounding areas.
- Apply Thin, Even Coats: Avoid applying the primer too thickly, as this can lead to drips and an uneven finish.
- Allow Proper Drying Time: Refer to the primer manufacturer’s instructions for drying times between coats and before applying paint.
Step 6: Deck Painting
Now your deck is primed and ready for its colorful transformation!
Choosing the Right Paint:
- Exterior Latex Paint: Look for high-quality exterior latex (acrylic) paint. These paints are flexible, durable, and resistant to cracking and peeling.
- Paint Finish: A satin or semi-gloss finish is generally more durable and easier to clean than a flat finish.
Painting Techniques:
- Stir the Paint: Thoroughly stir the paint before and during use.
- Application Tools:
- Brush: Use a good quality synthetic brush for cutting in edges and detailed areas.
- Roller: Use a medium-nap roller (3/8″ or 1/2″) for the deck boards.
- Pad Applicator: Some prefer a deck pad applicator for its ability to push paint into the wood grain.
- Apply Thin, Even Coats: Just like primer, apply the paint in thin, even coats. Two thin coats are almost always better than one thick coat.
- Work in Sections: Paint in manageable sections to avoid lap marks (where a wet edge meets a dry edge).
- Allow Drying Time: Let each coat dry completely according to the paint manufacturer’s instructions before applying the next.
Step 7: Deck Sealing (Optional but Recommended)
Once the paint has fully cured (this can take several days to a week or more, depending on the paint and weather), you might consider applying a clear deck sealing product. This adds an extra layer of protection against moisture and UV damage, further extending the life of your paint job and the deck itself.
Types of Deck Sealers:
- Water-Repellent Sealers: These penetrate the wood to provide protection against moisture.
- UV Protectants: Help prevent the paint from fading and degrading due to sun exposure.
Apply the sealer according to the product’s directions, typically with a brush or roller.
Maintaining Your Painted Deck
Regular deck maintenance is key to keeping your painted deck looking its best and prolonging its lifespan.
Regular Cleaning:
- Sweep your deck regularly to remove debris.
- Wash it down with mild soap and water annually or as needed to remove dirt and mildew.
Spot Repairs:
- If you notice any small chips or scratches in the paint, touch them up promptly to prevent water from seeping into the wood.
Reapplication:
- Depending on the quality of the paint and the exposure to the elements, you may need to repaint your deck every 3-5 years.
Summary Table: Deck Prep Steps
| Step | Purpose | Key Actions |
|---|---|---|
| Inspection | Identify damage, rot, loose parts, and the condition of the existing finish. | Walk deck, check boards, fasteners, railings; note any imperfections. |
| Deck Repair | Fix any structural issues or damage. | Replace rotten boards, secure loose fasteners, reinforce railings. |
| Deck Cleaning | Remove dirt, grime, mildew, and loose paint/stain. | Sweep, power wash or scrub with deck cleaner, rinse thoroughly. |
| Deck Stripping (if needed) | Remove old, failing paint or stain before cleaning and sanding. | Use chemical stripper or aggressive sanding. |
| Deck Sanding | Smooth the wood surface and create a good base for primer and paint. | Use orbital or belt sander with appropriate grit (60-80 then 100-120), remove all dust. |
| Deck Priming | Seal the wood, improve paint adhesion, and create a uniform color base. | Apply thin, even coats of quality exterior primer, allow to dry fully. |
| Deck Painting | Apply the protective and decorative color coats. | Apply thin, even coats of exterior latex paint, allow proper drying time between coats. |
| Deck Sealing (optional) | Add extra protection against moisture and UV rays. | Apply a clear deck sealer after paint has fully cured. |
Frequently Asked Questions (FAQ)
Q1: How long does it take to prep a deck for painting?
A1: The time can vary greatly depending on the size of your deck, its condition, and the amount of repair work needed. A small, well-maintained deck might take a weekend, while a larger or more weathered deck could take several days or even a week.
Q2: Can I skip sanding if the deck is in good condition?
A2: It is highly recommended to sand your deck, even if it looks good. Sanding creates a profile on the wood surface that allows the primer and paint to adhere much better, preventing peeling and chipping down the line.
Q3: How long should I wait for the deck to dry after cleaning before painting?
A3: It’s crucial for the deck to be completely dry before priming and painting. Typically, you’ll need to wait at least 24-48 hours after cleaning, and possibly longer if the humidity is high or there’s been recent rain. You can test for moisture by taping a small piece of plastic wrap to the deck overnight; if there’s condensation underneath in the morning, the deck is still too wet.
Q4: What’s the difference between deck stain and deck paint?
A4: Deck stain penetrates the wood and enhances its natural grain, offering a more translucent or semi-transparent finish. Deck paint forms a solid film on the surface, providing opaque color coverage. While both protect the wood, paint generally offers a thicker, more durable coating, but can be more prone to peeling if not applied correctly.
Q5: My deck has old peeling paint. Do I need to strip it completely?
A5: Yes, if the old paint is significantly peeling or flaking, you will likely need to remove it entirely before applying a new coat. Partial removal will lead to an uneven finish and the new paint will eventually peel in the same spots. This often involves using a paint stripper or aggressive sanding methods.
Q6: Can I paint over deck stain?
A6: While it’s possible, it’s not ideal and often leads to adhesion problems. Ideally, if you want to paint, you should strip off the old stain first. If you choose to paint over stain, ensure the stain is weathered and the surface is thoroughly cleaned and sanded. Use a high-quality primer specifically designed for adhesion to previously coated surfaces.
Q7: What is deck resurfacing?
A7: Deck resurfacing typically refers to more extensive repairs, such as replacing large sections of decking, repairing or rebuilding railings, or applying a completely new, thicker coating system that can sometimes fill minor imperfections. While not strictly a prep step for painting, significant deck repair might be considered a form of resurfacing if many boards are replaced.
By following these steps, you’ll ensure your deck is properly prepared for painting, leading to a beautiful, long-lasting finish that you can enjoy for years to come. Remember that good deck maintenance starts with thorough preparation.