
Can I prepare my car for painting myself? Yes, absolutely! With the right tools, patience, and attention to detail, you can prepare your car for a professional paint job or even tackle a DIY paint job yourself. Proper preparation is the cornerstone of a flawless finish, ensuring your new paint adheres well, looks smooth, and lasts for years. Skipping these crucial steps is a recipe for peeling, bubbling, and an overall disappointing outcome. This guide will walk you through the essential stages of getting your car ready for a fresh coat of paint.
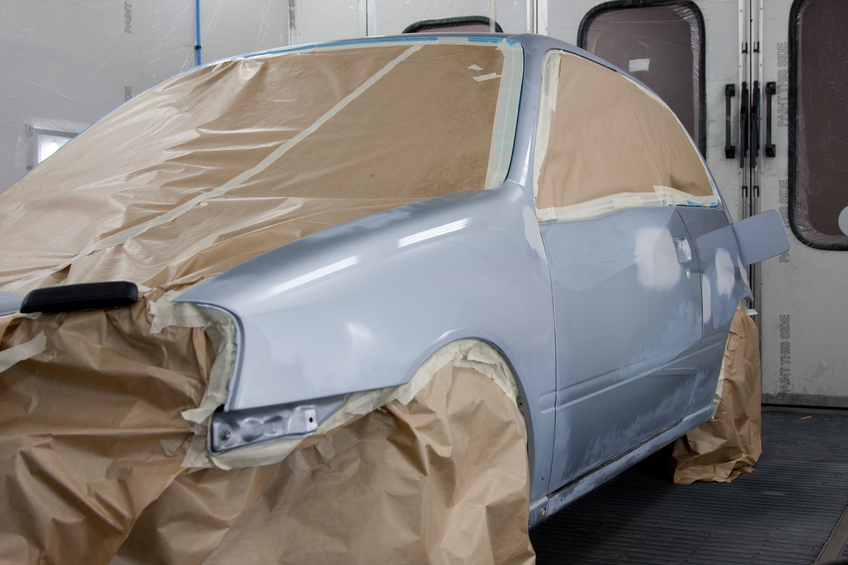
Image Source: sbfinishes.com
The Importance of a Clean Slate
Before any sanding or bodywork begins, the absolute first step is to ensure your car is thoroughly clean. Think of it as cleaning your canvas before you paint a masterpiece. Any dirt, grime, wax, or grease left on the surface will interfere with the adhesion of primer and paint, leading to potential problems down the line.
Deep Cleaning and Degreasing
What do I use to clean a car before painting? A high-quality automotive degreaser is your best friend here.
- Exterior Wash:
- Start with a thorough wash using a car-specific soap and plenty of water.
- Use clean wash mitts and buckets to avoid reintroducing dirt.
- Pay special attention to wheel wells, door jambs, and undercarriage areas where dirt accumulates.
- Degreasing:
- After the initial wash and rinse, spray down the entire vehicle with an automotive degreaser.
- Work in sections, allowing the degreaser to break down oils and residues.
- Scrub stubborn areas with a soft-bristle brush.
- Rinse thoroughly with clean water.
- Final Wipe Down:
- Use a clean microfiber towel to dry the car completely.
- For an extra layer of cleanliness, a final wipe with a wax and grease remover or a specialized automotive prep solvent is highly recommended. This will remove any last traces of contaminants.
Addressing Imperfections: Car Body Repair
Once your car is sparkling clean and dry, it’s time to inspect for any damage that needs attention. This is where car body repair comes into play. Even minor dents and scratches can show through fresh paint if not addressed.
Inspecting for Damage
- Walk around your car in good lighting.
- Feel the surfaces with your hands to detect subtle imperfections.
- Look for:
- Dents (large and small)
- Scratches (surface and deep)
- Rust spots
- Cracks in the paint or plastic
- Previous repairs that might be failing
Dent Repair
Small dents can often be repaired using a few different methods. For larger or more complex dents, professional help might be necessary, but for minor cosmetic issues, you can often do it yourself.
- Basic Dent Pulling: Kits are available that use suction cups or adhesive tabs to pull dents out.
- Heat and Cold: Sometimes, rapidly heating a dent with a heat gun and then quickly cooling it with compressed air can cause the metal to pop back into place. Be cautious with this method to avoid damaging the paint.
- Body Filler Application: For dents that don’t pop out, or for filling minor imperfections, body filler application is the next step.
Body Filler Application: A Step-by-Step Approach
Body filler, often called Bondo, is a two-part putty that hardens when mixed. It’s used to fill in dents, scratches, and other imperfections, creating a smooth surface.
- Clean the Area: Ensure the dented area is thoroughly cleaned and dry. If there’s any rust, it must be removed first.
- Mix the Filler: Follow the manufacturer’s instructions precisely for mixing the filler with the hardener. Over-mixing or under-mixing can affect curing time and strength.
- Apply the Filler: Use a flexible plastic spreader to apply the filler to the dent.
- Start by applying a thin, even layer.
- Build up the filler gradually, working from the edges of the dent inward.
- Slightly overfill the area to allow for sanding down to a smooth finish.
- Avoid excessive spreading or thick, uneven layers.
- Curing: Allow the filler to cure completely according to the manufacturer’s recommendations. This can take anywhere from 15 minutes to an hour, depending on the product and temperature.
- Sanding: Once cured, the filler needs to be sanded smooth.
Rust Removal
Rust is a car’s enemy. If you find any rust, it must be completely removed before painting.
- Light Surface Rust: Can often be removed with automotive sandpaper or a wire brush.
- Deeper Rust: May require more aggressive methods.
- Grinding: Using an angle grinder with a wire wheel or flap disc can remove rust quickly, but be careful not to remove too much metal.
- Sandblasting Car: For heavily rusted areas or for a very thorough removal, sandblasting car bodies is an effective, albeit often professional, method. It uses abrasive media propelled by compressed air to strip away rust, old paint, and contaminants. This method provides an excellent surface profile for new paint adhesion.
- Rust Converters/Treatments: After removing loose rust, applying a rust converter or inhibitor can help prevent its return.
Preparing the Surface for Primer: Sanding and Stripping
The surface of your car needs to be properly prepared to accept primer. This involves removing old paint, rust, and creating a smooth, uniform surface.
Paint Stripping
If the current paint job is in poor condition, peeling, or if you’re doing a complete color change and want the best adhesion, you might consider removing the old paint entirely.
- Chemical Paint Strippers: These products dissolve old paint. They require careful handling, ventilation, and protective gear. After application, the softened paint is scraped off.
- Mechanical Stripping:
- Sandpaper: For light paint removal or scuffing, automotive sandpaper is used.
- Orbital Sanders: Power tools like orbital sanders with various grits of sandpaper can speed up the process.
- Sandblasting: As mentioned, sandblasting car bodies is a very effective way to strip paint and contaminants down to bare metal.
Sanding for Adhesion
Whether you’re stripping to bare metal or working over existing paint, sanding is crucial for creating an adhesive surface.
- Grit Progression: You’ll typically start with a coarser grit of automotive sandpaper and progressively move to finer grits.
- 180-220 Grit: Good for initial sanding, removing clear coat, and smoothing body filler.
- 320-400 Grit: Used for sanding down primer and preparing surfaces for base coat.
- 600+ Grit: Used for wet sanding the final clear coat for polishing.
- Types of Sanding:
- Dry Sanding: Using sandpaper dry. Effective for initial stages.
- Wet Sanding: Using sandpaper with water. This lubricates the paper, reduces dust, and helps prevent clogging. It’s often used with finer grits for a smoother finish.
- Tools:
- Sanding Blocks: For flat surfaces to ensure even pressure.
- Orbital Sanders: For larger areas.
- Sanding Sponges: For curves and irregular shapes.
Applying Automotive Primer
What is automotive primer for? Primer is a foundational coating that serves several critical purposes:
- Adhesion: It creates a surface that paint can adhere to effectively.
- Corrosion Resistance: Many primers contain anti-corrosive agents to protect the metal.
- Surface Smoothing: It fills in minor imperfections and provides a uniform surface for the paint.
- Color Uniformity: It creates an even base color, which is essential for achieving the true color of your topcoat.
Types of Primer
- Epoxy Primer: Excellent adhesion, corrosion resistance, and chemical resistance. Often used directly on bare metal.
- Urethane Primer: Durable and flexible, good for overall vehicle coating.
- High-Build Primer (Primer-Surfacer): Designed to fill minor imperfections and sand easily, creating a very smooth surface. This is often the go-to for most prep work.
- Etch Primer: Used on bare metal to promote adhesion. Typically applied in thin coats.
Primer Application Process
- Clean the Surface: After all sanding is complete, thoroughly clean the car again with wax and grease remover and tack cloths to remove any dust.
- Masking: Use masking tape for cars and masking paper or plastic sheeting to protect areas you don’t want to paint. This includes windows, trim, tires, and any other components. Ensure the tape edges are sealed tightly.
- Mixing Primer: Follow the manufacturer’s instructions for mixing the primer with the appropriate reducer and hardener (if applicable).
- Spraying Primer:
- Use a spray gun (HVLP – High Volume Low Pressure – spray guns are recommended for efficiency and reduced overspray).
- Apply in thin, even coats, overlapping each pass by about 50%.
- Maintain a consistent distance between the spray gun and the surface.
- Allow flash-off time between coats as recommended by the manufacturer.
- Sanding Primer: Once the primer has cured, it needs to be block-sanded.
- Use finer grit sandpaper (e.g., 400-600 grit, possibly wet sanding) to smooth out any imperfections, dust nibs, or unevenness in the primer.
- The goal is a perfectly smooth, uniform surface.
Final Touches Before Painting
You’re almost there! Just a few more steps before you’re ready for the color coat.
Final Cleaning and Dust Removal
- After sanding the primer, the car will be covered in dust.
- Use compressed air to blow off loose dust.
- Wipe down the entire car with a clean wax and grease remover.
- Crucially, use tack cloths – these are specially treated cloths that pick up the finest dust particles without leaving residue. Work gently from top to bottom.
Inspecting the Prepared Surface
- In good lighting, carefully inspect the entire car for any missed spots, scratches, or imperfections.
- Run your hand over the surface – it should feel perfectly smooth.
- Any flaws you see or feel now will be amplified by the new paint, so address them.
Materials and Tools Checklist
To ensure you have everything you need, here’s a checklist of essential items:
| Item | Purpose |
|---|---|
| Automotive Degreaser | Removing grease, oil, and contaminants. |
| Car Wash Soap & Buckets | Initial cleaning. |
| Microfiber Towels | Drying and cleaning without scratching. |
| Wax and Grease Remover | Final surface cleaning before painting. |
| Automotive Sandpaper | Removing old paint, smoothing filler, sanding primer. |
| Sanding Blocks/Sponges | Even pressure during sanding. |
| Orbital Sander (Optional) | For faster sanding of larger areas. |
| Wire Brush/Wheel | Rust removal. |
| Body Filler | Filling dents and imperfections. |
| Spreaders | Applying body filler. |
| Rust Converter/Inhibitor | Treating rust after removal. |
| Automotive Primer | Foundation for paint adhesion and smoothing. |
| Reducer & Hardener (Primer) | Mixing primer as per manufacturer’s instructions. |
| Spray Gun (HVLP Recommended) | Applying primer and paint. |
| Air Compressor | Powering spray guns and air tools. |
| Masking Tape for Cars | Protecting areas not to be painted. |
| Masking Paper/Plastic | Covering larger areas. |
| Tack Cloths | Final dust removal before painting. |
| Safety Gear (Mask, Gloves, Goggles) | Protection from dust, fumes, and chemicals. |
| Car Polishing Supplies | For post-paint finishing (not prep, but good to have ready). |
| Sandblasting Car Gear | For heavy rust or paint removal (often professional service). |
Frequently Asked Questions (FAQ)
Q1: How long does car paint preparation take?
A1: The time it takes to prepare a car for painting can vary significantly based on the car’s condition, the extent of repairs needed, and your experience level. It can range from a few days for a relatively clean car with minor issues to several weeks for a car with significant rust, dents, or previous poor repairs.
Q2: Do I need to use primer if I’m just touching up small scratches?
A2: For very minor surface scratches that haven’t gone through to the bare metal, you might be able to get away without primer, especially if you’re using touch-up paint. However, for any scratch that reaches the metal, or for deeper scratches that require filling, primer is essential for proper adhesion and corrosion protection.
Q3: What’s the difference between primer and sealer?
A3: Primer is a preparatory coating that enhances paint adhesion, fills minor imperfections, and provides corrosion resistance. A sealer is often applied over primer or existing paint to create a uniform color base and block stains or different colored paints from bleeding through the new topcoat.
Q4: Can I skip sanding the old paint if it’s in good condition?
A4: No, you should never skip sanding. Even if the old paint looks good, you need to scuff the surface to create a microscopic profile for the new primer and paint to adhere to. Without this scuff sanding, the new paint could peel or flake off later.
Q5: What is the best grit sandpaper to use for primer?
A5: For sanding primer to prepare for the base coat, grits ranging from 320 to 400 are commonly used. If you plan to wet sand, you might go up to 600 grit. The goal is a smooth, defect-free surface.
Q6: Is it okay to use household cleaners for car prep?
A6: It’s best to avoid household cleaners. They can contain waxes, silicones, or other chemicals that can interfere with paint adhesion. Always use automotive-specific cleaners, degreasers, and wax and grease removers.
By meticulously following these steps, you lay the groundwork for a professional-quality paint job. Remember, patience and attention to detail during the preparation phase are the most critical factors in achieving a stunning and durable finish. While car polishing comes after the paint is fully cured, the foundation for that shine is built during this intensive prep work.