
What is paper collage art? Paper collage art is a beautiful and accessible art form where you create pictures or designs by gluing pieces of paper onto a surface. Can I make it with just basic supplies? Yes, you absolutely can! Who is this guide for? This guide is for anyone who wants to dive into the fun world of DIY paper art, from absolute beginners to those looking for new collage techniques.
Creating art with paper might seem simple, but it offers endless possibilities for expression. It’s a fantastic way to recycle materials, explore textures, and build unique visuals. This guide will walk you through everything you need to know to start making your own paper collage art. We’ll cover the basics, share creative ideas, and help you discover the joy of creative paper crafts.
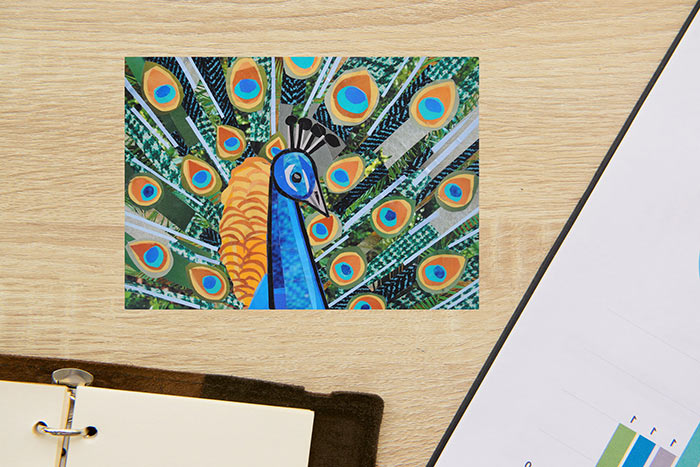
Image Source: megancoyle.com
Getting Started: Your Paper Collage Toolkit
Before you start cutting and pasting, let’s gather your supplies. The beauty of paper collage is its flexibility; you can start with very little.
Essential Materials
- Base Surface: This is what you’ll glue your paper pieces onto.
- Cardstock: Sturdy and comes in many colors and weights. Great for smaller pieces or framing.
- Cardboard: Recycled cereal boxes, shipping boxes – anything flat and firm works.
- Canvas Board: Provides a rigid and slightly textured surface, good if you want to paint over your collage later.
- Heavyweight Paper: Mixed media paper or watercolor paper (at least 140lb/300gsm) is ideal as it can handle glue and layers without buckling too much.
- Adhesive: The sticky stuff that holds your masterpiece together.
- PVA Glue (White Glue): The most common and versatile. Dilute it slightly with water for a smoother application.
- Glue Stick: Good for small, flat pieces. Less messy for kids. Look for acid-free options for longevity.
- Mod Podge: Acts as both glue and sealant. Comes in various finishes (matte, gloss). Excellent for layered paper art.
- Spray Adhesive: For covering large areas quickly, but use in a well-ventilated space.
- Cutting Tools: To shape your paper.
- Scissors: A good pair of sharp scissors is essential. Small embroidery scissors are great for intricate details.
- Craft Knife/X-Acto Knife: For precise cuts and paper cutting crafts. Always use with a cutting mat.
- Rotary Cutter: Good for straight lines, especially on larger pieces of paper.
- Paper Sources: The heart of your collage!
- Magazines and Newspapers: A treasure trove of images, text, and colors.
- Old Books: Beautiful textures and interesting fonts.
- Wrapping Paper: Adds patterns and vibrancy.
- Scrapbooking Paper: Acid-free and comes in countless designs.
- Printed Images: Photos, illustrations from online sources (ensure you have permission if for commercial use).
- Textured Papers: Tissue paper, handmade papers, rice paper, fabric scraps – these add depth and interest to textured paper art.
Optional (But Fun!) Supplies
- Tweezers: For picking up and placing small pieces.
- Brayer: To smooth down glued paper and remove air bubbles.
- Cutting Mat: Protects your work surface when using a craft knife.
- Bone Folder: For crisp folds and smoothing.
- Paintbrushes: For applying glue evenly.
- Palette Knife: For applying thicker adhesives or textured mediums.
Building Your First Paper Collage: Step-by-Step
Let’s get down to business! Here’s a simple process to follow for your first paper collage art.
Step 1: Choose Your Theme or Inspiration
What do you want to create?
* Abstract: Focus on colors, shapes, and textures.
* Figurative: Create recognizable objects, people, or scenes.
* Pattern-Based: Arrange repeating motifs or geometric shapes.
* Text-Focused: Use words, letters, or snippets of text.
Having an idea can guide your material selection, but don’t be afraid to let the materials inspire you as you go!
Step 2: Gather and Prepare Your Paper
Start collecting paper that fits your theme. Look for:
* Colors: What color palette do you want?
* Textures: Smooth, rough, shiny, matte?
* Images/Patterns: Are there specific elements you want to include?
* Words/Letters: Do you want to incorporate text?
Sort your papers by color, type, or image. This makes it easier to find what you need.
Step 3: Sketch or Plan (Optional but Helpful)
Lightly sketch a basic outline of your idea on your base surface with a pencil. This gives you a framework. For abstract collages, you might just mark out general areas for color or texture.
Step 4: Start Cutting and Arranging
This is where the magic begins!
* Cut or Tear: You can cut precisely with scissors or a craft knife, or tear edges for a softer, more organic look. Tearing paper can create lovely rough edges, contributing to textured paper art.
* Layering: Begin placing your paper pieces onto your base. Don’t glue them down yet! Experiment with different arrangements. Think about how shapes and colors interact. This is a crucial part of developing layered paper art.
* Composition: Consider balance, contrast, and focal points. Where do you want the viewer’s eye to go? How can you create depth using overlapping pieces?
Step 5: Gluing Down Your Pieces
Once you’re happy with an arrangement, start gluing.
* Work in Sections: Don’t try to glue everything at once. Glue a few pieces at a time.
* Apply Adhesive: Apply glue to the back of the paper piece or directly onto the base surface. A thin, even layer is best. If using PVA glue, a diluted mix applied with a brush or old credit card works well.
* Press Firmly: Gently press each piece onto the base. Use your fingers, a brayer, or a bone folder to smooth out any air bubbles and ensure good adhesion.
* Overlapping: For mixed media collage, overlapping pieces creates depth and visual interest. Make sure the edges of the underlying pieces are securely glued down before covering them.
Step 6: Building Depth with Layers
This is where layered paper art truly shines.
* Background First: Generally, start with your background elements and work forward.
* Vary Thickness: Use different types of paper. Thicker papers can sit on top of thinner ones, creating subtle dimension.
* Partial Adhesion: Sometimes, you might want to glue only the center of a paper piece, leaving the edges free to lift slightly. This adds a fantastic 3D effect.
Step 7: Refining and Adding Details
As your collage takes shape, you might want to:
* Add Small Pieces: Tiny scraps of paper can create fine details, like eyes on a face or highlights. This is similar to creating a paper mosaic art.
* Incorporate Other Materials: Think about adding small fabric scraps, threads, buttons, or even small found objects. This moves into assemblage art paper.
* Draw or Paint: You can draw or paint over your paper collage using markers, colored pencils, or acrylic paints to add details or unify the composition. This is a great way to incorporate mixed media collage.
Step 8: Sealing and Finishing (Optional)
Once your glue is completely dry:
* Seal: If you used Mod Podge, you can apply a final coat over the entire piece to seal and protect it. You can choose a matte or glossy finish.
* Frame: Your paper collage is ready to be framed or displayed!
Creative Tips to Elevate Your Paper Collages
Now that you know the basics, let’s explore some ways to make your paper collage art even more exciting.
Embracing Texture
Texture is key to making your collage visually appealing.
* Variety is Key: Don’t just use smooth magazine pages. Mix in corrugated cardboard, tissue paper, crinkled paper, or even sandpaper.
* Paper Cutting Crafts for Texture: Experiment with different ways of cutting. Zigzag scissors, deckle-edged paper, or even tearing with a ruler can create unique edges.
* Embossing: If you have an embossing tool, you can create raised patterns on thicker paper to add tactile interest.
* Layering Different Textures: Place a rough piece of paper next to a smooth one to create contrast.
Playing with Color and Value
- Color Palettes: Decide on a dominant color scheme. You can go monochromatic, complementary, or analogous.
- Contrast: Use light and dark paper pieces to create contrast and guide the viewer’s eye.
- Value: Think about the lightness or darkness of your papers. A range of values adds depth and form.
Incorporating Text
- Words as Design Elements: Cut out interesting words or letters from newspapers and magazines. Arrange them to form sentences, phrases, or just create abstract patterns with typography.
- Background Text: Use pages from old books or newspapers as a subtle background layer. The text can add a vintage feel or a layer of subtle detail.
Exploring Different Collage Techniques
Beyond the basic cut-and-paste, there are various collage techniques to try.
* Decoupage: Applying thin layers of paper with glue, often to cover an entire object or surface. Mod Podge is perfect for this.
* Paper Mosaic Art: Creating images or patterns by cutting or tearing small, uniform pieces of paper (like tiles) and arranging them closely together. This is a patient but rewarding technique.
* Assemblage Art Paper: This involves attaching 3D objects or elements made from paper to a surface. Think of building up layers with cardstock cutouts or folded paper elements.
* Gessoed Backgrounds: Apply a layer of gesso (a primer) to your base before collaging. This creates a uniform surface and can be painted or drawn on before adding paper.
* Wet Media Integration: After your collage is dry, you can add watercolor washes, acrylic paint, ink, or pastels to further develop the image. This is the heart of mixed media collage.
Theme Ideas to Spark Your Creativity
- Nature: Cut out leaves, flowers, sky, and earth tones.
- Portraits: Use magazine faces, cut out eyes, noses, and mouths to create new characters.
- Cityscapes: Look for architectural elements, windows, doors, and street signs.
- Dreamscapes: Combine surreal imagery, abstract shapes, and unusual color combinations.
- Personal History: Use old photos, ticket stubs, or snippets from letters.
Working with Specific Paper Types
Let’s dive deeper into some common and unique paper types used in collage.
Magazines and Newspapers
These are the most accessible and versatile.
* Pros: Vast array of colors, images, textures, and text. Free or very low cost.
* Cons: Can be thin and may wrinkle if too much glue is applied. Ink can sometimes bleed.
* Tips:
* Tear edges for a softer look.
* Use glossy magazine pages for reflective elements.
* Cut out specific elements with precision for detailed paper cutting crafts.
Handmade and Textured Papers
These add a unique tactile quality.
* Types: Rice paper, mulberry paper, tissue paper, corrugated cardboard, textured cardstock.
* Pros: Adds significant visual and tactile interest. Creates beautiful textured paper art.
* Cons: Can be more expensive. Some are delicate and require careful handling.
* Tips:
* Layer translucent papers like tissue or rice paper to create depth and color blending.
* Crinkle tissue paper before gluing for an interesting texture.
* Corrugated cardboard adds a strong linear texture.
Printed Images and Digital Downloads
The digital age offers endless possibilities.
* Pros: Access to any image you can find online. High-quality prints.
* Cons: Requires a printer. Make sure you are using images legally.
* Tips:
* Print on heavier paper stock (like matte photo paper or cardstock) for better durability.
* Experiment with different print finishes (glossy, matte, satin).
Fabric Scraps and Other Materials
Expanding beyond just paper.
* Types: Small pieces of fabric, lace, ribbon, yarn, buttons, beads.
* Pros: Adds significant dimension and texture, moving towards assemblage art paper.
* Cons: May require stronger adhesives. Can be trickier to glue flat.
* Tips:
* Use fabric glue or a strong PVA for fabric.
* Consider sewing small elements onto the paper.
* Braid or twist yarn to create textural lines.
Troubleshooting Common Collage Challenges
Even experienced artists encounter issues. Here’s how to tackle them.
| Problem | Cause | Solution |
|---|---|---|
| Buckling Paper | Too much liquid adhesive, thin paper base. | Use less glue, dilute PVA glue sparingly. Work on sturdy mixed media paper or cardstock. Gently press with a brayer. Ensure the surface is flat while drying. |
| Air Bubbles | Glue not applied evenly, paper not pressed down firmly. | Apply glue in thin, even layers. Press down firmly with a brayer or bone folder, working from the center outwards. |
| Peeling Edges | Insufficient glue along the edges, paper dried before gluing. | Ensure glue covers the entire back of the paper, especially the edges. If edges are already peeling, carefully lift and reapply glue. |
| Glue Showing Through | Glue applied too thickly, or a very thin paper was used. | Use less glue. If the paper is very thin, consider using a glue stick or applying glue to the base instead of the paper. |
| Ink Bleeding | Using water-based glues on certain inks or newsprint. | Test your papers first. Use a glue stick or spray adhesive for delicate papers. Seal with a spray fixative before collaging if concerned. |
| Colors Muted | Paper choices are too similar in value or saturation. | Introduce more contrast by adding darker or brighter papers. Layer papers of different opacities. |
Fostering a Creative Practice
Making paper collage art is a journey. Here are some ways to keep your creative spirit alive.
- Keep a Collage Journal: Dedicate a sketchbook or notebook to experiment with small collage ideas, color combinations, and new techniques. This is a low-pressure way to develop your creative paper crafts.
- Join a Challenge: Many online communities host collage challenges. These provide prompts and deadlines to encourage regular practice.
- Visit Galleries and Online Platforms: Look at the work of other collage artists for inspiration. See how they use collage techniques and mixed media collage.
- Don’t Fear Mistakes: Every piece, even the ones that don’t turn out as planned, is a learning opportunity. Embrace happy accidents.
- Experiment with Tools: Try different cutting tools, adhesives, and textured paper art elements. You might discover a new favorite.
- Collaborate: Work with a friend on a collage. You can exchange ideas or even work on the same piece.
Frequently Asked Questions About Paper Collage
Q1: What is the best type of glue for paper collage?
A1: For general use, a good quality white PVA glue (like Elmer’s or Aleene’s) is excellent. Diluting it slightly with water makes it easier to spread. Mod Podge is also a fantastic choice as it acts as both glue and sealant. For small, flat pieces, a strong glue stick can work well.
Q2: Can I glue paper onto fabric or other materials?
A2: Yes, absolutely! Paper collage is often combined with other materials in mixed media collage. You can glue paper onto canvas, wood, fabric, or even certain plastics, but you might need stronger adhesives like fabric glue or a heavy-duty craft adhesive.
Q3: How do I make my paper collage look more professional?
A3: Consider your composition carefully, pay attention to clean edges (unless you prefer a torn look), use a variety of textures and values, and ensure all pieces are securely glued down. A final sealant like Mod Podge can also give a polished finish. Experimenting with layered paper art and paper mosaic art techniques can also elevate your work.
Q4: Is paper collage messy?
A4: It can be, depending on the adhesives and techniques you use. Working with PVA glue and brushes can be a bit messy, but using glue sticks or spray adhesives can be cleaner. Always protect your workspace with newspaper or a drop cloth.
Q5: How do I preserve my paper collage?
A5: Ensure all glue is completely dry. For added protection and longevity, you can apply a sealant like Mod Podge over the entire surface. Framing your collage under glass or acrylic can also protect it from dust and damage. Using acid-free papers and adhesives is crucial for long-term preservation.
Q6: Can I combine drawing or painting with paper collage?
A6: Absolutely! This is what mixed media collage is all about. You can draw or paint on your base before collaging, or add drawings and paint details on top of the finished collage. This adds another layer of creative possibility to your DIY paper art.
Q7: What are some unique papers I can use for collage?
A7: Beyond magazines, try old maps, sheet music, calendars, paper napkins (with the designs carefully separated), tea bag wrappers (cleaned and dried), and even paper towels with interesting textures. These can add unique character to your textured paper art.
Embarking on your paper collage adventure is a delightful way to express yourself. Whether you’re creating intricate layered paper art, vibrant paper mosaic art, or expressive assemblage art paper pieces, the process is rewarding and accessible. Gather your supplies, let your imagination soar, and start creating! The world of creative paper crafts awaits you.