
Can you paint cabinet doors while they’re still on the cabinets? While it’s possible for touch-ups or very minor projects, the best way to hang cabinet doors for painting involves removing them from the cabinet frames. This allows for a much smoother, more even finish on all sides, preventing drips and ensuring thorough coverage. This guide will walk you through the entire process, from cabinet door removal to cabinet door installation after painting.
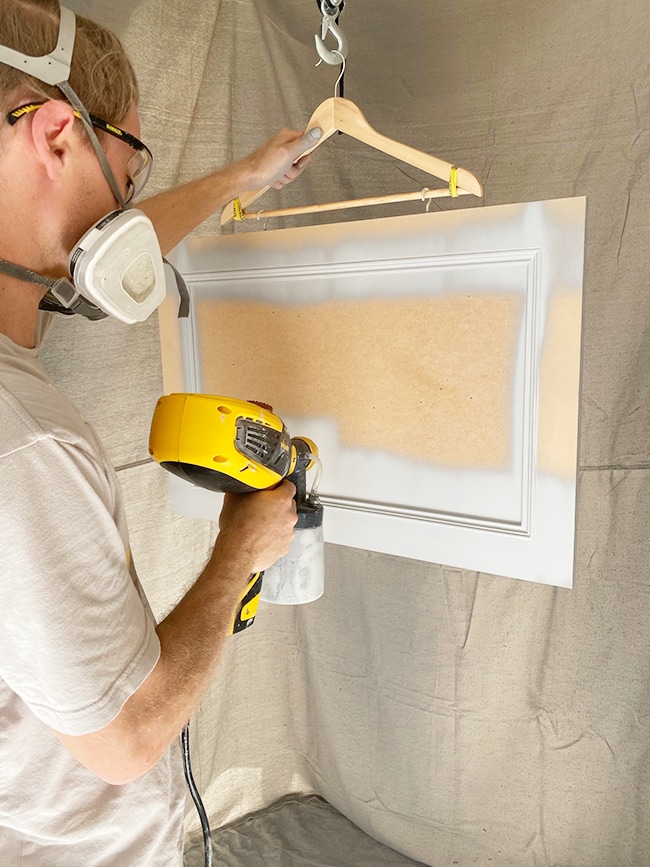
Image Source: www.jennasuedesign.com
Preparing for the Project: Gathering Your Tools and Supplies
Before you dive into cabinet door preparation, having all your tools and materials ready will make the job go much faster and smoother.
Essential Tools You’ll Need
- Screwdriver Set: A Phillips head and flathead screwdriver will be crucial for removing hinges.
- Drill/Driver with Screw Bits: This will speed up the removal and reinstallation of screws.
- Painter’s Tape: High-quality painter’s tape is essential for masking areas you don’t want to paint.
- Drop Cloths or Plastic Sheeting: To protect your floors and surrounding areas from paint drips and dust.
- Work Gloves: To keep your hands clean and protected.
- Safety Glasses: To protect your eyes from dust and paint.
- Dust Mask or Respirator: Especially important during sanding.
- Screwdriver or Wrench: For hinge adjustments if needed during reinstallation.
- Small Container or Zip-Top Bags: To store screws and hinge parts.
- Labels or Masking Tape: For marking doors and drawer fronts.
- Workbench or Sawhorses: A stable surface for painting.
- Clamps: To hold doors in place while painting if needed.
- Paint Brushes, Rollers, or Sprayer: Depending on your chosen cabinet door painting techniques.
- Paint Trays: For rollers.
- Stir Sticks: To mix paint thoroughly.
Important Materials for a Flawless Finish
- Cabinet Cleaner/Degreaser: To remove grease and grime.
- Sanding Sponges or Sandpaper: Various grits (e.g., 120-grit for initial sanding, 220-grit for smoothing).
- Tack Cloths: To remove fine dust after sanding.
- Wood Filler (if necessary): For filling any holes or imperfections.
- Primer: A good quality primer is key for adhesion and a uniform base.
- Paint: Cabinet-specific paint (alkyd enamel, latex enamel, or lacquer).
- Topcoat/Sealer (optional): For added durability.
Step 1: The Crucial Step – Cabinet Door Removal
The first and most important step in how to hang cabinet doors for painting is taking them off. This might seem intimidating, but it’s straightforward.
How to Detach Cabinet Doors Safely
- Prepare Your Workspace: Lay down drop cloths beneath the cabinets you’ll be working on.
- Mark Each Door: Before you start removing, use masking tape and a marker to label each door with its location (e.g., “Upper Left,” “Drawer Front 2”). This is vital for correct cabinet door installation later. You can even label the hinge side if the hinges are unique.
- Support the Door: Have a helper hold the door steady, or prop it up with a shim or a small block of wood. This prevents it from falling as you loosen the hinges.
- Locate the Hinges: Open the cabinet door to access the hinges.
- Remove the Screws: You’ll typically find screws attaching the hinge to the cabinet frame and screws attaching the hinge plate to the door.
- Option A: Hinge Attached to Door: Unscrew the screws that hold the hinge cup (the part that sits in the routed-out hole on the door) to the door itself.
- Option B: Hinge Attached to Frame: Unscrew the screws that hold the hinge plate to the cabinet frame.
- Tip: It’s often easier to remove the screws holding the hinge to the door first.
- Store Hardware Properly: As you remove each door, place the screws and hinges into a labeled zip-top bag that corresponds to the door. This ensures you don’t mix up hardware and makes reinstallation much simpler.
Handling Different Hinge Types
There are several types of cabinet hinges, but most modern ones are similar in their removal process.
- Concealed Hinges (European Style): These are common and usually have a clip-on mechanism or a few screws holding the hinge plate to the door. You’ll typically unscrew the plate from the cabinet frame.
- Surface-Mount Hinges: These are older styles where the hinge is directly attached to the surface of the door and frame. Remove the screws from both the door and the frame.
- Other Specialty Hinges: For less common types, observe how they are attached. The principle remains the same: identify the screws connecting the hinge to the door and the frame.
Step 2: The Foundation of a Great Finish – Cabinet Door Preparation
Proper cabinet door preparation is non-negotiable if you want a professional-looking paint job. This stage is all about creating a smooth, clean surface for the paint to adhere to.
Cleaning and Degreasing
Before any sanding or priming, you must thoroughly clean your cabinet doors. Kitchen cabinets, in particular, accumulate grease, grime, and food splatters.
- Choose Your Cleaner: Use a good degreasing cleaner. Options include:
- TSP (Trisodium Phosphate): A powerful cleaner, but wear gloves and ensure good ventilation.
- Commercial Cabinet Degreaser: Available at most hardware stores.
- Warm Water with Dish Soap: For less stubborn grime.
- Wipe Down Thoroughly: Use a clean cloth or sponge to wipe down both sides of each door and their edges. Pay attention to corners and recessed areas.
- Rinse and Dry: Rinse the doors with clean water to remove any cleaner residue. Dry them completely with a clean, lint-free cloth.
Filling Imperfections
Inspect each door for any dents, dings, or deep scratches.
- Apply Wood Filler: Use a small putty knife to apply wood filler to any imperfections.
- Overfill Slightly: It’s better to slightly overfill, as wood filler can shrink as it dries.
- Allow to Dry: Follow the manufacturer’s instructions for drying time.
The Importance of Cabinet Door Sanding
Cabinet door sanding is critical for creating a surface that paint can grip onto. Skipping this step is a common mistake that leads to peeling or chipping paint.
- Initial Sanding (120-grit): If your doors have a glossy finish, are heavily stained, or have minor imperfections, start with a 120-grit sandpaper or sanding sponge. This will scuff up the existing finish, creating “tooth” for the primer. Sand in the direction of the wood grain.
- Smoothing (220-grit): After filling any holes and sanding with 120-grit, go over the entire door again with a finer grit, such as 220-grit. This will create a smooth surface, removing any roughness from the initial sanding or wood filler.
- Sanding Edges and Details: Use sanding sponges or folded sandpaper to get into corners, edges, and any routed details on the doors.
- Dust Removal: This is a crucial part of sanding.
- Vacuum: Use a shop vacuum with a brush attachment to remove loose dust.
- Tack Cloth: Follow up with a tack cloth. These sticky cloths are designed to pick up the finest dust particles. Wipe down every surface of the door.
Step 3: Applying the Primer – The Unsung Hero
Primer is essential for a professional paint finish. It ensures even color, improves adhesion, and blocks stains.
Why Prime Cabinet Doors?
- Adhesion: Primer creates a bond between the old surface (or bare wood) and your new paint.
- Uniformity: It creates an even base color, so your topcoat will look the same everywhere, especially if you’re switching from a dark to a light color.
- Blocking Stains: If there are any tannins in the wood or residual stains, primer will block them from bleeding through your paint.
- Durability: A good primer can enhance the overall durability of your paint job.
Cabinet Door Priming Techniques
- Choose the Right Primer: For cabinets, a high-quality bonding primer or a stain-blocking primer is recommended. Water-based (latex) or oil-based primers can work, but oil-based often provides superior adhesion and stain blocking.
- Apply a Thin, Even Coat: Whether you use a brush, roller, or sprayer, apply a thin, even coat of primer. Avoid thick, gloppy applications, which can lead to drips and an uneven finish.
- Brush Strokes: If brushing, use long, even strokes in the direction of the wood grain.
- Roller Application: Use a high-density foam roller for a smooth finish. Roll in one direction.
- Sprayer Application: If you have a paint sprayer, this will give the smoothest finish. Ensure you maintain a consistent distance and overlap each pass.
- Drying Time: Allow the primer to dry completely according to the manufacturer’s instructions.
- Light Sanding After Priming: Once the primer is dry, lightly sand the doors with 220-grit or 320-grit sandpaper. This is often called “de-nibbing” and removes any small dust particles or imperfections that may have settled on the primer.
- Clean Again: Wipe down with a tack cloth after sanding the primer to remove all dust.
Step 4: Mastering Cabinet Door Painting Techniques
This is where your cabinet doors start to transform. Choosing the right cabinet door painting techniques will significantly impact the final look and feel.
Painting Methods: Brush, Roller, or Sprayer?
- Brush: Best for details and cutting in edges. For flat surfaces, use a high-quality synthetic brush for latex paints or a natural bristle brush for oil-based paints. Apply thin, even coats.
- Roller: A high-density foam roller is ideal for smooth surfaces like cabinet doors. It provides a more uniform finish than a brush on large areas and is faster. Roll in a “W” or “N” pattern and then smooth out the strokes in one direction.
- Sprayer: This method offers the smoothest, most factory-like finish. It’s the fastest for large projects but requires practice and proper setup (masking, ventilation).
Applying Paint to Cabinet Doors
- Paint the Edges First: If you’re using a brush or roller, paint all the edges of the doors first.
- Paint the Back: Apply your first coat of paint to the back of the doors. This is usually the less visible side, so it’s a good place to start and get a feel for the paint.
- Allow to Dry: Let the first coat dry completely according to the paint manufacturer’s instructions. Drying times can vary significantly based on humidity and temperature.
- Light Sanding Between Coats: After the first coat is dry, lightly sand the doors with a 320-grit sandpaper. This is a crucial step for a smooth finish, as it knocks down any minor imperfections or dust nibs.
- Clean with Tack Cloth: After sanding, use a tack cloth to remove all dust.
- Apply Second Coat: Apply the second coat of paint to the back of the doors.
- Flip and Paint the Front: Once the back is dry and lightly sanded, flip the doors and paint the front, starting with the edges and then the flat surfaces.
- Repeat for Additional Coats: Most cabinet paint jobs require at least two coats, sometimes three, for full coverage and durability. Always sand and clean between coats.
Tips for a Superior Finish
- Thin Coats are Key: Multiple thin coats are always better than one thick coat. They dry more evenly and reduce the risk of drips and runs.
- Work in a Dust-Free Environment: A clean space is vital. If painting outdoors, choose a still, overcast day. Indoors, ensure good ventilation but minimize dust circulation.
- Don’t Rush Drying Times: Be patient. Properly dried paint prevents smudging and allows for effective sanding between coats.
- Paint Cabinet Hardware Separately (Optional): While you’re at it, consider painting cabinet hardware. Remove knobs and pulls, clean them, and spray paint them with a metal-friendly primer and paint. This offers a cohesive new look.
Step 5: The Moment of Truth – Cabinet Door Installation
After all that prep and painting, it’s time to put everything back together. The best way to hang cabinet doors again is to reverse the removal process carefully.
Reattaching Doors to Cabinet Frames
- Ensure Doors are Fully Dry: Make absolutely sure your doors are completely dry and cured. Freshly painted doors can be prone to scratching or sticking. Check the paint manufacturer’s recommendations for curing times, which can be longer than drying times.
- Re-align Hinges: Pick up a labeled door and its corresponding bag of hardware.
- Attach Hinges to Door: If you removed the hinges from the doors, reattach them now using the original screws.
- Position the Door: Hold the door up to the cabinet frame, aligning the hinge plates with the pre-drilled holes.
- Screw in the Hinges: Start by loosely screwing in all the screws for the hinges. This allows for some adjustment.
- Adjust and Tighten:
- Alignment: Check that the door is level and the gaps around it are even. Most modern hinges have adjustment screws that allow you to move the door up/down, left/right, and in/out.
- Tighten Screws: Once the door is aligned, tighten all the screws securely.
Troubleshooting Common Issues
- Door Not Closing Properly: This usually means the hinges need adjustment. Consult your hinge manufacturer’s guide for specific adjustment screws.
- Gaps are Uneven: Again, hinge adjustment is the solution. Small turns can make a big difference.
- Paint Chipping at Hinge Area: This can happen if the paint wasn’t fully cured or if screws were overtightened during installation. Be gentle.
Frequently Asked Questions About Hanging Cabinet Doors for Painting
Q1: Can I paint cabinet doors without removing them?
A1: While it’s possible for minor touch-ups, it’s generally not recommended for a full repaint. Painting cabinet doors in place often leads to drips, uneven coverage, and difficulty painting the edges and sides properly. Removing them allows for a far superior finish.
Q2: How long should I wait before hanging painted cabinet doors?
A2: You should wait until the paint is thoroughly dry to the touch, but ideally, allow it to cure for at least 24-72 hours, or as recommended by the paint manufacturer. Curing is when the paint hardens completely. Hanging them too soon can lead to scuff marks or the paint sticking to the hinges.
Q3: What is the best type of paint for cabinets?
A3: High-quality enamel paints are best for cabinets. Options include alkyd (oil-based) enamels for durability and a hard finish, or water-based (latex) enamels with a satin or semi-gloss finish. Specialty cabinet paints are also available and often offer excellent results.
Q4: Do I need to sand between every coat of paint?
A4: Yes, it’s highly recommended to do a light sanding (with 220-320 grit sandpaper) between coats of primer and paint. This “de-nibbing” removes any dust nibs or imperfections, creating a smoother surface for the next coat, leading to a more professional and durable finish.
Q5: What’s the easiest way to keep track of which door goes where?
A5: The easiest way is to label each door with masking tape and a marker as soon as you remove it. Write down its position (e.g., “Upper Left,” “Drawer 3”). You can also label the corresponding hinge area on the cabinet frame if needed, or group the hardware bags by door number.
By following these detailed steps, you can confidently tackle the project of painting your cabinet doors. The effort you put into cabinet door removal, thorough cabinet door preparation, careful cabinet door sanding, proper cabinet door priming, skilled cabinet door painting techniques, and precise cabinet door installation will pay off with beautifully transformed cabinets.