
Can you frame a canvas painting yourself? Yes, you absolutely can frame a canvas painting yourself! This guide will walk you through everything you need to know to achieve professional-looking results, whether you’re working with a stretched canvas or a flat piece of art. We’ll explore various canvas framing and art framing methods, from the satisfying DIY canvas framing projects to more advanced techniques like creating a gallery wrap canvas or achieving the sleek look of a floating canvas frame. We’ll also cover essential aspects like stretching canvas and mounting artwork securely.
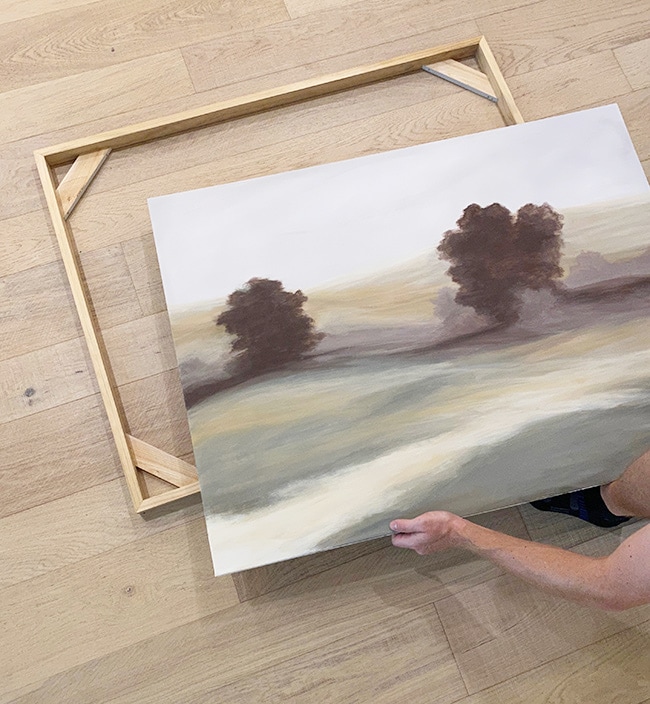
Image Source: www.jennasuedesign.com
Why Frame Your Canvas Art?
Framing a canvas art piece is more than just adding a border; it’s about preservation, presentation, and enhancing the overall aesthetic of your artwork. A well-chosen frame can complement the colors, textures, and mood of the painting, making it a true focal point in any room. Beyond aesthetics, framing provides a protective barrier against dust, UV rays, and accidental damage, ensuring your art remains vibrant for years to come. For artists, proper framing is crucial for presenting their work professionally, whether for sale, exhibition, or personal enjoyment.
Key Considerations Before You Frame
Before diving into the framing process, consider these important points:
- Artwork Type: Is your canvas already stretched over stretcher bars, or is it a flat piece of fabric you intend to stretch? This will dictate the framing approach.
- Desired Look: Do you want a traditional, ornate frame, a modern minimalist look, or something in between? The style of the frame should complement the artwork and your home decor.
- Budget: Custom framing can be expensive. DIY canvas framing can save money, but quality materials are still important.
- Size and Weight: Larger or heavier pieces may require more robust framing and stronger hanging hardware.
- Archival Quality: For valuable or sentimental pieces, consider using acid-free materials to protect the artwork from long-term degradation.
Popular Canvas Framing Methods
There are several popular ways to frame a canvas, each offering a distinct look and feel.
1. Traditional Framing with a Mat
While less common for fully stretched canvases, traditional framing with a mat is ideal for unframed canvas panels or artwork on canvas that hasn’t been stretched.
How It Works
The artwork is mounted onto a backing board. A mat board, with a window cut to reveal the artwork, is placed over it. The mat and artwork are then enclosed behind glass or acrylic in a traditional frame.
Pros
- Adds a layer of professionalism and a classic gallery look.
- Protects the artwork from touching the glass.
- Offers a wide variety of mat colors to enhance the artwork.
Cons
- Can obscure a portion of the canvas if not sized correctly.
- Adds bulk and weight to the framed piece.
- Requires more materials and precise cutting.
2. Stretched Canvas Framing: The Gallery Wrap
This is a very popular method for contemporary art.
How It Works
The canvas is stretched tightly over wooden canvas stretcher bars, and the excess fabric is wrapped around the sides and stapled or tacked to the back. This creates a clean, finished look without the need for a traditional frame. Often, the edges of the gallery wrap canvas are painted to match or complement the artwork.
Pros
- Modern and minimalist aesthetic.
- No glass needed, reducing glare and potential breakage.
- Lightweight and easy to hang.
- Allows the artwork to “float” on the wall.
Cons
- Requires precise stretching for a taut, professional finish.
- Edges are exposed, so they need to be finished neatly.
3. Floating Canvas Frames
This is a sophisticated way to present a stretched canvas.
How It Works
A floating canvas frame is essentially a shadow box-style frame designed specifically for stretched canvases. The canvas is mounted inside the frame with a small gap between the artwork and the frame’s inner edge, creating a “floating” effect. The canvas is typically attached to a backing board, which is then secured within the frame.
Pros
- Elegant and contemporary appearance.
- Highlights the artwork without the frame overpowering it.
- Protects the edges of the canvas.
- Offers a premium look.
Cons
- Can be more expensive than other framing options.
- Requires careful measurement and installation.
4. Simple Wood or Metal Frames (with or without a mat)
These are versatile and widely available options.
How It Works
For stretched canvases, these frames are often designed to sit behind the canvas, with the front edge of the frame visible around the artwork. For unframed canvases, they function like traditional frames with a mat and glass.
Pros
- Wide variety of styles, colors, and finishes.
- Readily available in standard sizes.
- Can be a cost-effective option.
Cons
- May not offer the same sleek look as a floating frame for stretched canvases.
- Glass can introduce glare.
Step-by-Step Guide: DIY Canvas Framing
Let’s get hands-on with DIY canvas framing. This guide focuses on framing a pre-stretched canvas using a floating canvas frame, a popular and achievable DIY project.
Materials You’ll Need:
- Your stretched canvas
- Floating canvas frame kit (ensure it’s the correct size for your canvas)
- Screwdriver (Phillips head is common)
- Measuring tape
- Pencil
- Optional: Wood glue, small clamps (for reinforcement)
Step 1: Prepare Your Canvas
Ensure your canvas is clean and free from dust. If your canvas isn’t already stretched, you’ll need to do that first.
How to Stretch Canvas (A Brief Overview)
- Materials: Canvas, canvas stretcher bars (sized appropriately), staple gun, fine-point staples, pliers, and a canvas stretching tool or putty knife.
- Process:
- Lay your canvas face down on a clean, flat surface.
- Place the stretcher bars in a rectangle on top of the canvas. If using interlocking bars, assemble them.
- Center your canvas over the stretcher bars.
- Start by pulling the canvas taut over one side of a stretcher bar and stapling it.
- Move to the opposite side, pull the canvas firmly (use a stretching tool for extra tension), and staple.
- Repeat for the remaining sides, working from the center outwards, creating even tension.
- For corners, fold the canvas neatly, ensuring a taut finish, and staple securely. Trim excess fabric if necessary.
Step 2: Assemble the Floating Frame
Floating frame kits usually come with four frame pieces and mounting hardware.
- Read the Instructions: Each kit can vary slightly, so always refer to the manufacturer’s instructions.
- Connect Frame Pieces: Typically, you’ll join the four frame pieces at the corners using screws provided in the kit. Ensure the rabbet (the groove where the canvas will sit) is facing inward.
Step 3: Mount Your Canvas
This is where the “floating” aspect comes into play.
- Positioning: Place your stretched canvas face down on a clean surface. Carefully position the assembled floating frame face down onto the back of the canvas. The frame should surround the canvas with a consistent gap on all sides.
- Securing the Canvas: The frame kit will include brackets or small metal supports. These are usually screwed into the back of the stretcher bars and then into the floating frame itself.
- Place Brackets: Distribute the brackets evenly around the canvas. The idea is to hold the canvas in place within the frame.
- Mark Placement: Lightly mark the position for each bracket on the back of the stretcher bars.
- Screw Brackets: Carefully screw the brackets into the stretcher bars.
- Attach to Frame: Align the brackets with the floating frame and screw them into the frame. Make sure the screws are not too long that they pierce through to the front of the frame.
Step 4: Final Touches
- Check Stability: Gently lift the framed canvas to ensure it’s secure and doesn’t wobble.
- Clean: Wipe away any fingerprints or dust from the frame and canvas.
Table: Floating Frame Assembly Components
| Component | Description | Purpose |
|---|---|---|
| Frame Pieces | Four lengths of molding forming the outer border. | To create the outer visual structure. |
| Mounting Brackets | Small metal L-shaped or flat brackets. | To secure the canvas within the frame. |
| Small Screws | Short screws for attaching brackets to frame and stretcher bars. | To connect frame components and attach brackets. |
| Frame Assembly Screws | Slightly longer screws for joining frame corners. | To create a sturdy frame structure. |
Alternative Art Framing Methods: Mounting Artwork
Sometimes, you might have a piece of artwork on canvas that isn’t stretched, or you might want to create a unique presentation. Mounting artwork is key here.
1. Mounting on Foam Core or Gatorboard
This is a great way to add rigidity to a flat canvas.
How It Works
The canvas is adhered to a rigid board like foam core or gatorboard. This mounted piece can then be framed using traditional methods or displayed as is.
Materials:
- Your canvas artwork
- Foam core or gatorboard (acid-free recommended for longevity)
- Spray adhesive (acid-free, permanent) or a roller adhesive applicator
- Brayer or rolling pin
- Craft knife and cutting mat
- Metal ruler
Process:
- Cut the Board: Cut the foam core or gatorboard to the exact size of your canvas using a sharp craft knife and metal ruler.
- Apply Adhesive: Lay the canvas face down on a clean surface. Spray the adhesive evenly onto the board, or use a roller applicator. Work in a well-ventilated area.
- Adhere Canvas: Carefully position the canvas onto the adhesive-covered board, ensuring it’s perfectly aligned.
- Smooth Out Bubbles: Use a brayer or rolling pin to firmly smooth out any air bubbles or wrinkles, working from the center outwards.
- Trim Edges: Trim any excess canvas or board if necessary.
- Frame: Once dry, you can frame this mounted piece using a traditional frame, potentially with a mat.
2. Mounting Directly to a Stretched Canvas Frame (Without a Gap)
Some frames are designed to hold the canvas flush against the back.
How It Works
The stretched canvas is secured directly to the back of a frame (often a deep shadow box frame) without a gap. This provides a very direct and impactful display.
Process:
- This is similar to the floating frame process, but instead of using brackets to create a gap, you’ll often attach the canvas directly to the rear frame support or backer board using staples or small screws.
Choosing the Right Frame for Your Canvas
The frame is the “clothing” for your artwork. Selecting the right one can elevate the entire piece.
Frame Materials:
- Wood: Offers a classic, warm feel. Available in various species, finishes, and profiles (ornate, simple, rustic).
- Metal: Provides a modern, sleek look. Aluminum and steel frames are durable and often minimalist.
- Polystyrene/Composite: More affordable alternatives to wood and metal, often mimicking their appearance. Can be lightweight and durable.
Frame Styles:
- Ornate: Intricate carvings and detailed profiles. Best for traditional or classical artwork.
- Simple/Modern: Clean lines, flat profiles. Ideal for contemporary art, photography, and minimalist decor.
- Rustic: Distressed wood, natural finishes. Suits landscapes, country art, or bohemian styles.
- Shadow Box: Deep frames that create a recess, perfect for floating canvas frame effects or displaying textured art.
Matting Considerations:
- Color: Choose a neutral color (white, off-white, grey) that complements the artwork without competing.
- Width: The width of the mat can significantly impact the final look. Wider mats can make a piece feel more formal and substantial.
- Opening: Ensure the mat opening is cut precisely to reveal the artwork without covering any crucial details. For a gallery wrap canvas, matting is generally not used.
Hanging Your Framed Canvas Art
Once your canvas is framed, the next step is hanging canvas art securely and attractively.
Hardware Options:
- Picture Wire: A strong wire attached to D-rings or eye screws on the back of the frame. Use a picture hook or a wall anchor appropriate for your wall type and the weight of the artwork.
- Sawtooth Hangers: Pre-attached to many lighter frames. They rest directly on a nail or screw. Ensure they are centered.
- D-Rings and Wire: The most common and secure method for medium to heavy frames. Attach D-rings to the sides of the frame (or stretcher bars for a gallery wrap) and then loop picture wire through them.
- French Cleats: An excellent, secure system for heavier items. Two interlocking pieces of wood or metal, one attached to the wall, the other to the artwork. They distribute weight evenly.
Hanging Tips:
- Measure Carefully: Determine the desired height for your artwork. A common guideline is to hang the center of the artwork at eye level (around 57-60 inches from the floor).
- Use a Level: Ensure your artwork hangs straight.
- Consider Weight: Use appropriate wall anchors (e.g., drywall anchors, toggle bolts) if you’re not screwing into a stud.
- Multiple Pieces: If hanging a gallery wall, plan the layout beforehand using templates or by arranging them on the floor.
When to Seek Professional Framing
While DIY canvas framing is rewarding, there are times when professional art framing methods are the best choice:
- Valuable or Sentimental Art: Professionals have the expertise and archival materials to ensure maximum preservation.
- Complex Projects: Multi-panel artworks, irregular shapes, or pieces requiring special mounting techniques.
- Delicate Materials: Watercolors, pastels, or artwork on paper often require specialized glazing and mounting.
- Lack of Time or Tools: If you don’t have the time, space, or necessary tools for a precise finish.
Frequently Asked Questions (FAQ)
Q1: Do I need glass for a stretched canvas?
A1: Generally, no. Stretched canvases, especially gallery wrap canvas styles, are typically displayed without glass. The frame itself offers protection, and omitting glass reduces glare and the risk of breakage.
Q2: Can I frame an unframed canvas using a floating frame?
A2: Yes, but it requires mounting artwork first. You would need to stretch the canvas onto canvas stretcher bars or mount it to a rigid board before placing it into a floating frame.
Q3: What is the best way to clean framed canvas art?
A3: For stretched canvases without glass, gently dust with a soft, dry brush or a microfiber cloth. For framed art with glass, use a glass cleaner on the glass only, and a slightly damp cloth on the frame, being careful not to let moisture seep behind the artwork.
Q4: How do I measure for a floating canvas frame?
A4: Measure the exact width and height of your stretched canvas. Then, choose a floating frame kit that corresponds to these dimensions. The frame is designed to fit around the canvas, leaving a visible gap.
Q5: What’s the difference between a stretcher bar and a canvas frame?
A5: Canvas stretcher bars are the wooden supports over which the canvas is stretched. A canvas frame (like a floating frame) is an additional decorative border that goes around the stretched canvas, creating a more finished look.
Q6: Can I repaint the edges of my canvas for a gallery wrap look?
A6: Absolutely! Repainting the edges of your gallery wrap canvas is a common practice to create a cohesive look and hide the staples. Ensure the paint you use is compatible with acrylic or oil paints.
Q7: How do I know if my frame is archival quality?
A7: Archival quality framing typically involves using acid-free mats, backing boards, and adhesives. If you’re unsure, consult with a professional framer. For DIY projects, look for materials specifically labeled as “acid-free” or “archival.”
By following these guides and tips, you can confidently tackle your canvas framing projects, turning your artwork into beautifully presented pieces that you’ll be proud to display. Whether you opt for a simple DIY approach or a more elaborate custom framing, the key is to choose a method that respects and enhances your artwork.