
Can you curve Word Art in Google Slides? Yes, you absolutely can curve Word Art (or more accurately, text within shapes) in Google Slides to create eye-catching designs and add a unique flair to your presentations. This guide will walk you through the process, revealing how to bend, warp, and shape your text for maximum creative impact. Whether you’re aiming for arched text, a circular arrangement, or simply want to add subtle curves, these Google Slides tips will help you achieve polished results. We’ll explore various text effects and formatting options to elevate your presentations with custom text.
Google Slides is a powerful presentation tool, but sometimes the standard text formatting options feel a bit… flat. You might want to create a logo, a decorative header, or simply make a key phrase stand out. This is where the magic of shaping your text comes in. By learning how to curve text, you unlock a whole new dimension of creative possibilities, transforming plain words into engaging visual elements. Forget boring blocks of text; it’s time to bend, arc, and warp your way to more dynamic presentations!
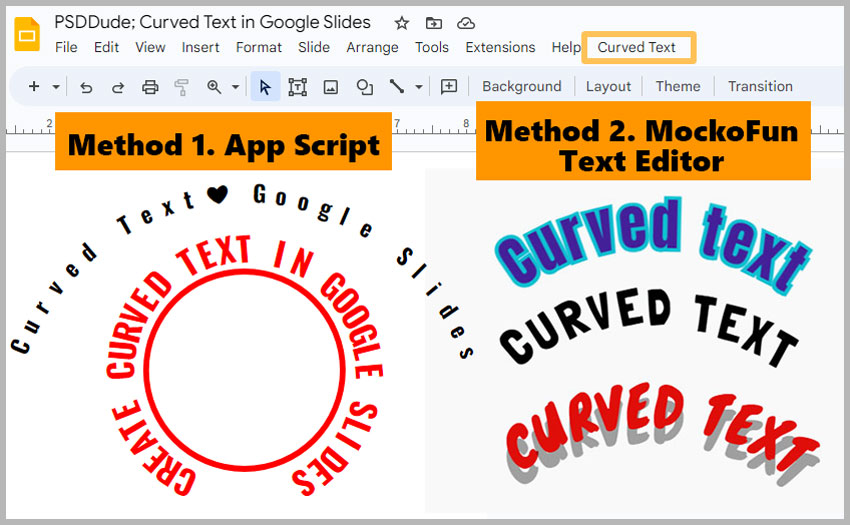
Image Source: www.psd-dude.com
Beyond Basic Text: Embracing Creative Text Effects
While Google Slides offers a robust set of standard text formatting tools – like changing fonts, sizes, and colors – it also provides pathways to more dynamic text treatments. These text effects are crucial for making your slides visually appealing and memorable. The ability to manipulate text, making it follow a curve or shape, is a particularly sought-after creative text effect. This goes beyond simple bolding or italics; it’s about fundamentally altering the visual presentation of your words.
What is Shape Text in Google Slides?
In Google Slides, “Shape Text” refers to the ability to place and manipulate text within a designated shape object. You can insert various shapes – circles, stars, banners, etc. – and then type directly inside them. The real power comes when you can then make that text follow the contours of the shape. This allows for arched text that wraps around a circle or bend text that follows a wavy line, all within the familiar Google Slides interface.
Why Curve Your Text?
Curving text can serve several purposes in your presentations:
- Visual Appeal: Curved text is inherently more dynamic and engaging than standard horizontal text. It breaks the monotony and draws the viewer’s eye.
- Branding: For logos, slogans, or company names, curved text can create a distinctive and memorable brand identity within your slides.
- Emphasis: Highlighting a key phrase or quote with a unique text treatment can make it more impactful.
- Layout and Design: Curved text can fit into specific design layouts, filling spaces more organically or creating interesting visual flow.
- Playfulness and Creativity: Sometimes, you just want to have fun and inject a bit of personality into your slides!
Fathoming Text Manipulation: The Core Techniques
Google Slides doesn’t have a direct “Word Art” feature like older Microsoft Word versions. Instead, you achieve similar effects using the built-in shape tools and text boxes. The primary method involves placing text inside a shape and then leveraging the shape’s properties. Let’s break down the most effective techniques for creating curved text in Google Slides.
Method 1: Using the “Curved Text” Functionality Within Shapes
This is the most straightforward way to achieve arched text or a circular text effect.
Step 1: Insert a Shape
- Go to Insert > Shape.
- Choose a shape that suits your desired text curve. A circle, oval, or even a freeform shape works well. For a classic circular text effect, a circle is ideal.
- Click and drag on your slide to draw the shape.
Step 2: Add Text to the Shape
- Double-click inside the shape you just inserted.
- A blinking cursor will appear, indicating you can now type your text.
- Enter the text you wish to curve. Keep in mind that shorter text often works best within smaller shapes, or you might need a larger shape for longer phrases.
Step 3: Apply the Curve Effect
This is where the magic happens, and it’s tied directly to the shape.
- Select the shape containing your text. Make sure the shape itself is selected, not just the text cursor within it. You’ll see a blue border around the shape when it’s selected.
- Go to the Format options panel. You can usually access this by right-clicking the shape and selecting “Format options” or by going to Format > Format options.
- In the “Format options” sidebar that appears on the right, expand the Text formatting section.
- Look for the “Text casing” or “Text options” dropdowns. You won’t see an explicit “Curve Text” button. Instead, the shaping is inherent to how text interacts with certain shapes.
Crucial Insight: Google Slides’ ability to “curve” text is less about a direct “bend text” command and more about placing text within a shape that influences its layout. For instance, text typed directly into a circle will naturally try to follow its curve to some extent, especially if the text box is large enough.
Refining the Curve:
- Shape Size: The size of the shape significantly impacts how the text curves. A larger circle will create a more gentle arc.
- Text Box within Shape: Sometimes, you might need to insert a separate text box within the shape and then resize/reposition that text box to fit the curve. This offers more control.
Let’s clarify: Google Slides doesn’t have a dedicated tool that lets you draw a line and then type along it, or a button that says “Warp Text.” The “curved text” effect is primarily achieved by leveraging the properties of shapes when text is placed inside them, or by using more advanced techniques involving combining shapes and text boxes.
Method 2: Combining Shapes for More Complex Curves
For more intricate curved text effects, you can combine multiple shapes or use specific shape types.
Creating Arched Text Over an Image or Object
- Insert the image or object you want your text to arc over.
- Insert a shape, like an arc or a semi-circle, that complements your design. You can find these under Insert > Shape > Shapes. Look for options like “Arc” or “Chord.”
- Adjust the shape to the desired curvature.
- Insert a text box (Insert > Text box).
- Type your text into the text box.
- Format the text (font, size, color) as needed.
- Carefully position the text box so it sits “on top” of the arc shape.
- Select both the text box and the arc shape (hold Shift and click on each).
- Go to Arrange > Group.
Now, your text is visually curved above the arc shape, creating the illusion of arched text. You can treat this grouped object as a single unit.
Text Following a Custom Path (Advanced)
This requires a bit more creativity and is not a direct Google Slides feature but rather a visual workaround.
- Draw a path using the Line tool with the “Scribble” or “Curve” options (Insert > Line > Scribble or Curve). This creates a freeform line.
- Make the line thick enough to be visible if you want it to act as a guide.
- Insert a text box. Type your text.
- Format the text.
- Manually position the text box and adjust its size and spacing so that the letters appear to follow the drawn line. This is tedious but effective for unique curves. You’ll need to carefully adjust font size, letter spacing, and the position of the text box.
- Once satisfied, you can either leave the line visible as part of the design or select the line and change its color to “transparent” (though this usually removes it entirely) or match it to the background. Alternatively, you can group the text box with a shape that follows the curve (like a very thin, elongated rectangle) and then make that shape transparent, keeping the text attached to the invisible path.
Method 3: Utilizing Existing Icons or Graphics with Text
Many pre-made graphic elements or icons in Google Slides already incorporate curved text.
- Go to Insert > Image and search Google Images or your Drive. Look for elements that might already have the curved text you need.
- Alternatively, explore Google Slides Add-ons (found under Extensions > Add-ons > Get add-ons). Some add-ons offer more advanced text manipulation tools, including features for bending and warping text that aren’t natively available. Search for terms like “Word Art,” “Text Effects,” or “Graphics.”
Enhancing Your Curved Text: Formatting and Styling
Once you have your text following a curve, you’ll want to make it look its best. This involves standard text formatting alongside shape formatting.
Text Formatting for Curved Text
When your text is inside a shape or part of a grouped element:
- Font Choice: Sans-serif fonts often work well for curves as they are cleaner. However, a stylized serif font can also work for a more decorative look. Experiment!
- Font Size: Adjust the font size to fit the curve of your shape. You might need smaller text for tighter curves and larger text for gentler arcs.
- Color: Choose text colors that contrast well with your background and the shape.
- Alignment: Within a shape, text alignment (left, center, right) can subtly change how it sits along the curve. Centering is common for symmetrical curves like circles.
- Line Spacing (Leading): While not directly adjustable for curved text in the same way as straight text, the overall spacing can be influenced by the font size and the dimensions of the shape.
- Letter Spacing (Kerning): This is crucial. If your text looks too spread out or too cramped along the curve, you may need to adjust the font size or, if possible through a workaround, the letter spacing.
Shape Formatting for Curved Text Containers
The shape containing your text also has its own formatting options:
- Fill Color: You can make the shape’s fill transparent if you only want the text to be visible, or fill it with a color or gradient.
- Border Color & Weight: Add or remove borders, and change their color and thickness. A border can help define the shape of your text.
- Shadows & Reflections: Adding a subtle shadow or reflection can give your curved text depth and make it pop. Access these under Format options > Adjustments.
Advanced Google Slides Tips for Creative Text
Mastering these techniques can significantly enhance your presentation’s visual appeal.
Tip 1: Using Transparent Shapes as Text Guides
As hinted earlier, you can use invisible shapes to guide your text.
- Draw a shape (like an arc) that represents the curve you want.
- Make the shape’s fill transparent and its border transparent (or a very light color if you want a subtle guide).
- Insert a text box. Type your text.
- Format the text.
- Carefully arrange the text box to follow the invisible curve of the transparent shape. You might need multiple text boxes for longer phrases or complex curves.
- Group the text box(es) with the transparent shape. This keeps them aligned.
This method allows you to create custom text paths that aren’t limited to predefined shapes.
Tip 2: Layering Text Boxes for Circular Text
For a complete circle of text:
- Insert a circle shape. Make it large enough to contain your text comfortably.
- Make the circle’s fill and border transparent. This will serve as your invisible guide.
- Insert a text box. Type a portion of your text (e.g., one or two words).
- Format the text (font, size).
- Rotate the text box so the text sits along the top arc of the invisible circle. You can rotate objects by clicking and dragging the circular handle that appears when the object is selected.
- Duplicate this text box (Ctrl+D or Cmd+D).
- Rotate the duplicated text box to the opposite side of the circle, placing it along the bottom arc.
- Continue duplicating and rotating text boxes, adjusting the text within each, to fill the entire circle. You might need to slightly adjust the angle of rotation for each new text box to ensure even spacing.
This is how many professional-looking circular text elements are created. It’s a manual process but offers precise control over the shape text layout.
Tip 3: Leveraging Add-ons for More Power
While native Google Slides features are improving, dedicated add-ons can offer more sophisticated text effects. Search the Google Workspace Marketplace for add-ons related to graphics, design, or text manipulation. Some might provide features for more advanced warp text or bend text functionalities that go beyond simple shapes. Always check reviews and permissions before installing.
Examples of Curved Text in Action
Let’s visualize how these techniques can be applied:
| Use Case | Technique | Result |
|---|---|---|
| Company Logo | Circle shape + text inside + grouping | Text curved around a central icon or image. |
| Event Title | Arc shape + text box on top + grouping | A catchy title arched over a key visual. |
| Quote Presentation | Custom line + text box arranged along it | A quote following a unique, flowing path. |
| Section Header | Banner shape + text inside | Text conforming to the curve of a decorative banner. |
| Call to Action | Circle/Ring shape + repeating text | “Click Here to Learn More” repeated around a button or image. |
| Decorative Element | Freeform shape + text inside | Text that follows a unique, artistic curve for visual flair. |
Troubleshooting Common Issues
- Text Distortion: If your text looks overly stretched or compressed, adjust the font size, the size of the containing shape, or the spacing between letters.
- Text Not Following Curve: Ensure the text box is properly contained within or grouped with the shape you intend it to follow. For circle text, make sure the text box is rotated correctly.
- Text Overlapping: For circular text, ensure your text boxes are spaced correctly. You might need to adjust the text within each box or use shorter phrases.
- Can’t Select Shape: Sometimes, text boxes can “take over” the selection. Click on the edge of the shape to ensure you’re selecting the shape itself, not just the text.
Frequently Asked Questions (FAQ)
Q1: Does Google Slides have a dedicated “Word Art” feature like Microsoft Word?
A1: No, Google Slides does not have a direct “Word Art” button. However, you can achieve similar effects using the built-in shape tools and text boxes to create curved text, arched text, and other creative text effects.
Q2: How do I make text follow a curve in Google Slides?
A2: The most common method is to insert a shape (like a circle or arc), add text directly into it, and then format the text and shape. For more complex curves, you might need to group text boxes with custom-drawn lines or use multiple text boxes arranged around an invisible shape.
Q3: Can I bend text into any shape I want?
A3: Google Slides offers limited direct control over bending text into arbitrary shapes. The primary way is by placing text within existing shapes or by manually arranging text boxes to follow a drawn path. You can achieve basic curves, arcs, and circular text effectively. For more advanced warp text capabilities, you might need to explore third-party add-ons.
Q4: How do I make text go in a circle in Google Slides?
A4: To make text go in a circle, insert a circle shape, make it transparent, and then insert multiple text boxes. Type parts of your text into each box, format them, and then rotate each text box to align with the circumference of the invisible circle. Grouping the text boxes can help maintain their arrangement.
Q5: Can I curve text along a custom path?
A5: Yes, though it’s a manual process. Draw a path using the line tool (scribble or curve). Then, carefully position and resize text boxes so the text appears to follow that path. You can group the text boxes with an invisible shape that follows the path for better management.
Conclusion: Unleash Your Textual Creativity
By mastering these techniques, you can move beyond static text and inject dynamism and visual interest into your Google Slides presentations. The ability to curve text, create arched text, and apply other creative text effects empowers you to design more engaging slides, craft distinctive logos, and make your key messages truly stand out. Remember, practice makes perfect, so experiment with different shapes, fonts, and arrangements to discover the full potential of shape text and custom text in Google Slides. These Google Slides tips will help you transform your presentations from ordinary to extraordinary.