
Want to know how to create texture in acrylic painting? You can achieve it by using various techniques like impasto painting, palette knife techniques, textural mediums, acrylic gel mediums, layering paint, brushstroke techniques, sgraffito in acrylics, and adding body to acrylics to create achieving visual texture. This guide will walk you through the many ways you can add depth and interest to your acrylic artwork.
Creating texture in acrylic painting can transform a flat surface into a visually dynamic and tactile experience. Texture refers to the surface quality of an artwork, how it feels or how it appears to feel. In acrylics, this can range from subtle variations in smoothness to pronounced, sculptural forms. It’s a powerful tool for artists to convey emotion, create depth, and engage the viewer on multiple sensory levels. This comprehensive guide explores various methods for achieving rich texture in your acrylic paintings.
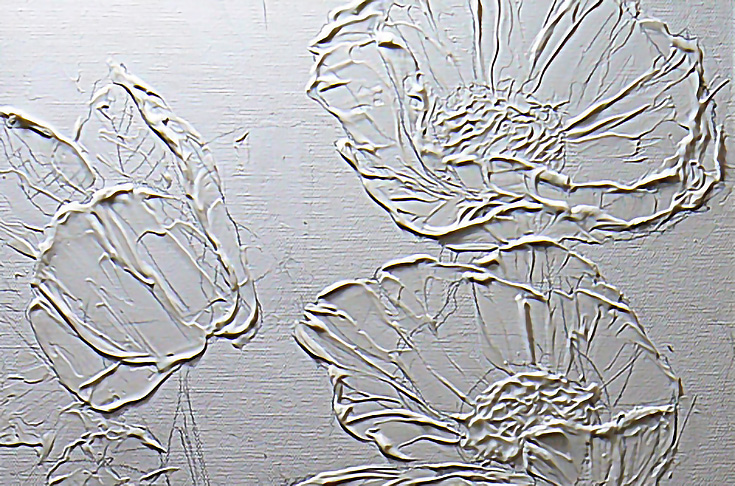
Image Source: emptyeasel.com
Building Physical Texture: Materials and Methods
Acrylics are versatile, and their inherent properties can be manipulated to create significant textural effects. This section delves into the materials and techniques that add physical substance to your paintings.
Impasto Painting: Building Up the Surface
Impasto painting is a technique where paint is applied thickly, so brushstrokes or palette knife marks are visible. The paint itself stands out from the surface, creating a relief-like effect.
- How it Works: The thick application of paint captures light and shadow, giving the surface a tangible quality. The direction and energy of the strokes become a significant part of the artwork’s narrative.
- Materials:
- Thick acrylic paints.
- Stiff brushes.
- Palette knives.
- Textural mediums (discussed later) can be mixed with paint.
- Tips for Impasto:
- Allow layers to dry partially before adding more to prevent muddiness.
- Use a limited palette to maintain color harmony when building up layers.
- Experiment with different tools for varying stroke effects.
Palette Knife Techniques: Sculpting with Paint
Palette knife techniques offer a direct and often dramatic way to apply paint and build texture. Unlike brushes, palette knives allow for a flat, even application or sharp, scraping movements that leave distinct marks.
- Types of Palette Knives:
- Painting Knives: These are usually stiff, with a flexible metal blade and a handle. They come in various shapes – straight, pointed, rounded, trowel-shaped – each offering unique application possibilities.
- Modeling Tools: While often used for clay, some broader modeling tools can be effective for spreading and shaping thicker acrylics.
- Application Methods:
- Spreading: Use the flat of the knife to spread thick paint across the surface, creating smooth or slightly ridged areas.
- Scraping: Drag the edge of the knife through wet paint to reveal underlying layers or create linear textures.
- Dabbing/Stippling: Use the tip or edge to dab paint, creating small peaks and valleys.
- Lifting: Scrape through wet paint to lift it off the surface, creating subtle indentations.
- Achieving Visual Texture: The way the paint is manipulated with the knife – the pressure, angle, and direction – directly translates into the achieving visual texture on the canvas.
Textural Mediums: Enhancing Acrylic Properties
Textural mediums are special additives designed to alter the consistency and surface quality of acrylic paints. They are invaluable for artists looking to create specific effects beyond what paint alone can offer.
- What They Are: These are typically acrylic-based gels, pastes, or liquids that, when mixed with paint, add body, transparency, or specific surface qualities.
- Common Types and Their Effects:
| Medium Name | Description | Textural Outcome | Best For |
|---|---|---|---|
| Heavy Gel | Thicker than regular gel, holds brushstrokes well. | Thick, buttery consistency; retains peaks and strokes. | Impasto painting, retaining texture, creating peaks. |
| Modeling Paste | A stiff, opaque paste that dries hard and can be carved or sanded. | Creates significant sculptural relief, like plaster. Can be opaque or transparent. | Building thick, solid textures; creating landscapes, sculptural effects. |
| Glass Bead Gel | Contains tiny glass beads that create a reflective, gritty surface. | Adds sparkle and a slightly raised, sandy feel. | Stippling, creating sandy or starry effects, adding subtle shimmer. |
| Pumice Gel | Contains ground pumice stone, providing a gritty, sand-like texture. | Creates a rough, matte, abrasive surface. | Sand textures, rough surfaces, adding tooth for other mediums. |
| Sand Gel | Similar to pumice gel but may use finer grit or sand for a smoother grain. | Provides a more controlled sandy texture. | Creating beaches, arid landscapes, adding subtle grit. |
| String Gel | Creates fine, string-like filaments when pulled or stretched. | Adds delicate, web-like or wispy textures. | Creating hair, cobwebs, organic lines, delicate details. |
| Texture Paste | A general term for pastes that add body and texture, often opaque. | Varies by brand, but generally adds opacity and thickness. | General thickening, creating opaque textural layers. |
- Mixing Tips:
- Start with a small amount of medium and gradually add more to achieve the desired consistency.
- Mix thoroughly to ensure even distribution of the medium.
- Be aware that some mediums may alter the paint’s color slightly (e.g., opaque mediums will lighten transparent colors).
Acrylic Gel Mediums: More Than Just Binder
Acrylic gel mediums are fundamental to adding body to acrylics and creating a wide range of textures. They act as binders, but their specific formulations dictate the final surface quality.
- Types of Gel Mediums:
- Gloss Gel: Dries clear with a glossy finish. It can be mixed with paint to create translucent glazes with a glossy sheen, and it also adds a bit of body.
- Matte Gel: Dries clear with a matte finish. Useful for reducing sheen and adding a subtle tooth to the paint.
- Soft Gel: A more fluid gel that adds body without being too stiff.
- Heavy Gel: As mentioned earlier, this is key for thick, sculptural applications. It holds its shape well.
- Extra Heavy Gel: Even thicker than heavy gel, for the most pronounced sculptural effects.
- How to Use Them:
- Mix with Paint: Combine directly with acrylic paints on your palette. Start with a 1:1 ratio and adjust as needed.
- Layering: Apply gel mediums between paint layers to create depth, adhesion, and textural variations. A layer of gel can act as a “glue” for subsequent paint applications or even collage elements.
- Direct Application: Apply gel mediums directly to the canvas and then paint over them, or incorporate pigments into the gel itself for colored textural elements.
Adding Body to Acrylics: Achieving Thickness
Adding body to acrylics is crucial for techniques like impasto painting and for creating raised textures. Gel mediums are the primary way to achieve this, but other methods exist.
- Using Gel Mediums: Heavy gels and modeling paste are the go-to for significantly increasing the paint’s body.
- Thick Paint Application: Simply using thicker, artist-grade acrylic paints directly from the tube can provide a good starting point for texture.
- Reducing Water: Avoid over-diluting acrylics with water, as this thins them out and reduces their body and binding strength. Use mediums instead.
Creating Visual Texture: Surface Effects
While physical texture is about the raised or indented surface, visual texture is about how an artwork appears to have texture, even if the surface is relatively smooth. This is achieved through color, value, line, and mark-making.
Brushstroke Techniques: The Artist’s Mark
The way you apply paint with a brush is a fundamental way to create both physical and visual texture.
- Types of Brushstrokes:
- Short, Dabbing Strokes: Can create a stippled effect, mimicking softness or granular surfaces.
- Long, Sweeping Strokes: Convey movement and energy, leaving visible directional marks.
- Cross-hatching: Layers of lines in different directions build up visual density and can suggest form or shadow.
- Dry Brush: Using a brush with very little paint and medium, dragged across a textured surface, creates broken, scratchy lines. This is excellent for suggesting weathered wood, grass, or rough surfaces.
- Brush Types:
- Bristle Brushes: Stiff bristles are ideal for impasto painting and creating bold strokes.
- Synthetic Brushes: Softer synthetics can be used for smoother application or for creating delicate blended textures.
- Fan Brushes: Useful for blending and creating feathery or grassy textures.
- Experimentation: The angle of the brush, the pressure applied, and the speed of the stroke all contribute to the final texture.
Layering Paint: Depth Through Application
Layering paint is a powerful technique for building depth, both in terms of color and texture. It allows for subtle shifts in surface quality and the creation of complex visual effects.
- Wet-on-Wet: Applying wet paint over wet paint can lead to soft blending and subtle textural transitions.
- Wet-on-Dry: Applying wet paint over a dry layer allows for crisp edges and distinct textural marks. This is essential for building up impasto painting effects or precise textural details.
- Glazing: Thin layers of transparent or semi-transparent paint applied over dry layers build color depth and can create a smooth, luminous surface that still implies underlying texture from the previous layers.
- Scumbling: Applying a thin, broken layer of opaque paint over a dry layer, allowing some of the underlying color and texture to show through. This creates a broken, vibrating effect.
Sgraffito in Acrylics: Scratching Through Layers
Sgraffito in acrylics is a technique where a layer of paint is scratched through to reveal an underlying layer. It’s a fantastic way to create sharp lines, detail, and contrast.
- How to Do It:
- Apply a base layer of paint and let it dry completely.
- Apply a second, contrasting color layer over the first, also letting it dry.
- Use a sharp object to scratch through the top layer, exposing the color beneath.
- Tools for Sgraffito:
- Palette knives
- Stylus tools
- The end of a brush handle
- Razor blades (use with extreme caution)
- Screwdrivers
- Applications:
- Creating fine details like hair, fur, or blades of grass.
- Adding highlights or sharp lines to objects.
- Creating decorative patterns or textures.
Collage and Mixed Media: Integrating Non-Paint Elements
While not strictly paint application, integrating other materials can add significant physical and visual texture.
- Materials to Consider:
- Sand, grit, or small stones: Can be mixed into mediums or glued onto the surface.
- Fabric scraps: Can be layered and painted over.
- Paper: Torn or cut paper can be used for collage.
- Found objects: Small, lightweight objects can be adhered to the canvas.
- Adhesion: Use heavy gel mediums or acrylic mediums as adhesives. Ensure all materials are securely attached before proceeding with paint.
Creating Dimension: Adding Depth and Form
Texture plays a vital role in creating dimension in a painting. By manipulating light and shadow through surface variations, you can make a painting appear to have real depth and form.
Light and Shadow Play
- How Texture Interacts with Light: Raised areas catch light, creating highlights, while indentations or deeper valleys fall into shadow. This interplay is crucial for making textures convincing.
- Strategic Darkening and Lightening: Apply lighter colors to the raised areas that will catch the light and darker colors to the shadowed areas. This enhances the sculpted feel.
- Using Gloss and Matte Mediums: Applying gloss medium to specific textured areas can make them appear more reflective and thus more prominent, while matte mediums can recede.
Gradual Transitions
- Subtle Gradations: Even with thick paint, smooth transitions between light and dark values can further enhance the illusion of form. Blend colors carefully within the textured areas.
- Building Up Forms: Think of your texture as sculpting. Start with broader applications and gradually refine the shapes and transitions with smaller strokes or knife applications.
Practical Tips for Texture Creation
Here are some actionable tips to help you master textural techniques in acrylics.
Experimentation is Key
- Test Surfaces: Before applying techniques to your final piece, experiment on scrap canvas, board, or thick paper.
- Combine Mediums: Don’t be afraid to mix different textural mediums with your paints or with each other to discover unique effects.
- Tool Variety: Use not just brushes and palette knives, but also sponges, old credit cards, combs, or even your fingers (with gloves!).
Considering the Surface
- Canvas Type: A pre-primed, sturdy canvas or board is usually best for heavy textural applications, as it can support the weight and prevent warping.
- Priming: Additional gesso layers can provide a good base for textural mediums and paint adhesion. You can even mix pumice or sand into your gesso.
Drying Time and Layering
- Patience: Thick applications of acrylics and mediums can take a significant amount of time to dry completely. Rushing the process can lead to cracking or muddy colors.
- Working in Stages: Plan your textural applications in stages, allowing layers to dry sufficiently before adding subsequent ones. This is especially important when using sgraffito or building up impasto painting.
Color Considerations with Texture
- Color Mixing: Remember that adding opaque mediums to your paints will lighten and alter their perceived color. Test your color mixes before applying them broadly.
- Saturation: Highly textured surfaces can absorb light differently. You might need to adjust color saturation to achieve the desired effect.
Troubleshooting Common Texture Issues
- Cracking: This usually happens when paint or medium layers are too thick and dry too quickly on the surface, or when a very thin layer is applied over a thick, still-wet layer.
- Solution: Allow layers to dry more slowly, or ensure underlying layers are sufficiently dry. Use mediums designed for thicker applications if cracking persists.
- Muddy Colors: Often a result of over-mixing wet colors or applying wet paint over a thick, un-dried layer, leading to colors blending undesirably.
- Solution: Work in stages, allowing layers to dry. Use barriers like clear gel medium between layers if needed.
- Adhesion Problems: If your textural elements are flaking off, they weren’t properly adhered.
- Solution: Ensure you are using appropriate mediums or adhesives and that the surface is clean and properly prepared.
Frequently Asked Questions (FAQ)
Q1: Can I create texture with just acrylic paint and brushes?
A1: Yes, absolutely! Brushstroke techniques, varying pressure, and applying paint thickly (impasto painting) can create significant texture even without special mediums.
Q2: Which acrylic medium is best for adding body to paint?
A2: Heavy Gel, Extra Heavy Gel, and Modeling Paste are excellent for adding body to acrylics and creating substantial texture.
Q3: How do I prevent thick acrylic paint from cracking?
A3: Ensure that each layer of thick paint or medium is dry before applying the next. Slow drying can also help. Use artist-grade acrylics, which are formulated for better flexibility.
Q4: Is it possible to sand down acrylic textures?
A4: Yes, if you’ve used mediums like modeling paste or very thick acrylics, you can often sand them down once completely dry to refine the texture or create a smoother transition. Use fine-grit sandpaper and work in a well-ventilated area, wearing a mask.
Q5: Can I mix almost anything into acrylic paint for texture?
A5: While you can mix many things, it’s crucial they are compatible with the acrylic binder. Things like fine sand, pumice, glass beads, or even small natural elements mixed with acrylic mediums work well. Avoid organic materials that might decay. Always test your mixes.
By exploring these techniques and materials, you can unlock a world of textural possibilities in your acrylic paintings, adding depth, interest, and a unique tactile quality that will captivate your viewers. Experiment, play, and discover your own signature textural style.