
Image Source: www.scotchblue.com
How Soon After Painting To Remove Tape: The Best Time for Pristine Paint Edges
The crucial question for any DIY painter or professional is: How soon after painting should you remove painter’s tape? The best time to remove painter’s tape is when the paint has dried to a touchable, yet not fully cured, state. This typically means waiting for the paint drying time to allow the paint to set without being so wet that it smears or so dry that it pulls away with the tape, leaving jagged edges.
Achieving sharp, clean lines is the ultimate goal when using tape for painting projects. Whether you’re creating accent walls, geometric patterns, or simply painting trim, the painter’s tape removal process is just as important as the application and painting itself. Removing the tape too soon can lead to smudged lines and a messy finish, while waiting too long can result in the tape bonding too strongly to the paint, potentially damaging your hard work. This guide will delve into the nuances of wet paint tape removal, dried paint tape removal, and the ideal windows of opportunity to ensure your painted surfaces look professionally finished.
The Science Behind Tape Removal Timing
Understanding how long to leave paint tape on your walls requires a basic grasp of how paint dries and adheres. Paint is a liquid that contains pigments, binders, and solvents. As the solvents evaporate, the binders harden and lock the pigments together, forming a solid film. This process isn’t instantaneous.
Paint Drying Stages: A Closer Look
Paint goes through several stages as it dries:
- Wet: The paint is still liquid and easily disturbed.
- Tack-free: The surface feels dry to the touch but may still be soft underneath. This is often the sweet spot for tape removal.
- Dry to touch: The surface is dry, and you can handle it gently without leaving fingerprints.
- Cured: The paint has reached its maximum hardness and durability. This can take days or even weeks depending on the paint type.
Removing tape during the “tack-free” or “dry to touch” stage offers the best chance for clean lines.
Factors Influencing Tape Removal Time
Several factors can affect the optimal time for removing masking tape after painting:
- Type of Paint: Different paint formulations have varying paint drying times. Latex or acrylic paints generally dry faster than oil-based paints.
- Environmental Conditions: Temperature and humidity play significant roles. Warmer, drier conditions accelerate drying, while cooler, humid conditions slow it down.
- Paint Thickness: Thicker coats of paint will take longer to dry than thinner ones.
- Type of Tape: The adhesive strength and material of the painter’s tape itself can influence how easily it releases from the paint.
When to Pull Paint Tape: Common Scenarios and Solutions
Let’s explore some common scenarios and what the best approach is for painter’s tape removal:
Scenario 1: The “I Can’t Wait” Dilemma (Wet Paint Tape Removal)
You’ve just finished painting, and the temptation to peel back the tape immediately is overwhelming. If you opt for wet paint tape removal, you’re taking a significant risk.
- Pros: In theory, removing tape while the paint is very wet might prevent the tape from adhering too strongly.
- Cons: The overwhelming probability is that the wet paint will smudge, drip, or create a ragged edge where the tape was. This leads to significant touch-up work and a compromised paint edge quality. If the paint is too wet, you might also pull the paint off the surface entirely.
Best Practice: Resist the urge! While some very specific situations and tape types might allow for very early removal, it’s generally not recommended for achieving a good paint edge quality.
Scenario 2: The “Touch It, It’s Dry!” Approach (Tack-Free Stage)
This is where the magic often happens. Once the paint is no longer tacky to the touch, it has begun to form a skin.
- Pros: The paint has enough integrity to resist smudging, but the tape hasn’t fully bonded to it yet. This stage offers the highest likelihood of a clean, crisp line. The tape should pull away smoothly, leaving a sharp demarcation.
- Cons: If you wait too long after the tack-free stage, the paint can begin to cure and harden around the tape’s edge. This can lead to tape marks on paint or the paint being pulled off the wall with the tape.
How Long to Leave Paint Tape in This Stage: This can vary widely. For latex paints, this might be anywhere from 30 minutes to a few hours. Oil-based paints will take considerably longer. Always check the manufacturer’s recommendations on the paint can for specific paint drying times.
Scenario 3: The “Wait Until Tomorrow” Strategy (Fully Dry, Not Cured)
This is another safe and often effective window for painter’s tape removal. By this point, the paint surface is dry and firm, but it hasn’t reached its final cured hardness.
- Pros: The paint is significantly less likely to smudge or pull. The tape has had ample time to dry onto the paint, but it’s usually still possible to remove it without damage, especially if you use the correct technique.
- Cons: There’s a slightly higher risk of tape marks on paint if the tape has been on for an extended period, particularly if the adhesive is very strong or the paint finish is delicate.
When to Pull Paint Tape in This Stage: This could be anywhere from 4-12 hours after painting, depending again on the paint type and environmental conditions.
Scenario 4: The “Oops, I Forgot” Situation (Fully Cured)
This happens when the paint has completely dried and hardened, and the tape has been left on for days or even weeks.
- Pros: None, really, regarding tape removal ease.
- Cons: The tape’s adhesive will likely have bonded very strongly with the cured paint. Attempting to remove it can easily peel off the paint underneath, leaving significant damage and requiring extensive repair. You’ll almost certainly get tape marks on paint.
How to Handle This: If you find yourself in this situation, proceed with extreme caution. Try to score the edge of the tape with a utility knife or a putty knife before peeling. Slowly and at a low angle is key. Sometimes, a hairdryer on a low heat setting can help soften the adhesive, but be careful not to overheat the paint itself.
The Best Time to Remove Painter’s Tape: A Detailed Breakdown
The overarching advice for when to pull paint tape is to aim for the window between the paint being tack-free and fully dry. This balance maximizes the chance of a clean release while minimizing the risk of smudging or paint damage.
Recommended Timing:
- Latex/Acrylic Paints: Often, within 1 to 4 hours after the last coat is applied. Check for tackiness. If it’s no longer sticky and you can touch it without residue on your finger, it’s likely a good time.
- Oil-Based Paints: These take longer to dry. You might be looking at 12 to 24 hours, or even longer in cooler, humid conditions. Again, test for tackiness.
Key Takeaway: Never rely on a fixed time. Always perform the “touch test” to gauge the paint’s dryness.
The Art of Painter’s Tape Removal: Techniques for a Perfect Finish
Even at the ideal time, the technique you use for removing masking tape after painting is critical for achieving a superior paint edge quality.
Essential Removal Techniques:
- Wait for the Right Time: As discussed, don’t rush.
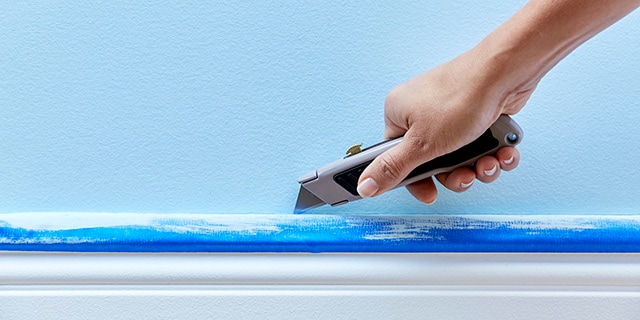
- Score the Edge (Optional but Recommended): For very crisp lines, especially with thicker paint or slightly longer drying times, you can gently score the edge of the paint line where it meets the tape. Use a sharp utility knife or a thin putty knife. This breaks any minor adhesion between the paint skin and the tape’s adhesive. Be very careful not to cut into the underlying surface or the painted wall itself.
- Pull at an Angle: Hold the tape at a sharp angle (around 45 degrees) to the surface. This ensures you are pulling the paint with the tape, not lifting it off the wall.
- Pull Slowly and Steadily: Avoid yanking the tape. A slow, consistent pull is much less likely to cause tearing or smudging.
- Pull in the Opposite Direction of the Seam: If you are removing tape from a painted surface against a taped surface (e.g., wall to trim), pull the tape away from the freshly painted surface and towards the surface it was adhered to.
- Remove While Paint is Still Slightly Flexible: This is the core principle of wet paint tape removal (in its ideal, slightly-dry form). The paint has enough grip on itself but not too much grip on the tape.
- Use the Right Tape: High-quality painter’s tape, especially those designed for delicate surfaces or specific drying times, can make a significant difference.
Table: Tape Removal Considerations by Paint Type
| Paint Type | Typical Drying Time (Touch-Free) | Optimal Tape Removal Window | Potential Issues if Delayed | Recommended Tape Type |
|---|---|---|---|---|
| Latex/Acrylic | 30 mins – 2 hours | 1 – 4 hours | Tape marks on paint, paint peeling | Medium adhesion painter’s tape (blue or green) |
| Oil-Based | 4 – 12 hours | 12 – 24 hours | Stronger adhesion, potential paint pull | Medium to high adhesion painter’s tape (if needed) |
| Specialty Paints | Varies (check can) | Varies (check can) | Varies | Manufacturer-recommended or specific purpose tape |
Common Pitfalls and How to Avoid Them
Tape marks on paint are the bane of many DIYers. Here’s how to sidestep the most common problems:
Pitfall 1: Paint Bleed-Through
This occurs when paint seeps under the tape, creating fuzzy or blurred lines.
- Cause: Inadequate sealing of the tape edge, tape not pressed down firmly, or painting too heavily over the tape edge.
- Solution: Ensure the tape is pressed down firmly with a putty knife or a smooth edge, especially along the painted line. For critical lines, consider a “reverse tape” method: paint the main area, let it dry, apply tape, then paint a thin line of the main color along the tape edge. Once dry, apply the new color over this seal. This locks the tape edge with the original paint.
Pitfall 2: Paint Peeling with the Tape
This is the worst-case scenario, where the tape pulls the underlying paint off the surface.
- Cause: Removing the tape when the paint is too wet, the tape adhesive is too strong for the paint, or the paint job itself is weak (e.g., poor surface prep, incompatible primer).
- Solution: Wait for the paint to reach the tack-free or dry-to-touch stage. Use painter’s tape appropriate for your paint type and surface. Ensure proper surface preparation and priming.
Pitfall 3: Tape Sticking Too Well
The tape is difficult to remove, and when it does come off, it leaves adhesive residue or damages the paint.
- Cause: Leaving the tape on for too long (after the paint has fully cured), using a tape with an excessively strong adhesive, or applying tape to freshly painted surfaces that haven’t fully dried.
- Solution: Remove the tape within the recommended window. Use painter’s tape specifically designed for clean removal, like those for delicate surfaces if you’re concerned.
Expert Tips for Superior Paint Edge Quality
- Use Quality Painter’s Tape: Invest in good painter’s tape. Different brands and types are designed for different surfaces and paint types. Blue tape is common for general use, while green or purple tape is often for delicate surfaces.
- Test a Small Area: If you’re unsure about the paint drying time, test a small, inconspicuous area by gently touching it. If it’s still tacky, wait longer.
- Work in Good Lighting: Proper lighting helps you see the paint’s condition and ensure you’re applying and removing tape correctly.
- Consider Temperature and Humidity: If it’s very humid or cold, your paint drying time will be longer. If it’s hot and dry, it will be shorter. Adjust your expectations and testing accordingly.
- Don’t Overlap Tape Edges Excessively: While you want a good seal, excessive overlapping can create thicker areas that are harder to remove cleanly.
- Smooth Application is Key: When applying tape, ensure it lies flat and smooth against the surface. Air bubbles or wrinkles are prime spots for paint bleed.
Frequently Asked Questions (FAQ)
Q: Can I remove painter’s tape immediately after painting?
A: It’s generally not recommended. Removing tape while the paint is still very wet significantly increases the risk of smudging and poor paint edge quality. It’s best to wait until the paint is at least tack-free.
Q: How long should I leave paint tape on a wall?
A: The ideal time depends on the paint type and environmental conditions. For latex paints, aim for 1-4 hours. For oil-based paints, it might be 12-24 hours. Always test for tackiness. The key is to remove it when the paint is dry to the touch but not fully cured.
Q: What happens if I leave painter’s tape on too long?
A: If left on too long, the tape’s adhesive can bond strongly with the fully cured paint. This can lead to tape marks on paint, difficulty in removal, and the paint peeling off the surface when the tape is pulled.
Q: My paint bled under the tape. What did I do wrong?
A: This usually happens because the tape wasn’t sealed down properly, allowing paint to seep underneath. Ensure you press the tape edge firmly with a putty knife or fingernail. Using a high-quality tape and the “reverse tape” method can also help prevent bleed-through.
Q: Is there a specific temperature or humidity for removing tape?
A: While not a strict rule, moderate temperatures and lower humidity generally lead to more predictable paint drying times. Extreme conditions can necessitate longer waiting periods or cause issues with tape adhesion.
Q: What’s the best way to remove tape without damaging the paint?
A: Wait for the paint to be tack-free. Pull the tape slowly and steadily at a sharp angle (around 45 degrees) away from the painted surface. Gentle scoring along the edge with a utility knife before pulling can help create an even cleaner line.
By carefully considering the paint drying time, employing the right painter’s tape removal techniques, and understanding the nuances of wet paint tape removal versus dried paint tape removal, you can achieve professional-looking results and enjoy crisp, clean lines on all your painted projects. The best time to remove painter’s tape is a balance of patience and observation, ensuring the paint is ready for the tape’s departure.