
When hanging art in a room with 12-foot ceilings, the ideal height for the center of your artwork is typically around 57 to 60 inches from the floor. This standard height is a good starting point, but with dramatically higher ceilings, you’ll need to adjust your approach to maintain visual balance. What is the main goal when hanging art in a large room with high ceilings? The primary objective is to fill the vertical space effectively without making the artwork feel lost or disconnected from the room’s occupants. Can you hang art higher with tall ceilings? Absolutely, but it requires careful consideration of scale and proportion. Who needs to know about art hanging guidelines for high ceilings? Anyone decorating a living room or any space with 12-foot or taller ceilings who wants to create a harmonious and aesthetically pleasing environment.
High ceilings offer a fantastic opportunity to create a dramatic and open feel in your living room. However, they also present a unique challenge: how to hang art so it doesn’t look too small or too high up. Getting your art placement just right is crucial for high ceiling decor and creating a sense of balance in a large room. This guide will delve into the specifics of living room art height when you have soaring 12-foot ceilings, offering practical advice and interior design tips to help you master wall art placement.
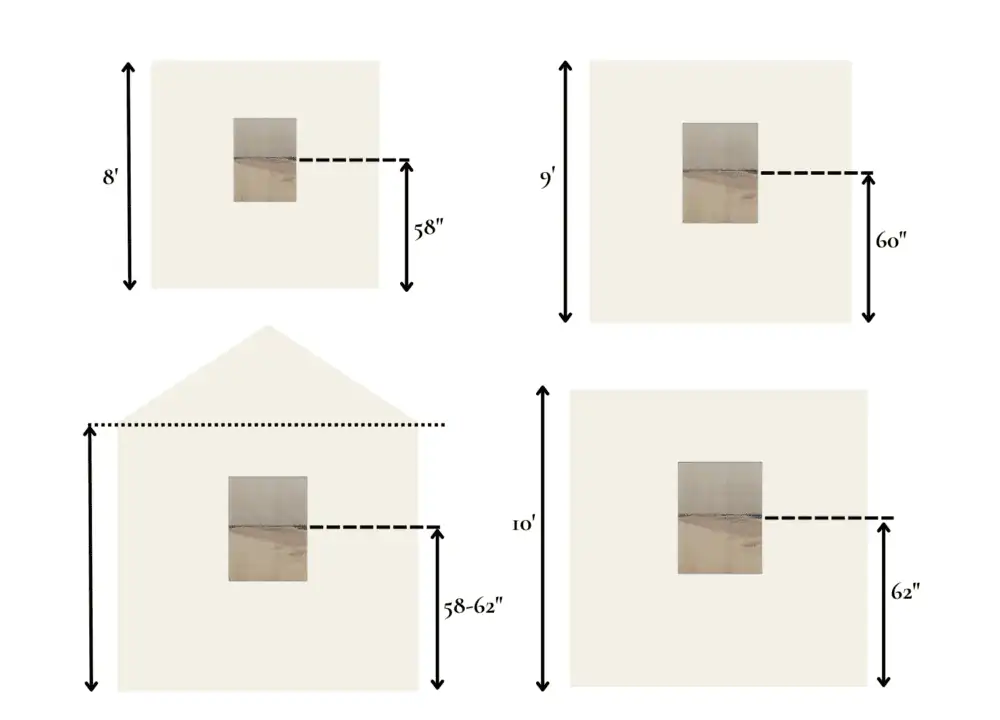
Image Source: boxwoodavenue.com
The Challenge of 12-Foot Ceilings and Art
Twelve-foot ceilings are a luxurious feature, lending an air of grandeur and spaciousness. But this vertical expanse can be daunting when it comes to decorating. Many standard art-hanging rules, often derived from rooms with 8-foot ceilings, won’t translate directly. If you hang art too low in a room with 12-foot ceilings, it can feel disconnected from the rest of the space, as if it’s floating adrift on a vast expanse of wall. Conversely, hanging art too high can make it difficult to appreciate, appearing insignificant against the towering walls. The key is to strike a balance that acknowledges and utilizes the vertical space without overwhelming the viewer or the artwork itself.
Why Standard Art Height Doesn’t Always Work
The commonly cited rule of thumb for hanging art is to place the center of the artwork at eye level, typically around 57 to 60 inches from the floor. This guideline is based on the average human eye level in a standard room. In rooms with 12-foot ceilings, this standard height can leave a significant amount of empty wall space above the artwork. This can make the room feel unbalanced, with the art appearing too small for the scale of the wall.
Creating Visual Balance in Large Spaces
Art placement in a large room with high ceilings is about more than just hanging a picture. It’s about creating a focal point, drawing the eye upwards, and anchoring the space. You want the artwork to feel intentional and integrated into the overall design, not an afterthought. This involves considering not just the height of the artwork, but also its size, the wall space it occupies, and its relationship to other elements in the room, like furniture and architectural features.
Deciphering Art Hanging Guidelines for High Ceilings
When you have 12-foot ceilings, you have more leeway, but also more variables to consider. The goal is to make the art feel substantial and impactful, contributing to the room’s aesthetic rather than getting lost in its immensity.
The “Eye Level” Rule Revisited
While the 57-60 inch rule is a good general guideline, for rooms with 12-foot ceilings, you’ll often need to hang art slightly higher. Think of the artwork as occupying a “zone” on the wall. For higher ceilings, this zone extends upwards.
General Height Adjustment for High Ceilings:
- Standard Ceilings (8-9 ft): Center of artwork at 57-60 inches from the floor.
- 10-11 ft Ceilings: Consider centering art at 60-65 inches from the floor.
- 12 ft Ceilings and Above: Aim for the center of the artwork to be between 60 to 70 inches from the floor, or even slightly higher depending on the artwork’s size and the overall room proportions.
Important Considerations:
- Artwork Size: Larger pieces naturally lend themselves to being hung higher. A tiny piece hung too high will look lost.
- Furniture Placement: The art should relate to the furniture. It should generally be hung so the bottom of the artwork is about 6-10 inches above the top of your sofa or console table. This relationship is crucial for creating a grounded feel.
- Wall Space: How much wall space is available? If you have a very large wall, you might consider a larger piece or a grouping that fills more of the vertical space.
The Importance of Scale and Proportion
The artwork scale is perhaps the most critical factor when dealing with high ceilings. A small piece of art will look minuscule against a 12-foot wall. To achieve a balanced look, you need to select art that has a substantial presence.
Tips for Artwork Scale:
- Go Big: Don’t be afraid to choose larger pieces or diptychs/triptychs that create a commanding presence.
- Groupings: A well-executed gallery wall height arrangement can fill a large wall effectively. The overall height of the gallery wall should be considered, not just individual pieces.
- Consider the Visual Weight: A busy or dark artwork can carry more visual weight than a minimalist or light-colored piece, influencing how high it should be hung to feel grounded.
Anchoring the Art: Furniture as a Guide
Even with 12-foot ceilings, art shouldn’t float in isolation. It needs to relate to the architecture and furniture in the room.
Relationship to Furniture:
- Sofas and Chairs: The bottom edge of the artwork should typically be 6 to 10 inches above the top of the sofa or seating. This creates a visual connection between the art and the furniture.
- Console Tables and Sideboards: Similar to sofas, a gap of 6 to 10 inches between the tabletop and the bottom of the artwork is usually appropriate.
- Eye Level Within the Furniture Zone: Imagine a horizontal line running across the room at the typical eye level of someone seated on the furniture. Your art should generally sit above this line, but still feel connected to it.
Strategic Wall Art Placement for 12 Foot Ceilings
Achieving the perfect art placement involves more than just measuring. It’s about creating a visual narrative and flow within your living room.
The “Vertical Zone” Approach
Instead of a single eye-level point, think of the wall in sections. With 12-foot ceilings, you have a substantial vertical zone to work with.
Defining the Vertical Zones:
- Lower Zone (Floor to ~4 ft): This is the area closest to furniture. Art here should relate directly to the seating arrangement.
- Mid Zone (~4 ft to ~8 ft): This is the primary visual field for standing viewers. This is where the adjusted “eye level” rule often falls.
- Upper Zone (~8 ft to Ceiling): This is the space that benefits most from the height. Artwork here can draw the eye upwards and emphasize the ceiling.
For a living room with 12-foot ceilings, you’ll want to ensure your art occupies the mid to upper zones effectively.
Hanging Single Large Pieces
A single, large-scale artwork can be incredibly impactful in a room with high ceilings.
Guidelines for Large Art:
- Centering: If you have a very large piece and a significant amount of wall space above it, consider centering the artwork slightly higher than the standard 57-60 inches. A center point of 65-70 inches from the floor can work well.
- Placement Relative to Furniture: Ensure the bottom of the artwork is still the correct distance (6-10 inches) above your sofa or console. This anchors the piece.
- Consider Proportionality: The width of the artwork should ideally be about two-thirds to three-quarters the width of the furniture it’s above.
Example: For a 10-foot sofa on a 12-foot ceiling wall, a 6-foot wide artwork centered 8 inches above the sofa would have its center around 66 inches from the floor (assuming the sofa is 32 inches tall).
Creating a Gallery Wall with High Ceilings
A gallery wall height arrangement can be a fantastic way to fill a large wall and add personality.
Strategies for Gallery Walls:
- Maintain a Consistent Center Point: Even with multiple pieces, aim to keep the average center point of the entire grouping at your adjusted eye level (60-70 inches).
- Visual Hierarchy: Use larger or more prominent pieces to anchor the gallery wall, usually in the center or lower portions.
- Build Upwards: Allow the gallery wall to extend upwards to fill a good portion of the wall space. Don’t be afraid to have pieces reach higher than the standard eye level.
- Spacing: Maintain consistent spacing between frames (typically 2-4 inches) for a cohesive look.
Table: Gallery Wall Height Considerations
| Scenario | Bottom of Gallery Wall | Top of Gallery Wall | Center of Gallery Wall |
|---|---|---|---|
| Standard Ceiling (8 ft) | ~10-12 inches above sofa | ~4-6 inches below ceiling | ~57-60 inches from floor |
| 12 Foot Ceiling | ~8-10 inches above sofa | ~12-24 inches below ceiling | ~60-70 inches from floor |
| Impactful High Ceiling | ~8-10 inches above sofa | ~6-12 inches below ceiling | ~65-75 inches from floor |
Note: These are guidelines and can be adjusted based on the size of the artwork and the overall room composition.
Utilizing the Vertical Space: Above Furniture
When you have high ceilings, the space above furniture becomes a prime area for art.
Filling the Space Above Sofas/Consoles:
- Verticality: Choose pieces that have a strong vertical orientation or a tall gallery wall to emphasize the height.
- Bridging the Gap: The 6-10 inch gap between the furniture and the artwork is crucial. Then, allow the artwork to extend upwards, perhaps taking up 2-3 feet or more of the wall space.
- Multiple Pieces: A vertical arrangement of 2-3 framed pieces can work beautifully above a sofa with 12-foot ceilings.
Art Placement in Corners and Awkward Spaces
High ceilings can sometimes create awkward empty corners or wall sections.
Maximizing Verticality in Corners:
- Tall, Narrow Art: A long, narrow piece of art can draw the eye upwards and fill vertical space in a corner.
- Corner Gallery Walls: Creating a gallery wall that wraps around a corner can add visual interest and address the vertical challenge.
- Floating Shelves with Art: Combine artwork with floating shelves to create visual layers and utilize the vertical space.
Practical Tips for Hanging Art with 12 Foot Ceilings
Measuring and hanging correctly is essential to ensure your art is securely displayed and looks its best.
Tools and Techniques
You’ll need basic tools, and potentially some heavier-duty hardware depending on the weight of your art.
Essential Tools:
- Tape Measure
- Pencil
- Picture Hanging Hooks (appropriate for wall type and artwork weight)
- Hammer or Drill
- Level
- Stud Finder (optional, but recommended for heavier pieces)
Pre-Hanging Planning
Before you put a nail in the wall, do some prep work.
Planning Steps:
- Measure the Wall: Note the height, width, and any architectural features (windows, doors).
- Measure the Artwork: Note its height and width.
- Measure Furniture: Note the height of the furniture the art will be above.
- Mark the Center Point: Based on your chosen height (e.g., 65 inches for the center), mark a subtle pencil line.
- Mark the Hanging Point: Measure the distance from the top of your artwork to its hanging wire or hook. Subtract this from your desired center height to find where the hook should go. For example, if your artwork is 30 inches tall and you want the center at 65 inches, and the wire is 8 inches from the top, you need to hang the hook at 65 – (30/2) = 50 inches from the floor.
- Dry Fitting: Cut out paper templates the size of your artwork and tape them to the wall to visualize the placement.
Securing Your Artwork
Using the right hardware is paramount for safety and longevity.
Hardware Recommendations:
- For Lighter Art: Picture hanging kits with nails or adhesive hooks might suffice.
- For Medium to Heavy Art: Use sturdy picture hooks rated for the weight of your artwork. If possible, aim to secure at least one hook into a wall stud for maximum support. D-rings with wire are a common and reliable hanging method.
- For Very Heavy Art: Consider using specialized heavy-duty picture hanging systems or professional installation. Toggle bolts or molly bolts can be used if you cannot locate a stud, but ensure they are rated for the weight.
Achieving a Level Finish
A crooked picture can ruin the aesthetic, especially in a large room where imperfections are more noticeable.
Ensuring Levelness:
- Use a Level: Place a level on top of the artwork or frame once it’s hung to ensure it’s straight.
- Adjusting: If it’s slightly off, you may need to adjust the hanging hardware or the wire itself.
Frequently Asked Questions (FAQ)
Q1: What is the standard height to hang art?
The generally accepted guideline is to hang art so the center of the piece is at eye level, typically 57 to 60 inches from the floor. This is a good starting point, but can be adjusted for different ceiling heights and room proportions.
Q2: Can I hang art higher with 12 foot ceilings?
Yes, absolutely. With 12-foot ceilings, you can and often should hang art higher than the standard 57-60 inches to fill the vertical space effectively. Aim for the center of the artwork to be around 60 to 70 inches from the floor, or even higher if the artwork is very large or part of a grouping that extends upwards.
Q3: How do I choose the right size artwork for a large room with high ceilings?
For rooms with high ceilings, choose artwork that has a substantial presence. This often means opting for larger pieces, or a grouping of smaller pieces that together create a significant visual impact. The artwork should feel proportionate to the wall and the room, not diminutive.
Q4: How far above a sofa should art be hung?
A good rule of thumb is to hang the bottom of the artwork 6 to 10 inches above the top of the sofa. This creates a visual connection between the art and the furniture, anchoring the piece without making it feel too high or too close to the seating.
Q5: What if I want to create a gallery wall with high ceilings? How do I determine the height?
For a gallery wall, consider the overall height of the arrangement. Aim to have the average center point of the entire grouping fall within the adjusted eye level range for high ceilings (60-70 inches). Allow the gallery wall to extend upwards, filling a good portion of the vertical space above the furniture, ensuring it doesn’t feel cramped at the top.
Q6: Does ceiling height art mean I have to hang everything higher?
Not necessarily. While higher ceilings allow for higher art placement and encourage filling vertical space, you can still have art at lower levels if it’s appropriate for the furniture arrangement or a specific design intent. However, to achieve balance in a room with 12-foot ceilings, it’s common to place the main or anchor pieces of art higher than in standard-height rooms.
Q7: How do I avoid art looking too small on a large wall?
To prevent artwork from looking too small, select pieces that are larger in scale or create a substantial grouping. Consider the visual weight of the artwork. A tall, narrow piece can also help to emphasize the verticality of the wall.
Q8: Are there any specific interior design tips for high ceiling decor?
Yes, with high ceilings, consider drawing the eye upwards. This can be achieved with artwork placed higher, tall plants, floor-to-ceiling curtains, or even architectural elements like uplighting. Artwork placement is a key component of this strategy, helping to define zones and provide visual interest in the expansive vertical space.
Conclusion
Decorating a living room with 12-foot ceilings is an exciting opportunity to create a sophisticated and dynamic space. By moving beyond the standard art-hanging guidelines and embracing the verticality of your walls, you can achieve stunning wall art placement. Remember to consider artwork scale, the relationship between art and furniture, and the overall visual balance. Whether you’re hanging a single large statement piece or curating a detailed gallery wall height arrangement, these interior design tips will help you transform your high-ceilinged living room into a beautifully balanced and inviting environment. Don’t be afraid to experiment and adjust until you find the perfect height that makes your art truly shine.