
Can you paint directly onto aluminum without preparation? No, you cannot achieve lasting, perfect results by painting directly onto aluminum without proper preparation. Aluminum requires specific steps to ensure paint adheres well and doesn’t peel or flake off over time. This guide will walk you through everything you need to know to prep aluminum for painting, ensuring a smooth, durable finish.
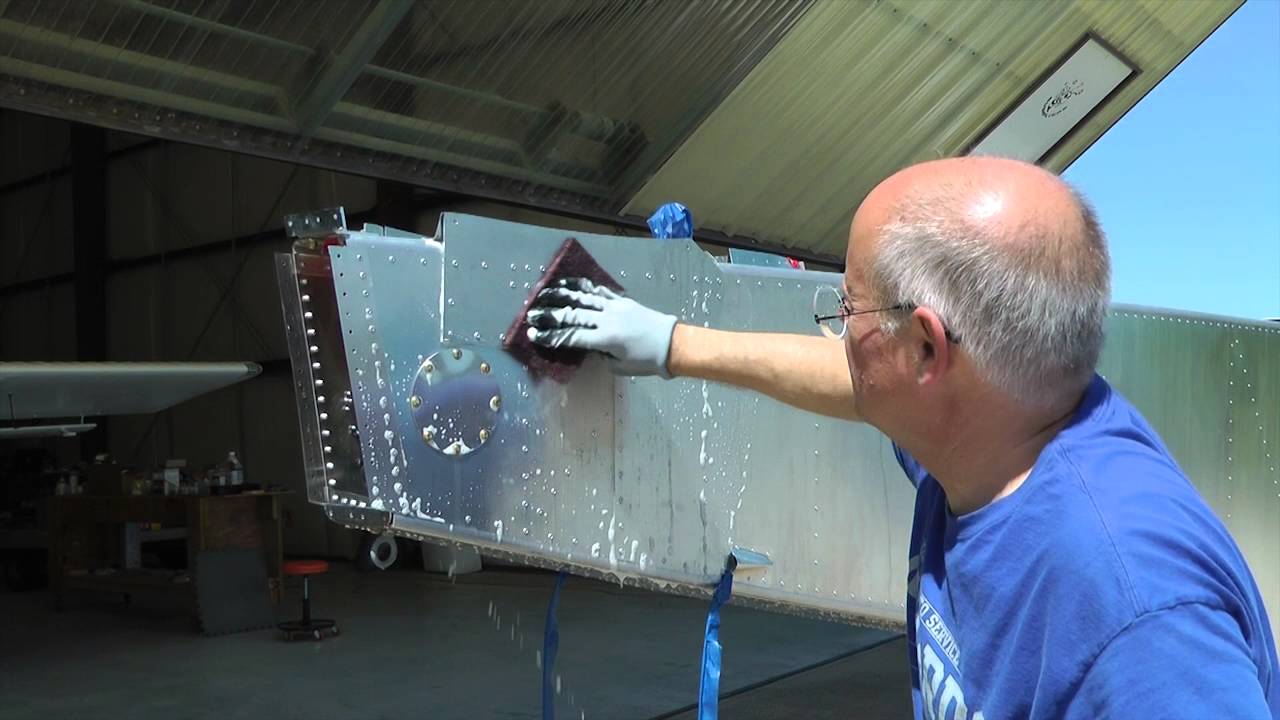
Image Source: i.ytimg.com
Why Aluminum Needs Special Preparation
Aluminum is a wonderful material, but it has some unique characteristics that make it different from other metals. Unlike iron or steel, aluminum doesn’t rust in the same way. Instead, it forms a thin, invisible layer of aluminum oxide when exposed to air. While this oxide layer protects the aluminum from further corrosion, it also creates a barrier that prevents paint from sticking effectively. This is why proper aluminum surface preparation is crucial. Without it, your paint job is destined to fail, leading to chipping, peeling, and a disappointing finish. Getting the surface right is the most important step for aluminum paint adhesion.
Key Stages of Aluminum Painting Preparation
Preparing aluminum for painting involves several critical stages. Each step plays a vital role in creating a surface that paint can bond to securely. Let’s break down the process into manageable steps.
Stage 1: Thorough Aluminum Cleaning
The first and perhaps most vital step in aluminum cleaning is removing all contaminants. This includes dirt, grease, oil, grime, and any existing loose paint or coatings. Even a small amount of residue can compromise the adhesion of your new paint.
Degreasing Aluminum: The Foundation of a Good Finish
Degreasing aluminum is non-negotiable. Grease and oil act as strong release agents, preventing paint from sticking.
-
Why Degrease?
- Removes oils, lubricants, and other residues.
- Ensures a clean surface for subsequent steps.
- Prevents paint failure due to contamination.
-
Methods for Degreasing:
- Mild Detergent and Water: For light contamination, a good quality dish soap mixed with warm water can be surprisingly effective. Use a soft cloth or sponge.
-
Mineral Spirits or Acetone: For tougher grease and grime, mineral spirits or acetone are excellent choices. These are strong solvents that break down oils effectively.
- Safety First: Always use these in a well-ventilated area, wear gloves, and eye protection. Have a fire extinguisher nearby.
- Application: Apply with a clean, lint-free cloth. Wipe the surface thoroughly, changing to clean sections of the cloth frequently to avoid spreading the grease.
-
Specialized Aluminum Cleaners: Many automotive and hardware stores offer dedicated aluminum cleaners and degreasers. Follow the product instructions carefully.
-
Rinsing: After degreasing, it’s essential to rinse the aluminum thoroughly with clean water. If you used soap, ensure all suds are gone. If you used solvents, allow them to evaporate completely.
Stage 2: Addressing Aluminum Oxidation and Corrosion
Aluminum can develop a dull, chalky surface due to aluminum oxidation removal. While this is a natural process, it needs to be addressed before painting. You might also encounter specific areas of corrosion, often appearing as white powdery spots.
Aluminum Oxidation Removal
The dull, powdery layer of aluminum oxide needs to be removed to expose fresh aluminum for better paint adhesion.
-
Methods for Oxidation Removal:
- Abrasive Pads: Fine-grade Scotch-Brite pads (like gray or white) can effectively remove the oxidation layer without damaging the aluminum significantly.
- Fine-Grit Sandpaper: Sandpaper with a grit of 180-220 can also be used. Always sand in one direction if possible for a more uniform surface.
- Wire Brushes: For heavier oxidation, a stainless steel wire brush can be used. Be cautious not to scratch the aluminum too deeply.
-
Post-Oxidation Cleaning: After removing oxidation, clean the surface again. A wipe-down with mineral spirits or acetone will remove any dust created during the sanding or brushing process.
Aluminum Rust Removal (More Accurately, Corrosion Removal)
While aluminum doesn’t “rust” like iron (which is iron oxide), it does corrode. This corrosion typically appears as a white, powdery substance.
-
Methods for Corrosion Removal:
- Mechanical Removal: The most common method is to gently abrade the corroded area using fine-grit sandpaper (180-220 grit) or a fine wire brush. The goal is to remove the white powdery material until you reach clean, bright aluminum.
- Chemical Treatments: Specialized aluminum corrosion removers are available. These often contain mild acids that dissolve the corrosion. Follow product instructions precisely and always rinse thoroughly afterward.
-
Important Note: Always use non-ferrous tools (like stainless steel) when working with aluminum to avoid introducing iron particles, which can then rust.
Stage 3: Surface Texturing for Enhanced Adhesion
Once the aluminum is clean and free of oxidation, you need to create a surface that the paint can grip. This is where sanding aluminum and potentially etching aluminum come into play.
Sanding Aluminum: Creating a “Tooth”
Sanding aluminum is essential for creating a mechanical bond. Paint adheres much better to a slightly roughened surface than a perfectly smooth one.
-
What Grit to Use?
- For most applications, a grit between 180 and 320 is ideal.
- Finer grits (like 400) can be used for very smooth finishes, but ensure it’s not too fine.
-
Sanding Technique:
- Wet or Dry? You can often sand aluminum dry. However, wet sanding (using water or a sanding fluid) can help keep the sandpaper from clogging with aluminum dust and can provide a smoother finish.
- Direction: Sand in a consistent direction, or use a random orbital sander for efficiency. The key is to create a uniform dullness across the entire surface.
- Avoid Over-Sanding: You don’t need to aggressively abrade the metal; just a light scuffing is sufficient.
-
Post-Sanding Cleaning: After sanding, you must clean the surface again. Use mineral spirits or acetone to remove all sanding dust and any oils your hands might have transferred. A tack cloth is also very useful at this stage to pick up fine dust particles.
Etching Aluminum: A Chemical Advantage
Etching aluminum is a more aggressive method that can provide superior adhesion, especially for challenging surfaces or when maximum durability is required. Etching creates a microscopic profile on the metal surface that paint can key into.
- How Etching Works: Etching solutions typically contain mild acids (like phosphoric acid) that chemically alter the surface of the aluminum, creating a finely textured “tooth.”
- Etching Products: These are usually available as a two-part system or a single-step etchant. Common names include “Alumi-Prep” or “metal prep.”
- Application:
- Clean: Ensure the aluminum is already clean and degreased.
- Apply Etchant: Apply the etching solution according to the manufacturer’s instructions, usually with a spray bottle or cloth.
- Agitate: Gently scrub the surface with a Scotch-Brite pad or soft brush to ensure even contact.
- Rinse: Rinse the surface thoroughly with clean water.
- Neutralize (if required): Some etching processes require a neutralizing rinse, often with baking soda and water solution, to ensure all acid is removed. Check the product instructions.
- Dry Immediately: Dry the aluminum immediately with a clean, lint-free cloth to prevent flash rusting or water spots.
- Safety: Etching solutions can be corrosive. Always wear appropriate personal protective equipment (PPE), including gloves, eye protection, and protective clothing. Work in a well-ventilated area.
Stage 4: Priming Aluminum: The Crucial Layer
Priming aluminum is the essential step that bridges the gap between the prepared aluminum surface and your topcoat. A good primer will enhance adhesion, provide corrosion resistance, and ensure a uniform base for the paint.
Why Prime Aluminum?
- Adhesion: Primers are formulated to bond strongly to metal surfaces, creating a better foundation for subsequent paint layers.
- Corrosion Inhibition: Many primers contain rust inhibitors or corrosion-fighting agents that offer an extra layer of protection, even if the topcoat is scratched.
- Surface Uniformity: Primers can help to hide minor imperfections and provide a consistent color base for your topcoat.
- Blocking Oxidation: A good primer seals the aluminum surface, preventing further oxidation.
Choosing the Right Aluminum Primer
Not all primers are created equal, especially when it comes to aluminum.
- Etch Primers: These are specifically designed for difficult-to-paint surfaces like aluminum and galvanized steel. They contain mild acids that bite into the metal, creating excellent adhesion. They are often a two-part system.
- Direct-to-Metal (DTM) Primers: Some DTM primers are formulated for use on aluminum and offer good adhesion and corrosion protection without needing a separate etching step, though etching is always recommended for best results.
- Epoxy Primers: These are very durable and offer excellent adhesion and chemical resistance. They are often a two-part system and provide a robust base.
- Zinc Chromate or Zinc Phosphate Primers: These are traditional types of primers used for corrosion protection on aluminum, often found in aerospace and automotive applications. However, due to environmental concerns, zinc chromate is less common now.
Applying the Primer
- Application Method: Primers can be applied by brush, roller, or spray. Spray application often provides the smoothest, most uniform finish.
- Follow Manufacturer Instructions: Always read and follow the primer manufacturer’s instructions regarding mixing (if applicable), application temperature, drying times, and number of coats.
- Thin Coats: Apply the primer in thin, even coats rather than one thick coat. This promotes better adhesion and a smoother finish.
- Sanding Between Coats (Optional but Recommended): For an ultra-smooth finish, you can lightly sand the primer once it’s dry with very fine-grit sandpaper (e.g., 400-600 grit). Clean off any dust with a tack cloth before applying the next coat or the topcoat.
Stage 5: Applying the Topcoat
Once the primer is properly applied and dry, you’re ready for the topcoat.
- Compatibility: Ensure your chosen topcoat is compatible with the primer you’ve used. Most acrylic, enamel, or urethane paints will work well over a properly applied primer.
- Application: Apply the topcoat in thin, even coats, following the manufacturer’s recommendations for drying times between coats.
- Environmental Conditions: Paint in a well-ventilated area, away from direct sunlight, extreme temperatures, and dust.
Common Mistakes to Avoid
Even with the best intentions, mistakes can happen. Here are some common pitfalls to sidestep when prepping aluminum for painting:
- Skipping the Degreasing: This is the most common mistake. Even if the aluminum looks clean, unseen grease can ruin your paint job.
- Not Removing Oxidation: Painting over the dull oxide layer is a recipe for peeling.
- Using Steel Wool or Iron Brushes: These can leave behind iron particles that will rust, ruining the finish. Always use stainless steel or non-ferrous abrasives.
- Inadequate Rinsing: Leftover cleaning agents or etchants can interfere with paint adhesion.
- Painting in Poor Conditions: Extreme temperatures, high humidity, or dust can negatively impact the paint application and drying process.
- Using the Wrong Primer: Not all primers are formulated for aluminum. Using a general-purpose primer might not provide the necessary adhesion or corrosion protection.
- Applying Paint in Thick Coats: This can lead to drips, sagging, and poor adhesion as the paint doesn’t cure properly.
What About Aluminum Rust Removal?
As mentioned, aluminum doesn’t rust in the same way iron does. The white powdery substance is aluminum oxide corrosion. If you’re dealing with actual rust spots (which would likely only occur if the aluminum has been in contact with iron or steel), the preparation steps are similar:
- Remove the Rust: Mechanically remove as much of the rust as possible using sandpaper or a wire brush.
- Clean and Degrease: Thoroughly clean and degrease the area.
- Prime: Apply a suitable primer, preferably one with excellent rust-inhibiting properties. You might consider a dedicated rust-converter primer for the affected spot before applying a standard primer.
Summary of Aluminum Preparation Steps
Here’s a quick reference table for the key stages:
| Stage | Primary Goal | Key Activities |
|---|---|---|
| Cleaning & Degreasing | Remove all surface contaminants | Wash with detergent, solvent wipe (mineral spirits/acetone) |
| Oxidation & Corrosion | Remove dull oxide layer and any corrosion | Light sanding (180-220 grit), abrasive pads, specific removers |
| Surface Texturing | Create a “tooth” for paint adhesion | Sanding (180-320 grit), optional etching with chemical etchant |
| Post-Preparation Cleaning | Remove all dust and residue | Solvent wipe, tack cloth |
| Priming | Ensure adhesion, provide corrosion protection | Apply a suitable aluminum primer (etch, DTM, epoxy) in thin coats |
| Topcoat Application | Provide color and final finish | Apply compatible paint in thin, even coats |
Frequently Asked Questions (FAQ)
Q1: Do I need to sand aluminum before painting?
Yes, sanding aluminum creates a surface “tooth” that helps the paint adhere better. Even if you’re using an etch primer, a light scuff sanding is often recommended.
Q2: What is the best primer for aluminum?
The best primer for aluminum is typically an etch primer or a high-quality direct-to-metal (DTM) primer specifically formulated for aluminum. Epoxy primers also offer excellent adhesion and durability.
Q3: Can I use steel wool on aluminum?
No, it’s best to avoid steel wool. Steel wool can leave behind iron particles that will rust and contaminate the aluminum surface, leading to future paint failure. Use synthetic abrasive pads (like Scotch-Brite) or stainless steel brushes instead.
Q4: How do I remove white powdery stuff from aluminum?
The white powdery substance is aluminum oxide corrosion. You can remove it by gently abrading the surface with fine-grit sandpaper (180-220 grit) or a fine wire brush, followed by thorough cleaning.
Q5: What’s the difference between aluminum oxidation and rust?
Aluminum doesn’t rust like iron. The common white, powdery substance on aluminum is aluminum oxide, a protective layer. True rust is iron oxide, which appears on ferrous metals.
By following these detailed steps for aluminum surface preparation, you can ensure your paint job looks professional and lasts for years to come. Remember, patience and thoroughness in the preparation stages are key to achieving perfect results on your aluminum projects.