
Can you frame a canvas painting that isn’t stretched? Yes, you absolutely can frame an unstretched canvas painting, and it’s a rewarding DIY project. Framing an unstretched canvas, often referred to as “canvas mounting” or simply “framing a canvas,” opens up a world of creative possibilities beyond the typical gallery wrap. This guide will walk you through the entire process, from preparing your artwork to the final presentation, ensuring your masterpiece is beautifully showcased.
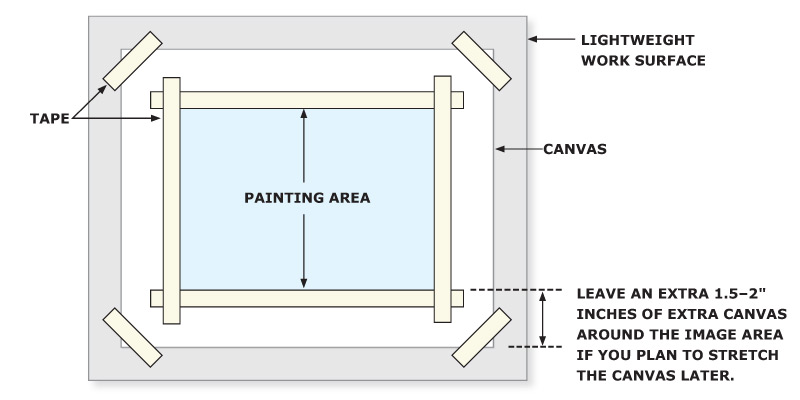
Image Source: mitchalbala.com
Preparing Your Unstretched Canvas for Framing
Before you even think about a picture frame for canvas, you need to ensure your unstretched painting is ready. This means handling it with care and making sure it’s clean and flat.
Handling Your Unstretched Artwork
Unstretched canvas is delicate. It can tear, crease, or develop new wrinkles if not handled properly.
- Clean Hands are Key: Always wash your hands thoroughly before touching your artwork. Oils and dirt from your skin can transfer to the canvas.
- Work Surface: Find a large, clean, and flat surface to work on. A large table or even a clean floor is suitable.
- Avoid Bending or Folding: Never fold or crease your unstretched canvas. If it arrived rolled, it might have some natural curves. We’ll address these later.
Cleaning the Canvas Surface
A clean canvas will look its best in its new frame.
- Gentle Dusting: For light dust, a very soft, dry brush (like a makeup brush or a clean paintbrush) can be used gently. Brush away from the center of the painting.
- Dealing with Smudges: For minor smudges or fingerprints, a slightly damp (not wet!) microfiber cloth can be used. Test this in an inconspicuous corner first. Always blot, never rub.
- Avoid Liquids: Never use solvents or harsh cleaning agents on your painting, as they can damage the paint.
Flattening a Rolled Canvas
If your canvas arrived rolled, you’ll need to flatten it. This is a crucial step for achieving a neat finish in your frame.
Methods for Flattening
- Weighting: Lay the canvas flat on a clean surface. Place heavy, flat objects (like books or framed artwork) on top of it. Distribute the weight evenly. Leave it like this for at least 24-48 hours. Ensure the objects don’t have any sharp edges that could damage the canvas.
- Backing Board Method: You can also gently tape the edges of the canvas to a smooth, flat surface like a piece of foam board or a large piece of glass (with protective edges). This will help it lie flat over time.
Choosing the Right Framing Method for Unstretched Canvas
There are several ways to frame an unstretched canvas, each offering a different aesthetic. The most common methods involve either creating a DIY canvas frame that supports the canvas directly or using a specialized floater frame canvas that creates a gap between the canvas and the frame.
Method 1: Mounting onto a Rigid Backing Board
This method involves attaching your unstretched canvas to a sturdy board, which is then placed into a traditional picture frame. This is a popular approach for canvas mounting.
Materials Needed:
- Unstretched canvas painting
- Acid-free foam board or Gatorboard (ensure it’s slightly larger than your canvas)
- Acid-free spray adhesive or archival glue stick
- Brayer or roller
- Utility knife or mat cutter
- Straight edge ruler
- Gloves (for handling adhesive)
- Your chosen picture frame for canvas (with glass or acrylic, and backing)
Step-by-Step Guide:
-
Cut the Backing Board:
- Measure your unstretched canvas precisely.
- Cut your acid-free foam board or Gatorboard to the exact size of your canvas or slightly larger (about 1/4 inch on all sides can be helpful). A utility knife and a straight edge are best for clean cuts.
-
Prepare the Backing Board:
- Ensure the surface of the board is perfectly clean.
-
Apply Adhesive:
- Work in a well-ventilated area. Wear gloves.
- Lay the foam board flat.
- If using spray adhesive, hold the can the recommended distance away and apply a thin, even coat to the board. Work quickly.
- If using an acid-free glue stick, apply it evenly to the board.
-
Position the Canvas:
- Carefully lay your unstretched canvas onto the adhesive-coated board.
- Start from one edge and gently roll it down onto the board, smoothing as you go to avoid air bubbles. This is where the brayer comes in handy.
-
Smooth Out Air Bubbles:
- Use the brayer or a clean roller to firmly press the canvas onto the board. Start from the center and work outwards to push out any trapped air. Repeat until the canvas is smooth and adhered.
-
Trim Excess Canvas (Optional):
- If you left any extra canvas edge, you can carefully trim it with a utility knife and straight edge to create a clean border.
-
Assemble the Frame:
- Place the protective glass or acrylic into your chosen picture frame for canvas.
- Add the backing board with your mounted canvas on top.
- Secure the assembly using the frame’s hardware.
Method 2: Using a Floater Frame
A floater frame canvas is specifically designed for canvas artwork, creating a “floating” effect where the canvas appears to hover within the frame. This method often involves a simple process of attaching the canvas to an inner support, which then fits into the floater frame.
Materials Needed:
- Unstretched canvas painting
- Wooden canvas stretcher bars (or a pre-made stretcher frame) – this is essentially creating a wooden canvas stretcher to support the artwork.
- Staple gun and staples (or small screws)
- Measuring tape
- Pencil
- Your chosen floater frame canvas (ensure it’s the correct size for your stretched canvas)
Step-by-Step Guide:
-
Create a Stretcher Frame:
- If you don’t have a pre-made stretcher frame, you’ll assemble one. Buy stretcher bars that are the correct size for your artwork.
- Interlock the corners of the stretcher bars to form a frame.
- You may need to tap them gently with a rubber mallet to ensure a snug fit.
-
Stretch the Canvas:
- Lay your unstretched canvas face down on a clean, flat surface.
- Place the assembled stretcher frame onto the back of the canvas, centering it.
- Begin to staple canvas to the stretcher bars. Start in the middle of one side, pulling the canvas taut as you staple.
- Move to the opposite side, pull the canvas taut, and staple in the middle.
- Continue this process, working from the center outwards to each side, ensuring even tension. This is how you stretch canvas properly for this method.
- Pay attention to the corners. You can create neat folds, similar to a gallery wrap canvas or a museum wrap, to ensure the front edges are clean.
-
Secure the Canvas to the Floater Frame:
- Floater frames typically come with small metal brackets or wooden strips.
- Position the now-stretched canvas within the floater frame. There will be a small gap between the canvas edge and the frame itself – this is the “float.”
- Use the provided brackets or strips to attach the stretcher frame to the back of the floater frame. This is often done with small screws or staples. The goal is to secure the stretcher bars to the frame, not the canvas itself.
Alternative Framing Techniques
While mounting on a board and using floater frames are popular, other options exist for canvas framing.
Method 3: Creating a DIY Canvas Frame (Simple Construction)
This method is for those who want a more integrated look or to create a custom frame from scratch.
Materials Needed:
- Unstretched canvas painting
- Wooden molding or craft wood
- Wood glue
- Brad nails or small screws
- Saw (miter saw is ideal for clean corners)
- Measuring tape
- Sandpaper
- Paint or stain (optional)
- Mounting hardware (e.g., D-rings, wire)
- Backing board (optional, for added rigidity)
Step-by-Step Guide:
-
Measure and Cut Wood:
- Determine the final size you want your framed artwork to be.
- Cut four pieces of wooden molding to create a rectangular frame. Use a miter saw to cut the corners at 45-degree angles for a professional look. The inside dimensions of the frame should accommodate your canvas.
-
Assemble the Frame:
- Apply wood glue to the angled edges.
- Join the pieces together to form a rectangle.
- Reinforce the corners with brad nails or small screws.
-
Prepare the Frame:
- Sand the frame smooth.
- You can paint or stain the frame at this stage if desired.
-
Mount the Canvas:
- Option A (With Backing Board): As in Method 1, mount your unstretched canvas onto a rigid backing board. Then, place this mounted artwork inside your DIY frame and secure it with glazier points or staples from the back.
- Option B (Directly to Frame): Carefully position the unstretched canvas onto the inside lip of the frame. You can then use staples or small tacks to secure the canvas to the back of the frame, ensuring it’s taut and wrinkle-free. This method is trickier for achieving a perfectly flat finish without a backing. For a more robust build, you might consider building a shallow box frame where the canvas sits within the box.
-
Add Hanging Hardware:
- Attach D-rings to the sides of the frame and string picture wire.
Ensuring a Professional Finish: Tips and Tricks
Regardless of the method you choose, a few key considerations will elevate your framed artwork.
Maintaining Canvas Tension
Even when not using a stretcher, keeping the canvas as flat and taut as possible is crucial. This prevents sagging within the frame and ensures the paint surface isn’t stressed.
Using Archival Materials
For artwork you want to preserve, always opt for acid-free materials. This includes the backing board, matting (if used), and any adhesives. Archival materials prevent yellowing and degradation over time.
Dealing with Different Canvas Types
The thickness of your canvas and the medium used (oils, acrylics) can influence the best framing method. Thicker impasto work might benefit from a floater frame, while thinner acrylics can be mounted on board more easily.
Protecting the Artwork
- Glass vs. Acrylic: Acrylic (plexiglass) is lighter and shatter-resistant, making it safer for larger pieces or if you’re concerned about damage during hanging. Glass offers superior clarity and scratch resistance.
- UV-Protective Options: Consider UV-protective glass or acrylic to shield your artwork from fading caused by sunlight.
Frequently Asked Questions (FAQ)
Here are answers to some common questions about framing unstretched canvases.
Q1: Do I need to stretch a canvas before framing it?
A1: No, you do not have to stretch canvas before framing. Many methods allow you to frame an unstretched canvas by mounting it onto a backing board or directly into a frame designed for loose canvas.
Q2: What is the difference between gallery wrap and museum wrap?
A2: Both gallery wrap canvas and museum wrap refer to methods where the canvas is stretched tightly around a wooden frame and the edges are finished neatly. A gallery wrap usually has the image extended around the sides, while a museum wrap emphasizes clean, neat staples or folds on the back, with no staples visible on the sides. Neither of these terms strictly applies to an unstretched canvas before it’s framed, but they describe the finished look once a canvas is stretched.
Q3: Can I use a standard picture frame for an unstretched canvas?
A3: Yes, you can use a standard picture frame for canvas, especially if you plan to mount the unstretched canvas onto a rigid backing board first. The backing board then fits into the standard frame like a regular print or photograph.
Q4: How do I prevent my unstretched canvas from creasing in the frame?
A4: The best way to prevent creasing is to ensure the canvas is laid flat and taut. Mounting it onto a rigid backing board (like foam core) before framing is highly recommended for unstretched canvases. This provides support and keeps it flat.
Q5: What is the easiest way to frame an unstretched canvas?
A5: The easiest way is often to mount the unstretched canvas onto an acid-free foam board using spray adhesive or an archival glue stick, then place it into a standard picture frame for canvas. This requires minimal specialized tools.
Q6: Is it possible to staple an unstretched canvas directly to a frame?
A6: While you can technically staple canvas to a frame, it’s challenging to get it perfectly flat and wrinkle-free without a stretcher bar or a backing board for support. This method is generally not recommended for a professional look.
Q7: What is a floater frame canvas?
A7: A floater frame canvas is a type of frame with a built-in shadow gap. The canvas is typically stretched and then mounted to a backing that fits into this frame, creating the illusion that the canvas is floating within the frame’s borders.
Q8: Can I use a simple DIY canvas frame without stretching?
A8: Yes, you can create a DIY canvas frame. A common approach is to create a shallow box frame, place the unstretched canvas within it, and then secure it to a backing board that fits into the frame.
Conclusion
Framing an unstretched canvas painting is a skill that can beautifully present your artwork and add significant value to its display. Whether you choose to mount it on a rigid backing, create a custom DIY canvas frame, or opt for a modern floater frame canvas, taking the time to prepare your artwork and execute each step carefully will result in a stunning final product. Remember to prioritize archival materials for longevity and handle your artwork with the utmost care throughout the process. Enjoy showcasing your framed masterpiece!