
What is the standard art hanging height? The standard art hanging height for most artwork is with the center of the piece at eye level, typically around 57 to 60 inches (145 to 152 cm) from the floor. This guideline ensures that the majority of viewers can comfortably see and appreciate the artwork without straining.
Deciding where to hang art can transform a room, but it’s a question many people grapple with. Getting the artwork placement just right is key to creating a harmonious and visually appealing space. Too high, and your art feels disconnected from the room. Too low, and it can make the ceiling seem lower and the room feel cramped. This guide delves into the nuances of hanging art height, offering practical advice and design principles to help you achieve that perfect look, whether you’re adorning a single wall or creating a stunning gallery wall arrangement.
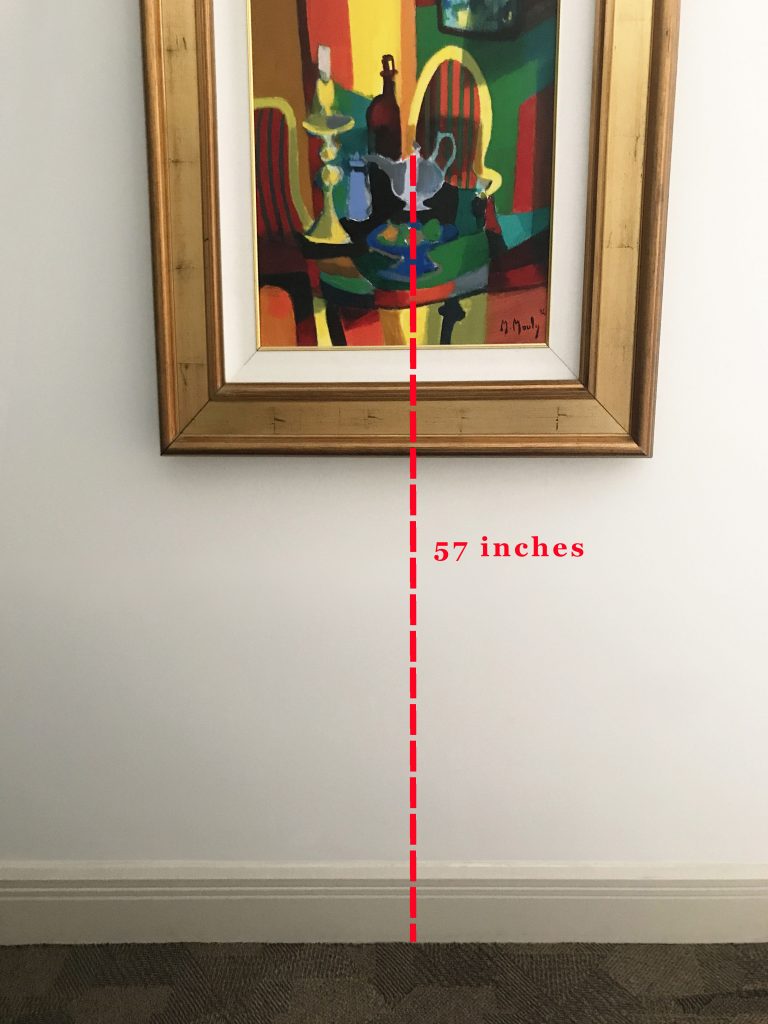
Image Source: www.parkwestgallery.com
Grasping the Core Principle: Eye Level
The golden rule in art hanging is eye level art. This means the focal point of your artwork – usually the center of the piece – should align with the average viewer’s line of sight. Think about how you naturally look at things. You don’t typically crane your neck up or hunch down.
Why Eye Level Matters
- Comfort: It allows viewers to engage with the art without discomfort.
- Connection: It anchors the artwork to the human scale of the room, making it feel more integrated.
- Appreciation: It allows for a better view of details and nuances within the piece.
The average eye level is generally considered to be between 57 and 60 inches (145 to 152 cm) from the floor. However, this can vary depending on the ceiling height of the room and the intended viewers. For instance, in a home with predominantly children, you might adjust slightly lower.
Factors Influencing Hanging Height
While eye level is the foundation, several factors can influence the ideal standard art hanging height:
Ceiling Height
- High Ceilings: If you have soaring ceilings, you have more flexibility. Hanging art slightly higher than the standard 57-60 inches can help fill the vertical space and prevent the art from looking too small or lost. However, avoid the temptation to hang it too high, as this can create a disconnect. Aim for the center of the artwork to be around 1/3 of the way down from the ceiling. For example, in a 12-foot (3.6m) room, the center of your artwork could be around 72-84 inches (183-213 cm) from the floor.
- Low Ceilings: For rooms with lower ceilings, sticking closer to the standard eye level is crucial. Hanging art too high will only emphasize the low ceiling. Hanging it slightly lower can make the room feel more expansive.
Furniture and Room Layout
The relationship between your art and the furniture in the room is paramount for effective artwork placement.
Art Above Sofas or Mantels
- Rule of Thumb: The bottom edge of the artwork should be approximately 6 to 10 inches (15 to 25 cm) above the top of the furniture.
- Why? This creates a visual connection between the art and the furniture, making them appear as a unified grouping. Too much space, and they look separate. Too little, and it can feel crowded.
- Size Consideration: For large sofas or mantels, consider hanging one large piece or a curated collection of smaller pieces that collectively span about two-thirds the width of the furniture.
Art Above Sideboards or Consoles
- Similar to sofas, aim for a 6 to 10-inch (15 to 25 cm) gap between the top of the furniture and the bottom of the artwork.
- Ensure the width of the art or art grouping is proportionate to the width of the console.
The Scale of the Artwork
The size of the artwork itself plays a significant role in determining its hanging height.
- Large Pieces: A single, large-scale artwork can often be hung slightly higher than smaller pieces, especially in rooms with ample wall space and higher ceilings. However, remember the eye-level principle; the center should still be comfortable to view.
- Small Pieces: Multiple small pieces, like in a gallery wall arrangement, require careful consideration of their collective visual weight and how they relate to the overall wall space and furniture. The guiding principle of eye level should apply to the center of the entire grouping.
Type of Room and Its Function
The purpose of the room can also dictate the ideal hanging art height.
Living Room Art Height
In a living room art height, the primary goal is comfort and conversation. Art above a sofa or fireplace should be at a height that is pleasing to someone seated. The 6-10 inch rule above furniture is especially important here. If the art is on a wall without furniture, the standard 57-60 inch center height is a good starting point.
Dining Room Art Placement
Dining room art placement often involves art above a buffet, credenza, or directly on the wall. If hung above furniture, follow the 6-10 inch rule. If hung on a wall in the dining room, consider the eye level of diners seated at the table. A slightly lower placement, perhaps with the center at 55 inches (140 cm), can be more appropriate to ensure comfortable viewing from a seated position.
Bedroom Art Height
For bedroom art height, it’s about creating a relaxing and personal sanctuary. Art above a headboard or dresser typically follows the 6-10 inch rule. If hanging art on a wall where you might be sitting or lounging, consider that eye level. The overall mood of the bedroom might also influence the placement; softer, more relaxed placements can be achieved with slightly lower art.
Groupings and Gallery Walls
Creating a gallery wall arrangement adds dynamism and personality, but it requires meticulous planning for artwork placement.
- Treat as One Piece: Imagine the entire gallery wall as a single, large artwork. The overall center of this “piece” should be at eye level (57-60 inches).
- Spacing: Maintain consistent spacing between frames. Typically, 2 to 4 inches (5 to 10 cm) is standard.
- Bottom Alignment: For a cohesive look, consider aligning the bottom edges of the frames in a row if they are of similar heights, or align them based on a visual center.
- Layout Planning: Before hammering nails, lay out your arrangement on the floor or use paper templates on the wall to visualize the scale and spacing.
Practical Steps for Hanging Art
Now that you grasp the principles, let’s walk through the practical steps for professional art hanging:
Measure Twice, Hang Once
- Determine the Center Point: Measure the height of your artwork and divide by two to find the center.
- Measure the Hanging Hardware: Measure from the top of the frame down to where the hanging wire or hook will rest on the nail or screw.
-
Calculate Nail Position:
- Take your desired eye-level height (e.g., 60 inches).
- Subtract the distance from the top of the frame to the hanging point.
- The result is the height from the floor where the nail or screw should be placed.
Example:
* Artwork Height: 24 inches
* Center Point: 12 inches from the top or bottom.
* Distance from top of frame to wire: 4 inches
* Desired eye-level (center of art): 60 inches
* Nail Position: 60 inches (desired center) – 4 inches (wire to top) = 56 inches from the floor.
Consider Your Walls
- Drywall: Use appropriate anchors and screws for secure hanging, especially for heavier pieces.
- Plaster: Can be more challenging. Pilot holes are often necessary.
- Brick or Concrete: Requires a masonry drill bit and specialized anchors.
Tools You’ll Need
- Measuring tape
- Pencil
- Level
- Hammer or drill
- Picture hooks, nails, screws, and anchors
- Stud finder (optional, but recommended for heavy items)
- Paper templates (for gallery walls)
When to Deviate from the Standard
While the eye level art rule is a strong guideline, there are times when you might adjust the hanging art height:
Art Over Large Furniture
As mentioned, the artwork placement over sofas, beds, or mantels is often dictated by the furniture itself. The 6-10 inch gap above the furniture is more critical than the strict eye-level rule in this context.
High Traffic Areas
In hallways or entryways where people are constantly moving, hanging art slightly lower can prevent people from bumping into it.
Art as a Visual Anchor
Sometimes, art is used to anchor a specific zone within a larger room. In such cases, the height might be adjusted to align with other elements in that zone.
The “Gallery Wall” Exception
While the center of a gallery wall arrangement should be at eye level, individual pieces within the gallery might be hung at slightly different heights to create visual interest and balance. However, the overall impression should still feel grounded and proportionate.
Common Mistakes to Avoid
Even with clear guidelines, professional art hanging can be tricky. Here are some common pitfalls:
- Hanging Too High: This is the most frequent mistake. It makes the art feel disconnected and can make a room feel awkward.
- Hanging Too Low: Can make the ceiling appear lower and the room feel cramped.
- Ignoring Furniture: Hanging art on a wall with furniture without considering the relationship between the two.
- Inconsistent Spacing: In gallery walls, uneven spacing looks messy and unprofessional.
- Overcrowding: Too much art on a wall can overwhelm the space. Less is often more.
- Mismatched Scale: Using art that is too small for a large wall, or too large for a small wall.
Creating a Dynamic Gallery Wall
A gallery wall arrangement is a fantastic way to showcase a collection of art, photos, or mementos. Here’s how to nail the artwork placement for a stunning effect:
Step-by-Step Gallery Wall Creation
- Curate Your Collection: Gather all the pieces you want to include. Consider a mix of sizes, styles, and frames for visual interest.
- Plan Your Layout:
- Floor Layout: Arrange your pieces on the floor first. This is the easiest way to experiment with different configurations.
- Paper Templates: Trace each piece onto paper, cut them out, and tape them to the wall using painter’s tape. This allows you to visualize the scale and spacing without making holes.
- Determine the “Center” of the Gallery: Identify the visual center of your planned arrangement. This is the point that should align with your eye level (57-60 inches).
- Spacing is Key: Decide on a consistent spacing between frames. 2-3 inches is a common and effective range. Use a ruler or a spacer tool for precision.
- Start with the Anchor Piece: If you have a central or particularly large piece, hang that first. Then, build the rest of the arrangement around it.
- Measure and Level: Use your calculated nail positions and a level for each piece to ensure everything is straight and perfectly aligned.
Gallery Wall Styles to Consider
- Grid Layout: Perfect for a modern, symmetrical look. All frames are the same size and spaced evenly.
- Eclectic Mix: A more casual and bohemian feel, with various sizes, shapes, and frame styles.
- Linear Arrangement: Pieces hung in a straight line, either horizontally or vertically.
The Art of Interior Design Art Placement
Interior design art is about more than just aesthetics; it’s about creating a cohesive and inviting atmosphere. The height at which you hang your art is a fundamental element of this.
How Art Interacts with Architecture
- Architectural Features: Consider doorways, windows, and built-in shelves. Art should not obstruct these features or feel awkwardly placed in relation to them.
- Wall Space: Large, blank walls can often accommodate slightly larger pieces or groupings hung slightly higher to fill the void. Smaller walls may require more delicate artwork placement.
Lighting and Art
The height of your art can also affect how it’s lit.
- Picture Lights: If using dedicated picture lights, ensure they are positioned correctly to illuminate the artwork without glare, and consider the height to ensure the light falls evenly.
- Ambient Light: Natural light and overhead lighting will naturally fall on your art. Placing art too high might mean it’s in shadow depending on the room’s light sources.
Specific Room Considerations for Hanging Art Height
Let’s break down some specific rooms to solidify these concepts:
Living Room Art Height: Creating a Focal Point
In the living room, the art often serves as a focal point, especially above the sofa or fireplace.
- Above Sofa: Aim for the bottom of the frame to be 6-10 inches above the sofa back. The center of the artwork should be around eye level when you’re seated. If the artwork is very tall, the 1/3 rule (center of art 1/3 down from the ceiling) can also be a good guide to ensure it doesn’t dominate the space.
- Fireplace Mantel: Art above a fireplace mantel often hangs a bit higher than art above a sofa, as fireplaces are typically higher off the floor. A 4-6 inch gap between the top of the mantel and the bottom of the frame is common, but ensure the center remains comfortably viewable.
Dining Room Art Placement: Enhancing the Atmosphere
The dining room art placement should complement the dining experience.
- Above Buffet/Credenza: Follow the 6-10 inch gap rule. The art should enhance the table setting and conversation, not distract from it.
- On Blank Walls: For art hung without furniture, consider the seated eye level. A center height of 55-58 inches can work well, ensuring it’s visible and enjoyable during meals.
Bedroom Art Height: A Personal Touch
In the bedroom, art should contribute to a relaxing and personal ambiance.
- Above Bed: Similar to a sofa, a 6-10 inch gap above the headboard is ideal. If the bed has no headboard or a very low one, the art’s center should still be around eye level when you are sitting up in bed.
- Dresser/Vanity: Art above a dresser or vanity generally follows the same principles as art above side tables, maintaining a comfortable viewing height.
Professional Art Hanging: Expertise Matters
While many people hang art themselves, professional art hanging services can ensure your precious pieces are displayed securely and at the perfect height. Professionals have the tools, experience, and knowledge to handle various wall types and art weights, preventing damage to both your walls and your art. They also have a keen eye for scale, proportion, and artwork placement that can elevate your interior design.
Summary Table of Hanging Heights
| Scenario | Recommended Gap (Bottom of Art to Top of Furniture) | Recommended Center Height (from Floor) | Notes |
|---|---|---|---|
| Standard Wall (no furniture) | N/A | 57-60 inches (145-152 cm) | For most comfortable viewing. |
| Above Sofa/Bed | 6-10 inches (15-25 cm) | Varies based on furniture height | Creates a visual connection. |
| Above Fireplace Mantel | 4-6 inches (10-15 cm) | Varies based on mantel height | Mantels are typically higher, so art may also hang slightly higher. |
| Above Buffet/Credenza | 6-10 inches (15-25 cm) | Varies based on furniture height | Enhances the dining or living space. |
| High Ceilings | N/A | 1/3 down from ceiling (e.g., 72-84″) | Fills vertical space, but keep center viewable. |
| Low Ceilings | N/A | Closer to 57 inches | Avoids making the ceiling feel lower. |
| Gallery Wall | N/A | Center of entire grouping at 57-60″ | Treat the entire arrangement as one piece for height determination. |
Frequently Asked Questions (FAQ)
Q1: Can I hang art lower than the standard eye level?
Yes, you can! In rooms where people will be primarily seated, like a cozy den or a media room, a slightly lower hanging height (e.g., center at 55 inches) might be more comfortable. It’s all about the viewer’s experience.
Q2: How do I hang a very large piece of art?
For very large pieces, ensure they are proportionate to the wall. The center should still ideally be at eye level. If the artwork is exceptionally tall, consider the 1/3 rule from the ceiling to prevent it from feeling too low or too dominant. Make sure to use appropriate hardware for its weight, possibly involving multiple hanging points.
Q3: What if my artwork has a very thick frame or matting?
The thickness of the frame or matting doesn’t usually change the hanging art height calculation. The measurement is still based on the artwork itself, with the center of the entire framed piece being the target for eye level.
Q4: How do I hang art on a slanted or vaulted ceiling?
This is more challenging. Often, art looks best hung parallel to the floor, even on a slanted wall. You might need specialized hanging systems or adjustable mounts. Consulting with a professional art hanging service is highly recommended for these situations.
Q5: How much space should I leave between multiple pieces of art on a wall?
For a cohesive look, maintain consistent spacing between pieces. 2 to 4 inches (5 to 10 cm) is a good general range. For smaller pieces or a very delicate arrangement, you might opt for slightly closer spacing (1-2 inches), while larger pieces can handle wider gaps.
Q6: Is it okay to hang art on a wall with a lot of windows or doors?
Yes, but be mindful of the flow and balance. Avoid hanging art directly over doorways where it might be bumped, or in a way that blocks natural light from windows unless intentional. Consider art as a way to complement architectural features.
By following these guidelines and applying a bit of visual judgment, you can transform your walls from bare surfaces into curated displays that enhance the beauty and comfort of your home. Happy hanging!