
Can you paint over wallpaper paste? No, you cannot paint over wallpaper paste and expect a smooth, durable finish. Leftover wallpaper paste residue can cause paint to peel, bubble, and adhere poorly, leading to a patchy and unprofessional look. This guide will walk you through the essential steps for prepping walls for paint removal of wallpaper paste, ensuring your walls are ready for a fresh coat of paint.
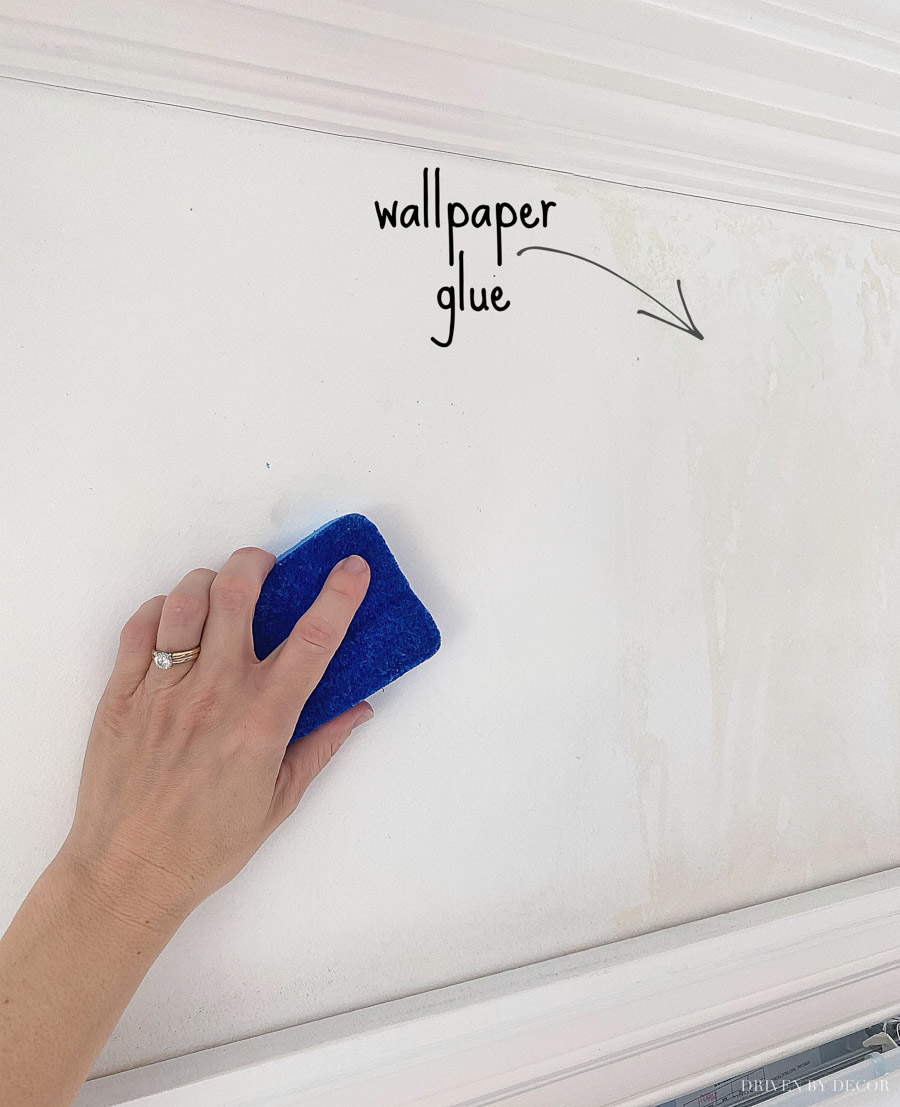
Image Source: www.drivenbydecor.com
Why is Thorough Paste Removal Crucial?
Before we dive into the how-to, let’s briefly touch on why this step is so important. Painting directly over wallpaper paste is a recipe for disaster. The paste, even if dry and seemingly invisible, can interfere with the new paint’s adhesion. This can manifest as:
- Poor Adhesion: The new paint won’t stick properly to the wall.
- Bubbling or Peeling: The paint may lift away from the wall in spots.
- Uneven Finish: The texture of the paste can show through the paint.
- Stains or Discoloration: Old paste can sometimes leach through new paint.
Therefore, removing wallpaper paste for painting is not an optional step; it’s fundamental to achieving a professional and long-lasting paint job.
Gathering Your Supplies: The Arsenal for Paste Removal
Having the right tools makes the job much easier. Here’s a list of what you’ll likely need for effective wallpaper paste residue removal:
- Scrapers:
- Putty knife (flexible and stiff blades are both useful)
- Wallpaper scraper (often wider and with a longer handle)
- Paint scraper
- Cleaning Solutions:
- Warm water
- Dish soap
- White vinegar
- Commercial wallpaper paste removers/cleaners (specifically formulated wallpaper paste cleaner for painting)
- Denatured alcohol (for stubborn spots)
- Application Tools:
- Sponges
- Clean cloths (microfiber works well)
- Spray bottles
- Paint rollers (for applying cleaning solutions)
- Protection:
- Drop cloths or plastic sheeting
- Painter’s tape
- Gloves
- Safety glasses
- Other Useful Items:
- Bucket
- Ladder or step stool
- Trash bags
- Sanding block or sandpaper (fine-grit, like 150-220 grit)
- Primer (high-quality, stain-blocking primer is essential)
Step-by-Step Guide to Removing Wallpaper Paste
Now, let’s get down to the nitty-gritty of stripping wallpaper adhesive and ensuring your walls are perfectly prepped.
Step 1: Initial Removal of Wallpaper
Before you can tackle the paste, you must remove the wallpaper itself. This is typically done with water or a wallpaper steamer. Once the wallpaper is off, you’ll likely be left with a sticky layer of adhesive.
Step 2: Wetting the Walls for Easier Scraping
How to clean wallpaper paste often starts with rehydrating it.
- Warm Water and Dish Soap: Mix a few drops of dish soap into a bucket of warm water. This is a gentle but effective solution for many types of wallpaper paste.
- Vinegar Solution: For slightly tougher adhesives, a mixture of equal parts warm water and white vinegar can be more potent.
- Commercial Removers: Follow the manufacturer’s instructions carefully when using a dedicated wallpaper paste cleaner for painting. These are often highly effective.
Application Methods:
- Sponge or Cloth: Dip a sponge or clean cloth into your chosen solution and wring it out so it’s damp, not dripping. Wipe down sections of the wall.
- Spray Bottle: For easier application, especially on larger areas, pour your solution into a spray bottle and generously mist the walls.
- Roller: For very large rooms, you can use a paint roller to quickly and evenly apply the cleaning solution.
Important: Allow the solution to soak into the paste for at least 10-15 minutes, or as directed for commercial products. This rehydrates the adhesive, making it much easier to remove. Don’t let the walls dry out completely.
Step 3: The Art of Scraping Wallpaper Glue
This is where your scrapers come into play.
Using a Putty Knife or Wallpaper Scraper
- Angle is Key: Hold your scraper at a low angle (around 30 degrees) to the wall. This helps lift the paste without gouging the drywall.
- Gentle Pressure: Apply firm, steady pressure. Let the scraper do the work; forcing it can damage the wall surface.
- Work in Sections: Focus on one small area at a time. Scrape away the loosened paste.
- Wipe Your Scraper: Regularly wipe your scraper on a damp cloth to remove accumulated paste. This prevents you from smearing it back onto the wall.
Scraping wallpaper glue can be tedious, but patience is rewarded.
Step 4: Deeper Cleaning: Tackling Stubborn Residue
Sometimes, even after scraping, a thin film of paste remains. This is where more thorough cleaning comes in.
- The Sponge Method: After scraping, use a clean sponge dipped in your warm water and soap or vinegar solution. Wipe down the walls again, rinsing the sponge frequently in clean water. This is a key step in cleaning walls after wallpaper.
- Microfiber Cloths: Microfiber cloths are excellent for picking up the last bits of residue. Use a damp cloth and wipe in a circular motion.
- Stubborn Spots: For particularly tenacious bits of wallpaper paste residue removal, you might need to try denatured alcohol applied with a cloth. Test this in an inconspicuous area first, as it can be harsher.
Pro Tip: Change your cleaning water and rinse your sponges frequently. Dirty water will only spread the paste around.
Step 5: Rinsing the Walls
After all the visible paste is gone, you need to rinse the walls to remove any remaining cleaning solution.
- Clean Water Rinse: Fill a bucket with clean, cool water.
- Damp Cloth: Use a clean sponge or cloth dampened with the clean water to wipe down the walls. Rinse your cloth or sponge often.
- Surface Check: Feel the walls with your hand. They should feel smooth and not at all sticky. If they feel tacky, repeat the rinsing process.
This rinsing is a critical part of prepping walls for paint removal and ensuring the paint adheres well.
Step 6: Drying the Walls
Allow the walls to dry completely. You can speed this up with fans or by opening windows if the weather permits. Ensure there is no lingering moisture before moving to the next step.
Step 7: Sanding for a Perfectly Smooth Surface
Even after diligent scraping and cleaning, there might be slight imperfections or dried paste particles. A light sanding is often necessary for the best way to remove wallpaper glue and achieve a perfectly smooth finish for painting.
- Choose the Right Grit: Use fine-grit sandpaper (150-220 grit) or a sanding sponge. The goal is to smooth the surface, not to remove drywall material.
- Light Pressure: Sand gently in a circular motion.
- Dust Removal: After sanding, wipe the walls down with a damp cloth to remove all dust. You can also use a vacuum with a brush attachment.
This sanding step is crucial for prep painting walls after wallpaper.
Step 8: Priming the Walls
This is arguably the most critical step after paste removal. A high-quality primer will seal the surface, cover any faint marks, and ensure your topcoat of paint adheres properly.
- Stain-Blocking Primer: Use a good quality, stain-blocking primer. This is especially important if there were any stains on the old wallpaper or if you suspect any residual paste might try to bleed through.
- Even Application: Apply the primer evenly with a roller or brush.
- Drying Time: Allow the primer to dry completely according to the manufacturer’s instructions.
This priming step completes the crucial prep painting walls after wallpaper process.
Troubleshooting Common Issues
- Very Old, Dried-On Paste: If the paste is extremely old and baked on, you might need to repeat the wetting and scraping process multiple times. Commercial paste removers can be particularly helpful here.
- Damage to Drywall: If you accidentally gouged the drywall during scraping, you’ll need to repair it with joint compound before priming and painting.
- Mold or Mildew: If you discover mold or mildew, you’ll need to treat it with a bleach solution (1 part bleach to 10 parts water) or a commercial mold killer. Ensure the area is well-ventilated and wear protective gear. Let it dry completely before proceeding.
- Stubborn Glue Spot: For tiny, persistent spots, a dab of mineral spirits on a cloth can sometimes work, but always test in an inconspicuous area first.
Table: Choosing the Right Cleaning Solution
| Cleaning Solution | Best For | Pros | Cons |
|---|---|---|---|
| Warm Water + Dish Soap | Most general wallpaper pastes | Gentle, readily available, inexpensive | May require multiple applications for tough paste |
| Warm Water + White Vinegar | Slightly tougher adhesives | Effective, good disinfectant | Vinegar smell (dissipates) |
| Commercial Wallpaper Removers | Very stubborn, old, or difficult adhesives | Specifically formulated, highly effective | Cost, requires following specific instructions |
| Denatured Alcohol (use sparingly) | Tiny, very resistant spots | Strong solvent | Can be harsh, may damage paint or plaster if used excessively |
Frequently Asked Questions (FAQ)
Q: Can I just paint over the wallpaper paste?
A: No, it’s strongly advised against. Painting over wallpaper paste will likely result in poor adhesion, peeling, bubbling, and an uneven finish. Thorough removal is essential for a quality paint job.
Q: What is the best way to remove wallpaper glue?
A: The best way involves a multi-step process: wetting the paste to soften it, scraping wallpaper glue with a scraper or putty knife, followed by thorough cleaning with water and soap or a commercial cleaner, rinsing, and then sanding and priming.
Q: How do I know if I’ve removed all the wallpaper paste?
A: After cleaning and rinsing, run your hand over the wall. It should feel smooth and not sticky or tacky. Visually, there should be no shiny or gummy spots.
Q: Is there a special wallpaper paste cleaner for painting?
A: Yes, commercial wallpaper removers often work as wallpaper paste cleaner for painting. These products are designed to break down the adhesive effectively, making it easier to remove and prepare walls for paint.
Q: My walls feel rough after removing paste, what should I do?
A: This is usually due to dried paste or minor damage to the drywall paper. A light sanding with fine-grit sandpaper (150-220 grit) will smooth the surface. Afterward, be sure to wipe away all dust and apply a quality primer.
Q: How long should I let the walls dry before priming?
A: Allow the walls to dry completely. This can take several hours to overnight, depending on humidity and ventilation. Ensure no dampness remains.
By following these detailed steps, you can effectively tackle the task of removing wallpaper paste for painting, ensuring a smooth, professional finish for your freshly painted walls. The effort put into cleaning walls after wallpaper is directly proportional to the quality of your final paint job.